


Navigating the Linux ecosystem can sometimes feel overwhelming, especially when you just want to listen to your favorite playlists. Because the official Spotify client for Linux is treated as a secondary project by its developers, the community and official channels offer several different packaging formats.
Understanding how to navigate the various installation methods is essential for getting the best audio quality and system integration. This guide provides the most reliable ways to install Spotify on Linux across all major distributions. Whether you prefer the simplicity of a graphical interface or the precision of the terminal, we have outlined the exact steps to get your music playing in minutes. We will focus on the most stable 2026 methods to ensure your installation remains secure and up-to-date.

Part 1. How to Install Spotify on Ubuntu, Debian, and Linux Mint via Snap
For users running Ubuntu or its derivatives, the Snap store provides the most frictionless experience available. Spotify officially recommends this method, meaning it generally receives updates quickly and requires zero manual configuration for background dependencies. While some power users dislike Snap due to slightly slower initial startup times, its plug-and-play nature makes it perfect for beginners transitioning from Windows or macOS.
Via Snap GUI Store
If you are using Ubuntu, Snap comes pre-installed on recent versions of Ubuntu (starting from 16.04 LTS). You can easily download Spotify on Linux and Ubuntu through the Snap's GUI store.
Step 1. Open "Software Center" from the applications menu and use the search bar at the top to type "Spotify". Wait for the official Spotify icon to appear.
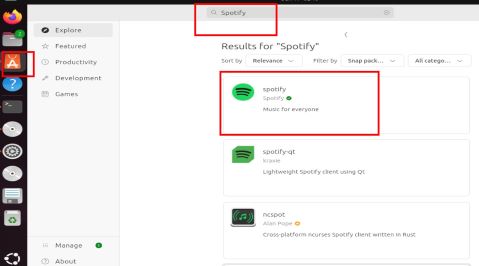
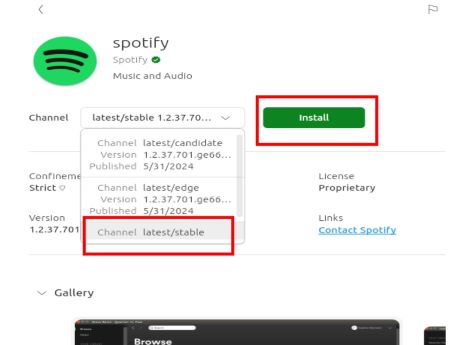
Step 2. Click on the Spotify app, select the latest version in the dropdown menu of "Channel", then click the "Install" button to install it.
Via Command Line
If your Ubuntu or Linux doesn't come with Snap installed, you can use the command lines to install Snap and then Spotify. Here's how:
Step 1.Open your terminal application using the shortcut Ctrl + Alt + T or by searching your app menu. Use the following command to update your package list. This step is crucial to avoid any dependency issues:
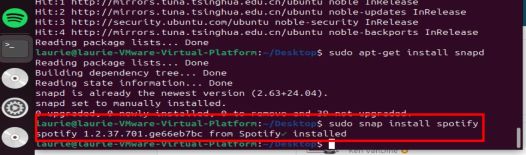
Step 2. Next, you can install Snap. Snap is the package manager you'll use to install Spotify:
Step 3. Enter the command and press "Enter" to begin the automated installation process.
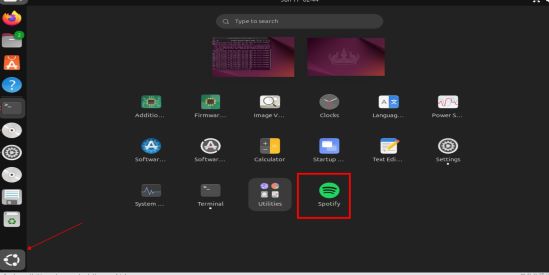
Step 4. You can click on the "Spotify" icon on the left bar or the Spotify app in your app center. Then you can log in your Spotify account and play your Spotify music on Linux.
Pros
-
 Ease of Use: Snap packages are self-contained, making installation straightforward.
-
Automatic Updates: Snap packages update automatically, so you always have the latest version.
Cons
-
 Disk Usage: Snap packages can be larger than traditional packages due to their bundled dependencies.
-
Performance: Some users report slower startup times with Snap applications.
Tips:
If at any point you decide to remove Spotify, you can do so with this command. This will uninstall Spotify from your Linux system:
Part 2. How to Install Spotify on Linux via Official Spotify APT Repository
Purists who want the lightest possible footprint often prefer adding native repositories directly to their system package manager. This avoids the overhead associated with containerized formats like Snap or Flatpak, resulting in faster launch times and better integration with custom desktop themes. However, this approach requires handling GPG security keys and repository lists manually, making it better suited for experienced system administrators running Debian or Ubuntu bases.
Step 1. First, add Spotify's signing key to ensure the packages you download are authentic. This step is important for security and ensuring you get the official Spotify packages:
Step 2. Next, add Spotify's APT repository to your system's software sources. This tells your system where to find the Spotify packages:
Step 3. Refresh your package cache and install the native client on Linux using:
Step 4. Launch Spotify by typing the following commond(In a new terminal). This opens Spotify and gets you ready to enjoy your music. Alternatively, you can open it in your app center.
Pros
-
System Integration: APT installations are well-integrated with your system, ensuring compatibility with other applications.
-
Lightweight: APT packages are typically smaller and use system libraries, reducing disk usage.
Cons
-
Manual Updates: You'll need to manually update Spotify using APT commands.
-
Complexity: The setup process is a bit more involved compared to Snap.
Tips:
To remove Spotify on Linux, if needed, use this command:
Part 3. How to Download and Install Spotify on Linux via Flatpak
If you prioritize system security or frequently hop between different distributions like Fedora, Arch, or Linux Mint, Flatpak is an exceptional alternative. This universal package manager isolates the application within a sandbox, ensuring it cannot access your personal files without explicit permission. Furthermore, the Flathub community actively maintains this package, often implementing rapid fixes for modern display servers like Wayland before official updates arrive.
Step 1. Ensure your system has Flatpak configured by adding the Flathub repository with:
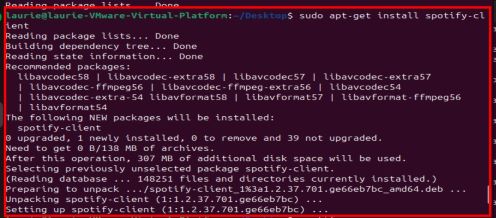
Step 2. Install Spotify from Flathub by typing the follow command in to your terminal window:
Tips:
Spotify installed on Linux via Flatpak won't appear in the left bar or app center like it does when installed using snap or APT. You'll need to use the command line to launch Spotify each time.
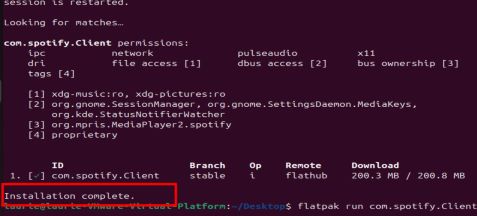
Step 3. Launch the sandboxed application directly from the terminal by running:
Pros
-
Cross-Distribution Support: Flatpak works on almost all Linux distributions.
-
Isolated Environment: Flatpak applications run in a sandbox, improving security.
Cons
-
Disk Usage: Like Snap, Flatpak applications can be larger due to bundled dependencies.
-
Initial Launch: Spotify requires a command line for launching.
Tips:
To uninstall Spotify via Flatpak, if needed, use this command.
Part 4. How to Install Spotify on Linux via Arch User Repository
The Arch Linux community is known for its efficiency, and the new spotify-launcher has become the gold standard for installation. This method is preferred over the traditional AUR (Arch User Repository) because it manages the application's updates independently of the system's core packages. It provides a cleaner experience that is less likely to break during major system upgrades.
Step 1. Sync your package database and install the launcher by running
Step 2. Launch the application from your terminal or app menu for the first time to allow it to download the latest binaries.
Step 3. If you prefer the community-maintained version with specific patches, you can alternatively use an AUR helper like Yay by typing:
Pros
-
System Integrity: It doesn't mix proprietary Spotify files with your core system files.
-
Official Binaries: You are getting the exact, untouched code from Spotify.
Cons
-
First-Run Delay: The first time you open it, there is a waiting period while it downloads several hundred megabytes.
-
Disk Usage: It stores the binaries in your home directory, which might be unexpected if you have strict partition management for your root vs. home folders.
Part 5. How to Play Spotify Music on Linux without Installation
While Linux offers several ways to install the Spotify client, many users prefer a "decoupled" approach. By converting Spotify tracks into local, DRM-free files, you bypass the need for an internet connection, avoid app-specific bugs, and can use high-fidelity Linux players like Audacious or Rhythmbox.
Since DRmare Spotify Music Converter is currently optimized for Windows and macOS, the most efficient workflow involves a "Convert-and-Transfer" strategy. This ensures you get bit-perfect, 320kbps/24bit/44/1kHz audio without the stability risks of running complex emulators like Wine on Linux.
Why Choose the Local File Method?
- Lossless Quality: Extract music in 100% original quality (FLAC/WAV) or 320kbps MP3.
- Zero Dependencies: No need for
pacman,apt, or AUR updates. Your music stays playable even if the Spotify app has an update error. - Metadata Integrity: DRmare preserves all ID3 tags (Title, Artist, Album Art), which are natively recognized by Linux file managers like Dolphin or Nautilus.
How to Download Spotify Music for Linux
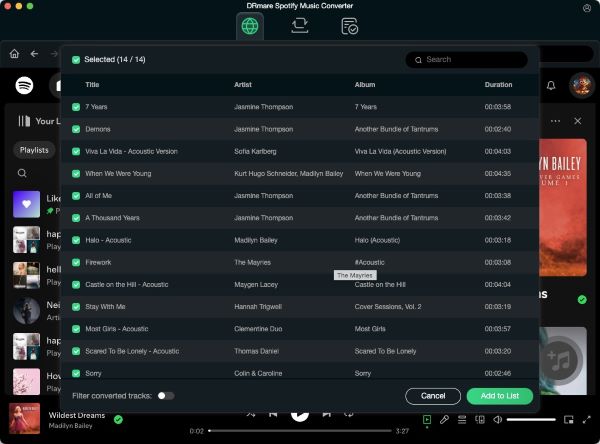
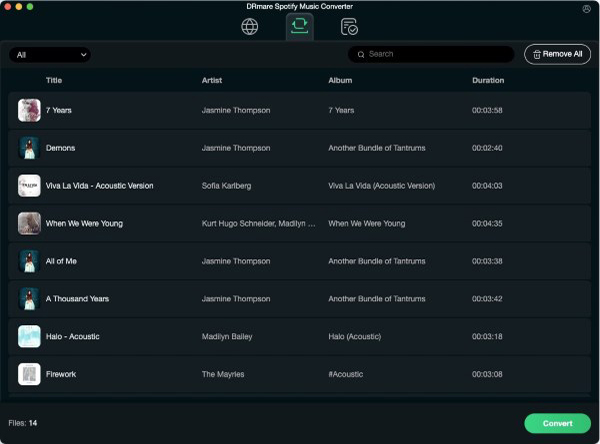
- Step 1. Add Spotify music to download
Download and launch the DRmare Spotify Music Converter on your computer and then log in to your Spotify account. Here, you can browse your library and tap the "Add" > "Add to List" button to load them to the conversion queue.
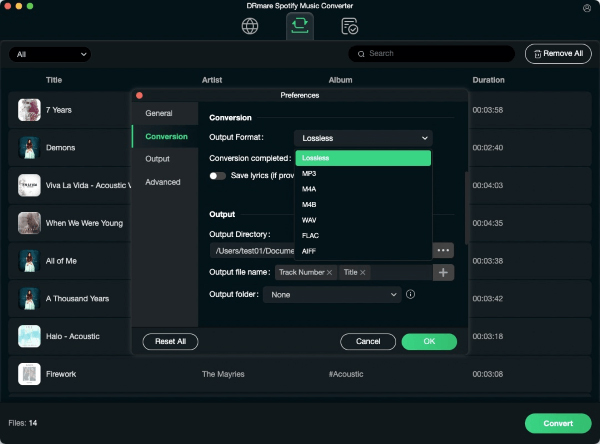
- Step 2. Set Spotify music output format and parameters
Click the top "Menu" or "DRmare Spotify Music Converter" option to choose the "Preferences", it will open the settings window for which you can set the output format as you want such as MP3, AIFF, M4B, M4A, WAV, FLAC. Besides, you can adjust the channel, sample rate, bit rate and so on.
- Step 3. Save the Spotify songs to your local folder
Press the "Convert" button to launch the converting process. DRmare Spotify Music downloader will convert DRM-protected music to DRM-free Spotify audio files. After converting, you can click the "Converted" button to check and locate the songs from the output folder.
How to Transfer Downloaded Spotify Music to Linux
If you are using VMware Workstation to run Linux, you can use the "Shared Folders" feature to transfer your downloaded Spotify music from Windows to Linux. Here's how to do it:
Enable Shared Folders in VMware
Step 1. Start VMware Workstation, make sure your Ubuntu virtual machine is powered off.
Step 2. Then right-click on your Ubuntu virtual machine and select "Settings".
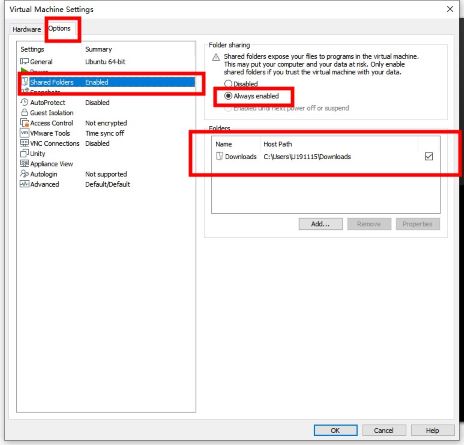
Step 3. In the "Options" tab, select "Shared Folders".
Step 4. Click "Add" to create a new shared folder.
Step 5. Choose the folder on your Windows machine that you use to store your downloaded Spotify music. Set the access permissions to either read-only or read/write.
Step 6. Ensure the shared folder is enabled by checking the "Always Enabled" box.
Install VMware Tools on Ubuntu
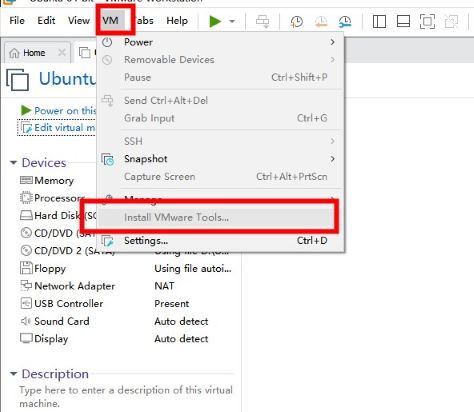
If VMware Tools is not installed, you need to install it, too. Select "VM" > "Install VMware Tools" from the VMware menu. Follow the on-screen instructions to complete the installation, which might involve mounting the VMware Tools CD image and running the installer.
Access Shared Folders from Ubuntu
Step 1.Open a terminal and create a mount point for the shared folder:
sudo mkdir /mnt/hgfs
Step 2.Mount the shared folder manually using: Replace "<SharedFolderName>" with the name of your shared folder as shown in VMware settings.
sudo mount -t vmhgfs .host:/<SharedFolderName> /mnt/hgfs
You may encounter the following problem which occurs due to missing or improperly installed VMware Tools:
![]()
You can use following commands to fix it:
sudo apt-get update
sudo apt-get install open-vm-tools open-vm-tools-desktop
sudo apt-get install -y open-vm-tools-desktop fuse
sudo vmhgfs-fuse .host:/Downloads /mnt/hgfs -o allow_other
Step 3. After fixing the problem, you can now navigate to the Mount Point and access your downloaded Spotify music. In the file manager, navigate to /mnt/hgfs to access the shared folder.
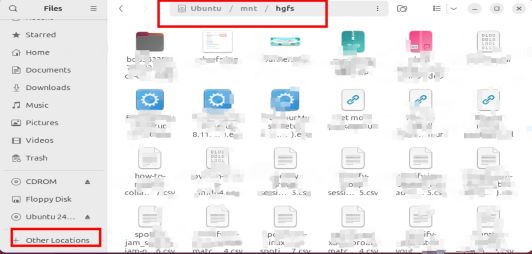
Step 4. Finally, you can copy the Spotify music you have downloaded in this shared folder into one of the original folders on your Linux system.
You can now listen to your favorite Spotify music on Linux anytime. And If your Linux system is stored on a portable drive, you can listen to your Spotify music anywhere. Enjoy your musical journey!
Part 6. FAQs about Downloading Spotify on Linux
Users frequently encounter minor bumps when bridging proprietary software with open-source desktop environments.
Why aren't my keyboard media keys working?
You may need to install the playerctl package to allow your desktop environment to properly communicate with the app's MPRIS interface.
Does the Linux version support local files?
Yes, you can enable local file playback in the settings menu, but you must ensure the application (especially if using Flatpak) has the correct read permissions for your Music folder.
How do I fix audio stuttering?
If you are using a modern PipeWire audio setup, installing the pipewire-alsa compatibility layer usually resolves playback lag.
Part 7. In Conclusion
Installing Spotify on Linux can be a smooth process once you understand the different installation methods available. Whether you prefer the simplicity of Snap, the integration of APT, the security of Flatpak, or the precision of the Arch User Repository, there's a method for every user. If you're looking for flexibility, you can even bypass the app installation altogether and use a 'convert-and-transfer' approach for your Spotify music. With the steps outlined in this guide, you can enjoy your favorite Spotify tunes on Linux with ease, no matter your preferred setup.


User Comments
Leave a Comment