


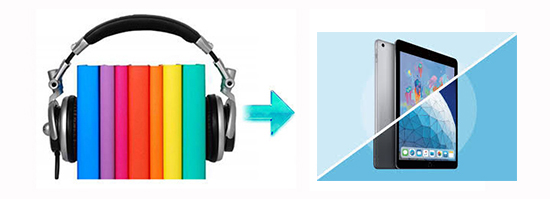
I still remember the first time I switched from listening to audiobooks on my phone to my iPad. I was settling in for a long flight, and having that larger screen for managing my library and browsing chapters just felt... better. The iPad is arguably the perfect media consumption device—great battery life, a beautiful display, and portability.
But if you are new to the Audible ecosystem, or if you are trying to get your Audible library to play nicely with your native Apple Books app, things can get a little confusing. The iPad offers a few different ways to listen, and they aren't all immediately obvious.
In this guide, we will walk through the standard way to use the official Audible app on iPad, the "hybrid" way for Kindle lovers, and a workaround for those who want total freedom to listen within the Apple Books interface.
Part 1. The Official Method: Using the Audible App on iPad
For most users, the path of least resistance is the official Audible app. It has evolved significantly over the years. If you haven't updated it recently, you might be missing out on some key features that remove old frustrations—specifically regarding how you buy books.
Getting Started and Downloading
Using the native app is straightforward, but let's ensure you have the basics optimized for the iPad's interface.
Step 1. Go to the App Store on your iPad, search for "Audible", and install the application.
Step 2. Sign in using your Amazon credentials. (Remember, Audible is an Amazon company, so your login is shared).
Step 3. Tap on Library at the bottom of the screen. You will see two tabs: "All" and "Downloaded". To save a book to your iPad for offline listening (essential for planes or Wi-Fi-free zones), tap the cover art of the book.

Tips:
For years, you couldn't buy books with cash inside the iOS app due to Apple's commission fees; you could only use credits. This has changed. You can now purchase titles directly within the app using your credit card or Audible credits. If you don't see the price, ensure your app is updated to the latest version.
Managing iPad Storage
Audiobooks are large files. High-quality narration can take up 300MB to 500MB per book. If you have a 64GB iPad, this adds up fast.
To free up space without losing your purchase:
Step 1. Go to your Library and find the book you want to remove.
Step 2. Long-press on the book cover or swipe left on the title.
Step 3. Select Remove from Device. This deletes the file from your iPad but keeps it safely in the cloud for re-downloading later.
Part 2. The Hybrid Method: Listening Audible on iPad via Kindle
One of my favorite features of the Amazon ecosystem is Whispersync for Voice. This is perfect if you are the type of person who likes to read on the couch but listen while doing dishes.
If you own both the Kindle eBook and the Audible audiobook companion, you don't actually need to open the Audible app to listen. You can do it right inside the Kindle app on your iPad.
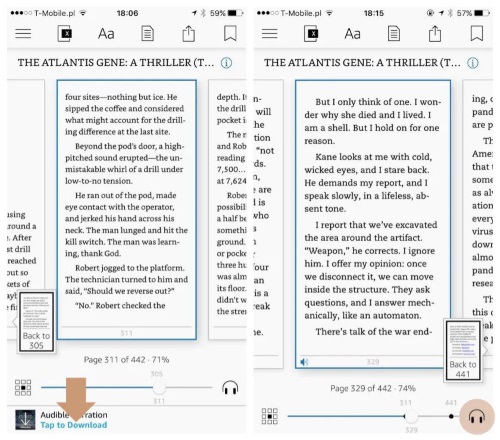
Step 1. Open the Kindle app on your iPad and open your book.
Step 2. Tap the center of the screen to reveal the menu bars.
Step 3. Look for the Headphone Icon (usually at the bottom right). Tap it to download the audio companion.
Step 4. Once downloaded, you can switch between reading text and listening instantly. The app will highlight the text as the narrator speaks, which is a fantastic way to stay focused.
Part 3. The "Native" Method: Listen to Audible in Apple Books
Here is a question I see constantly: "How do I move my Audible books into Apple Books so I can have everything in one place?"
Many of us prefer the interface of Apple Books. It's clean, integrated into the iOS widget system, and feels more "iPad-native". However, if you try to drag an Audible file directly into Apple Books, it usually won't work or will ask for complex authorizations. This is because Audible wraps its content in a proprietary format (AA/AAX) protected by DRM (Digital Rights Management). This creates a "walled garden"—you bought the book, but you can only listen to it where Amazon allows you to.
Breaking the Walls with DRmare Audible Converter
If you want true ownership of your audiobooks—meaning the ability to play them in Apple Books, save them to an external drive, or share them with family members who don't use Audible—you need a bridge.
This is where tools like DRmare Audible Converter become essential. I've used this when I wanted to archive my library without worrying about a subscription lapse locking me out of my books.
It effectively removes the "lock" from the file and converts it into a standard audio format (like M4B or MP3) that the iPad's Apple Books app understands perfectly.
How to Transfer Audible Books to Apple Books
Since you cannot do this conversion directly on the iPad OS, you will need a computer (Mac or PC) to act as the middleman.
- Step 1Launch and Log In
Open DRmare Audible Converter on your computer. Instead of a blank screen, you will now see an embedded Audible Web Player. Log in to your Audible account right inside the software to access your library.
- Step 2Set Output to M4B
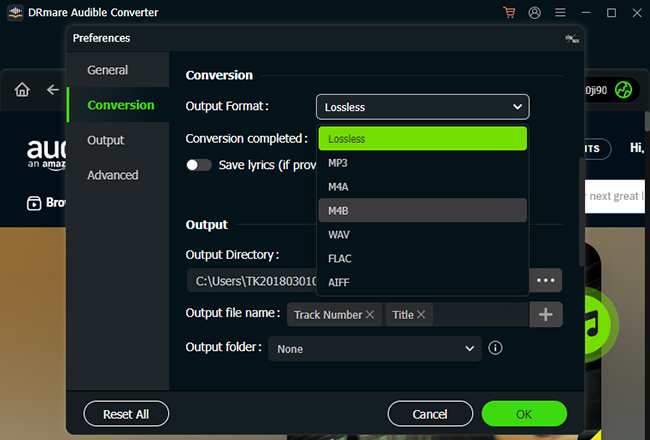
Before selecting books, click the "Menu" icon in the top right corner, select "Preferences", and navigate to the "Conversion" tab. Set the output format to M4B. While MP3 is good, M4B is better for Apple Books because it preserves your chapter markers, allowing you to skip through the book easily.
- Step 3Select Your Audiobooks
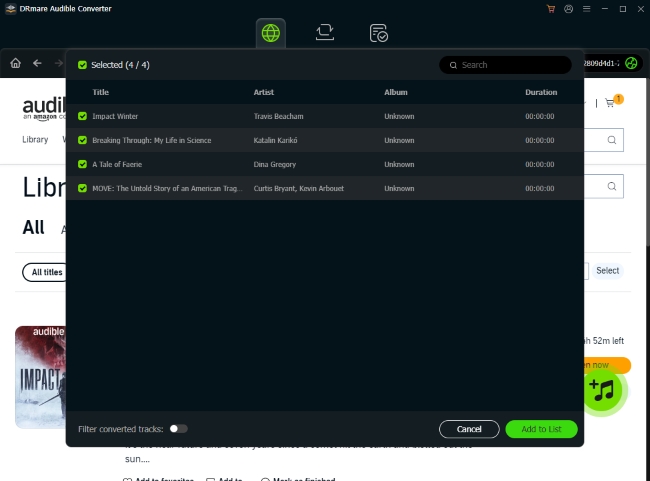
Browse your library within the embedded player. When you find the book you want to listen to on your iPad, click the Green "Add" Icon (usually floating in the bottom-right corner). A list will pop up; check the boxes next to the titles you want to convert and tap "Add to List".
- Step 4Convert and Transfer
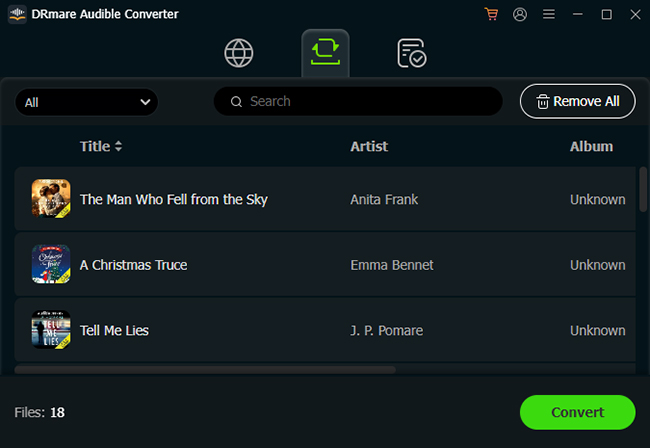
Click the "Convert" button. DRmare will download and convert the files simultaneously at high speed. Once finished, locate the files in the "Converted" folder, and you can sync them to your iPad:
- Mac: Drag the M4B files into the "Audiobooks" section of the Books app (or Finder).
- Windows: Use iTunes or a transfer tool to sync the files to your iPad.
Now, your Audible books are native Apple Books files. You can listen to them, organize them into collections, and enjoy them without the Audible app.
Part 4. Troubleshooting: When Audible Won't Sync to iPad
Nothing is more frustrating than pausing your audiobook on your iPhone, picking up your iPad, and realizing it didn't save your spot. You end up spending five minutes trying to find where you left off.
If you are searching for "Audible not syncing between iPhone and iPad", try these fixes in order.
Fix 1: The "Refresh" Maneuver
Sometimes the app just needs a nudge.
Step 1. Go to the Library tab on your iPad.
Step 2. Swipe down from the very top of the screen until you see the spinning wheel. Release to refresh. Do this on your iPhone as well.
Fix 2: Check Player Settings
Step 1. Open the Audible app and go to Profile > Settings (the gear icon).
Step 2. Tap on Player.
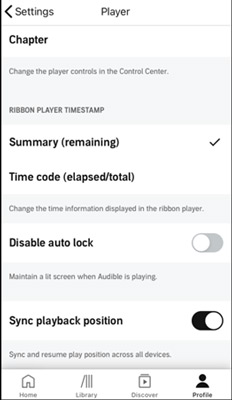
Step 3. Ensure the toggle for Sync Playback Position is turned ON. If it is already on, toggle it off and back on again to reset the connection.
Fix 3: The Nuclear Option (Deregister)
If sync is completely broken, don't just delete the app—deregister the device.
Step 1. Go to Profile > Settings > Data & Storage.
Step 2. Scroll down and sign out.
Step 3. Restart your iPad completely.
Step 4. Open Audible and sign back in. This forces a fresh handshake with the Amazon servers.
Part 5. Final Thoughts
The iPad is a fantastic device for audiobooks, whether you are using the official app for its ease of use, the Kindle app for Whispersync, or DRmare to curate a permanent, DRM-free collection in Apple Books.
My advice? If you are a casual listener, stick to the official app—it's gotten much better recently. But if you are building a serious digital library that you want to keep forever, taking the time to convert your favorites for Apple Books is worth the effort.


User Comments
Leave a Comment