


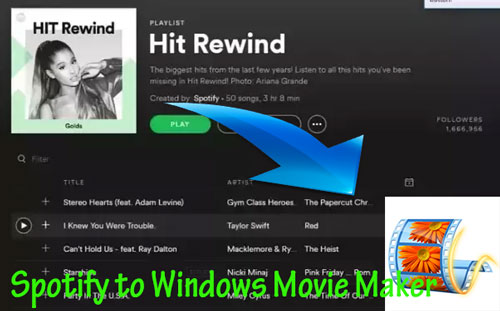
We have all been there. You are putting the finishing touches on a video project—maybe a travel vlog, a wedding slideshow, or a highlight reel of your pet. You found the absolute perfect track on Spotify that matches the mood, the timing, and the emotion of your video. You download the song, open Windows Movie Maker, try to drag the file onto the timeline, and... nothing happens. Or worse, you get an error message saying the file isn't compatible.
It is incredibly frustrating, especially when you can play the song perfectly fine on your desktop app. But don't worry, you aren't doing anything wrong. The issue lies in the hidden technical barriers between streaming services and video editing software.
Whether you are one of the loyal users still running the classic Windows Movie Maker or you have moved on to its modern successor, Microsoft Clipchamp, this guide will explain exactly why this happens and show you two reliable ways to fix it so you can finally get that soundtrack into your video.
Part 1. Why Can't I Import Spotify into Windows Movie Maker Directly?
Before we fix it, it helps to understand the "why". You might think that because you have a Spotify Premium subscription and you "downloaded" the song for offline listening, you own a file that works anywhere. Unfortunately, that is not the case.
Spotify music is streamed and stored in a specialized format called Ogg Vorbis. Furthermore, these files are wrapped in DRM (Digital Rights Management) encryption. This encryption acts like a digital lock that ensures the music can only be played inside the Spotify app.
Video editors like Windows Movie Maker or Clipchamp are designed to read standard audio files like MP3, WAV, or WMA. When you try to import a Spotify Ogg file, your video editor simply doesn't speak that language. To bridge this gap, you need to convert that encrypted stream into a standard audio file.
Part 2. Best Way to Add Spotify to Windows Movie Maker
If you have a large playlist to convert or you care deeply about audio quality, relying on screen recording tools can be tedious and often results in lower sound fidelity. This is where dedicated tools like DRmare Spotify Music Converter become incredibly useful.
I personally prefer this method for video projects because it solves the compatibility issue at the source. Instead of recording audio in real-time (which takes as long as the song lasts), DRmare downloads and converts the track directly from Spotify's servers to a standard MP3 file. This preserves the original audio quality and keeps all the metadata, like the song title and artist name, which helps keep your project files organized.
Here is how to use it to prepare your music for editing:
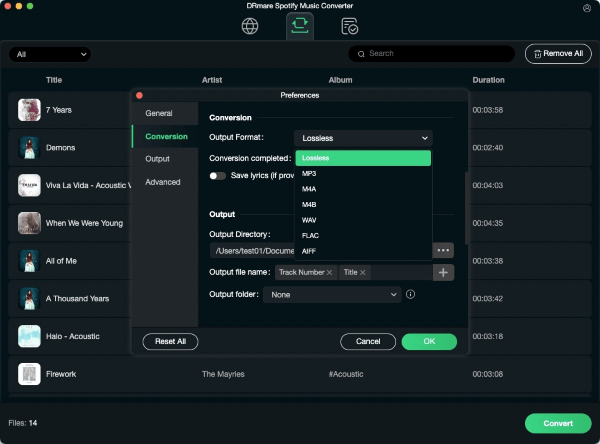
Step 1. Launch the software and log into your account using the built-in Spotify web player. Before selecting music, click the menu icon (top-right), select Preferences, and set the output format to MP3 to ensure compatibility with your video editor.
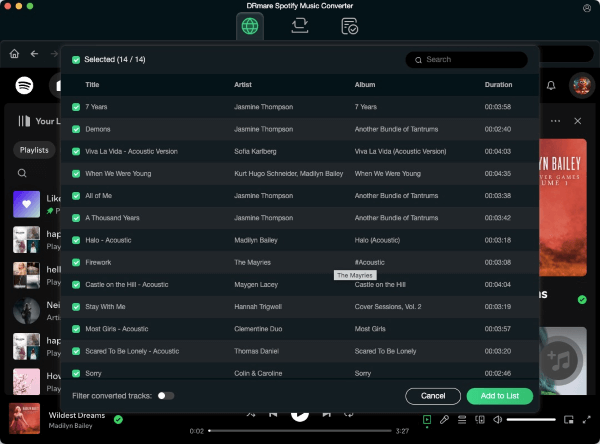
Step 2. Browse the web player to find the songs or playlists you need. Drag and drop your selection onto the green Music icon in the bottom-right corner (or click the icon), then hit "Add to list" to confirm your tracks.
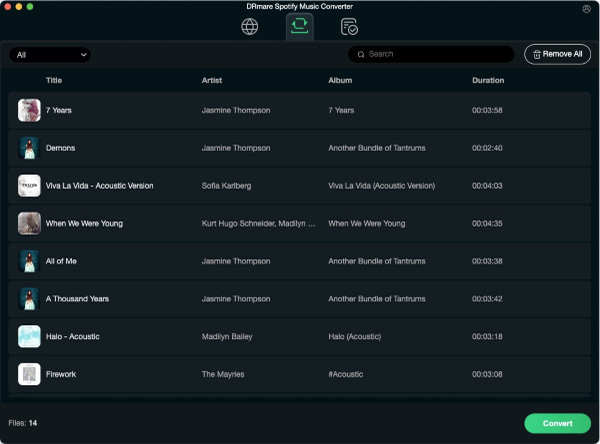
Step 3. Click the Convert button to download the files. Once finished, open the Converted tab to find your DRM-free MP3s, which are now stored locally on your computer and ready to be imported into your video project.
Part 3. Free Alternative to Put Spotify in Windows Movie Maker
If you are working with a zero-dollar budget and only need a snippet of one song, you might not need a professional converter. You can use a free audio tool like Audacity to record the system audio while the song plays.
Be aware that this method is time-consuming (you have to play the song in real-time) and you have to be careful not to have any other sounds play on your computer (like email notifications) during the recording, or they will end up in your song.
Step 1. Download and install Audacity. In the audio setup toolbar, change the "Audio Host" to Windows WASAPI.
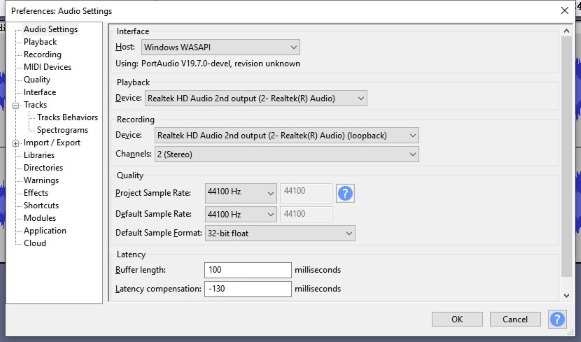
Step 2. Change the recording device to the option that says (loopback) usually typically labeled as "Speakers (loopback)" or "Headphones (loopback)." This tells Audacity to listen to the sound coming out of your computer rather than your microphone.
Step 3. Press the red Record button in Audacity, then immediately switch to Spotify and press play on your song.
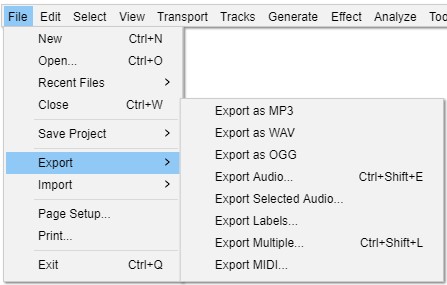
Step 4. When the song finishes, stop the recording in Audacity. You will likely need to edit the track to trim off the silence at the beginning and end. Finally, go to File > Export > Export as MP3 to save your file.
Part 4. How to Import Your Music to the Video Editor
Now that you have a compatible MP3 file (either from DRmare or Audacity), the hard part is over. Here is how to get that file into your project, depending on which version of "Movie Maker" you are using.
For Classic Windows Movie Maker Users
If you are still rocking the classic Windows Movie Maker (2012 or 6.0 versions), the process is straightforward.
Step 1. Open your project and ensure you are in the "Home" tab.
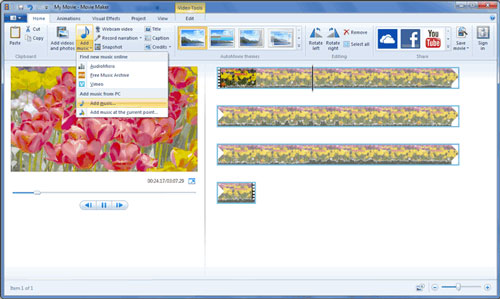
Step 2. Click on the Add music button. If you click the icon itself, it will prompt you to browse files. If you click the arrow below it, you can select "Add music from PC".
Step 3. Navigate to the folder where you saved your converted MP3 files. Select the song and click Open. The audio will appear as a green bar below your video clips. You can now drag it left or right to align it with specific scenes.
For Microsoft Clipchamp Users (Windows 10/11)
Since Microsoft officially discontinued the original Movie Maker, most Windows 10 and 11 users are now directed to Microsoft Clipchamp or the Photos App video editor. The workflow here is slightly more modern.
Step 1. Open Clipchamp and open your video project.
Step 2. On the left-hand sidebar, click the Import media button (usually looks like a plus sign).
Step 3. Select your converted MP3 file from your computer. Once it uploads to your media library, drag and drop the audio file onto the timeline at the bottom of the screen.
Step 4. Use the volume controls to balance the music against your video's original audio so the music doesn't overpower any dialogue.
Part 5. A Final Note on Safety
A quick word of caution: Because the original Windows Movie Maker was discontinued in 2017, there are many "fake" download sites ranking high on Google that claim to offer "Movie Maker 2024." Please be careful. Many of these contain malware or try to charge you for software that was originally free.
If you don't already have the classic version installed, it is much safer to use the built-in Microsoft Clipchamp app or stick to reputable tools. Regardless of which editor you choose, having your Spotify music converted to MP3 using a tool like DRmare ensures you can keep creating without hitting technical roadblocks.


User Comments
Leave a Comment