


If you are reading this, you probably share a specific frustration that I've dealt with many times. You have discovered an incredible playlist on Spotify, but when you listen to it through the standard app, it feels... flat. You miss the depth, the clarity, and the customizable power of JetAudio.
JetAudio isn't just a music player; for many of us, it's a necessity. Whether it's the BBE+ enhancement, the Crystalizer, or that granular 20-band graphic equalizer, JetAudio makes music sound alive in a way that streaming apps simply can't match.

However, bridging the gap between Spotify's massive library and JetAudio's superior sound engine isn't straightforward. Because of DRM (Digital Rights Management) restrictions, you cannot simply "open" Spotify songs inside JetAudio. But don't worry—there is a way to bridge this gap. In this guide, I'll walk you through exactly how to import Spotify playlist to JetAudio so you can finally hear your favorite tracks the way they were meant to be heard.
Part 1. Why Can't I Play Spotify Music on JetAudio Directly?
Before we fix it, it helps to understand why this problem exists. When you download a song for "offline listening" inside the Spotify app, you aren't downloading a standard MP3 file. You are downloading a cached, encrypted OGG Vorbis file that only the Spotify app can read.
JetAudio is a local media player. It thrives on standard formats like MP3, FLAC, WAV, and M4A. Since it cannot decrypt Spotify's cache files, your JetAudio library remains empty, no matter how many songs you've downloaded in Spotify.
To solve this, we need to convert those rented streams into owned, local files.
Part 2. The Best Way to Import Spotify Playlist to JetAudio
To get Spotify music into JetAudio, you need a tool that does two things:
- 1 Removes the encryption.
- 2 Preserves the ID3 tags (Artist, Album, Cover Art).
The second point is critical. JetAudio's interface relies heavily on accurate metadata. If you use a generic recorder, you'll end up with files named "Track 01" with no album art, making your library a mess.
This is where I recommend using a dedicated tool like DRmare Spotify Music Converter. It's designed to download Spotify playlists in batches while keeping all the metadata intact. This ensures that when you finally import them into JetAudio, the "Album" and "Artist" views work perfectly, and you get that crisp album art on your lock screen.
Phase 1: Convert Spotify Music to Local Files
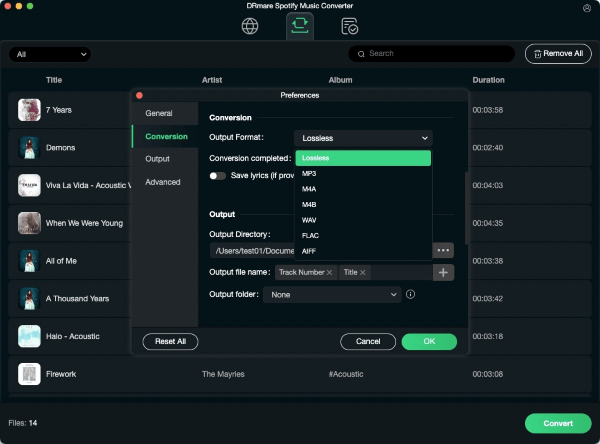
Step 1. Launch the DRmare Spotify Music Converter and log into your Spotify account using the built-in web player. Before selecting music, click the menu icon in the top-right corner and select Preferences. Here, you can set your output format (we recommend MP3 for compatibility or FLAC for higher quality) and customize other audio parameters.
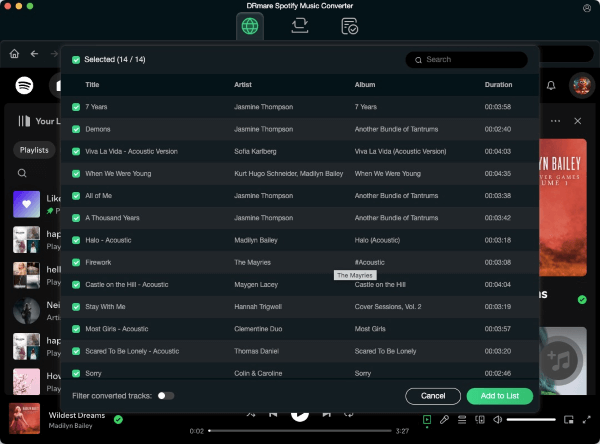
Step 2. Browse the built-in player to find the playlist or album you want to transfer. Drag and drop the content directly onto the green "Music" icon located at the bottom-right corner of the screen. A window will pop up; simply click "Add to list" to confirm your selection.
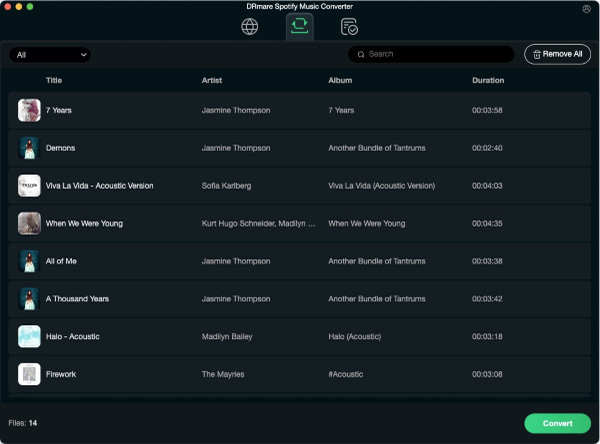
Step 3. Click the "Convert" button under the converting tab. The software will automatically batch download and convert your selected tracks. Once finished, navigate to the "Converted" tab to verify that your files are downloaded and ready to be moved to your device.
Phase 2: Transfer Music to Your Device
Most JetAudio users are on Android, as that is where the app truly shines. Now that you have the files, you need to move them to your phone.
Step 1. Connect your Android phone to your computer using a USB cable. On your phone screen, a notification will appear; tap it and select "File Transfer" or "MTP" mode.
Step 2. Open your phone's storage drive on your computer. Navigate to the Music folder (or create a new folder named Spotify Imports).
Step 3. Drag and drop the converted folder from Phase 1 into this folder on your phone.
Note:
If you use JetAudio on PC (Windows), you can skip this phase. Just point JetAudio's "Media Manager" to the folder where you saved the converted files.
Phase 3: Import and Scan in JetAudio
Now for the final step: getting JetAudio to recognize the new tracks.
Step 1. Open the JetAudio app on your device. Usually, it automatically scans for new media on startup. If your songs appear immediately, you are done!
Step 2. If the songs do not appear, tap the Menu icon (three distinct bars or dots) in the top left or right corner and look for the "Preferences" or "Settings" gear.
Step 3. Scroll down to locate the "Media Scanner" or "Re-scan" option. Tap it to force JetAudio to look through your storage again.
Step 4. Alternatively, use the "Folders" tab in the JetAudio browser. Navigate to the Music folder where you dropped your files. This is often the most reliable way to find new music if the library scan misses it.
Part 3. Alternative Method: Recording Audio
If you only need to transfer a few specific songs and don't want to use a dedicated converter, you can use free recording software like Audacity. This method is completely free but requires significantly more time and manual effort.
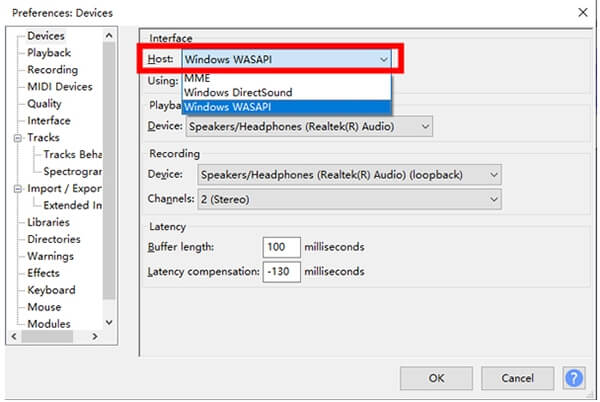
Step 1. Install Audacity and set the "Audio Host" to Windows WASAPI and the recording device to your computer's speakers (Loopback).
Step 2. Hit the "Record" button in Audacity, then immediately press "Play" on your Spotify track. You must let the song play in real-time until the end.
Step 3. Stop the recording and export the file as an MP3. You will likely need to manually type in the Artist and Song Name, as this method does not capture metadata automatically. This can be tedious for whole playlists, but it works well for single tracks.
Part 4. Getting the Most Out of JetAudio
Now that you have successfully managed to import Spotify playlist to JetAudio, here are a few settings I recommend tweaking to maximize your listening experience with these specific files:
- The AGC (Automatic Gain Control): Since Spotify tracks are already normalized, you might want to disable JetAudio's AGC to preserve the original dynamic range of the recording.
- X-Bass: If you converted your files to MP3 (which is compressed), the X-Bass feature can help add warmth that might have been lost during compression.
- Playlist Files (.m3u): If you try to export a .m3u playlist file from your computer to your phone, it often fails because the file paths (e.g., C:\Users\Name\Music) don't exist on Android. It is usually easier to create a new playlist inside the JetAudio app and add your imported folder to it rather than importing the playlist file itself.
By following these steps, you break free from the restrictions of the Spotify app and gain the freedom to use the powerful sound engine you love. Enjoy the music!


User Comments
Leave a Comment