





Apple Music Replay is great for a quick end-of-year and monthly recap, but it lacks continuous, in-depth analytical insights into your listening habits. This is where Stats.fm for Apple Music comes in. It bridges this gap, turning your raw streaming history into real-time statistics, detailed play counts, and visual listening trends.
Because Apple restricts third-party access to historical data, setting up Stats.fm with Apple Music requires a manual data import. If you are new to Stats.fm, you can learn how to use Stats.fm with Apple Music here. This guide covers how to set up the app, import your lifetime listening history, what statistics you can view, how it compares with Apple Music Replay, and troubleshoot common issues.

Part 1. Does Stats.fm Work with Apple Music?
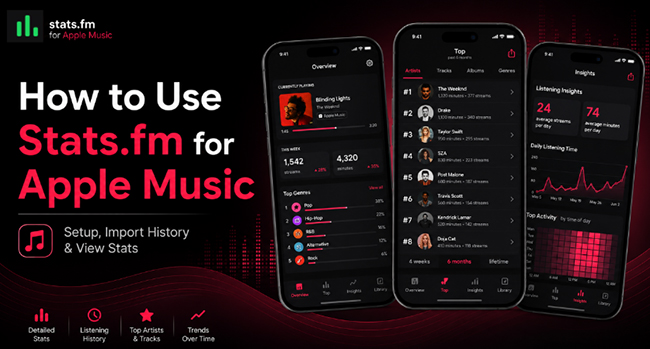
Yes. Stats.fm works with Apple Music. Stats.fm is a music statistics app that helps users analyze their listening activity. Originally popular among Spotify users, Stats.fm has expanded to support Apple Music, allowing Apple Music subscribers to explore their listening habits in more detail. With Stats.fm for Apple Music, you can view information such as:
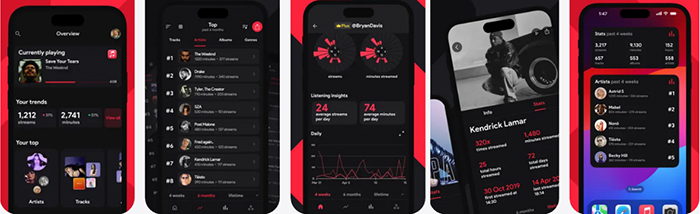
- Your Top Songs and Artists: See which songs and artists dominate your listening history.
- Granular Play Counts: View exact play counts and total minutes streamed for any track, artist, or album.
- Custom Timeframes: Filter your statistics by today, this week, 4 weeks, 6 months, 12 months, or lifetime.
- Stream Logs: Access a precise log showing the exact date and time you played specific songs.
- Listening Clock: Discover the specific hours of the day or days of the week you stream music the most.
Additional Features Beyond Key Stats
Beyond raw statistics, Stats.fm offers powerful social and visual sharing tools to help you engage with your music community.
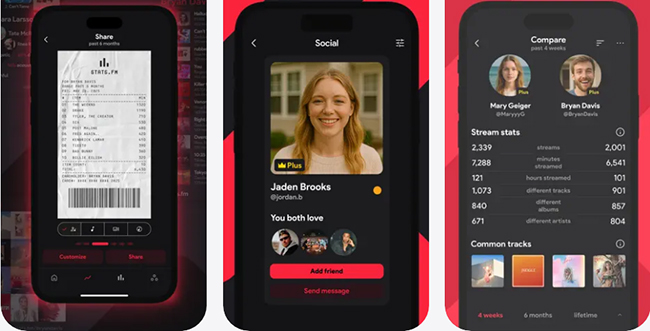
- Share Your Music Story: Turn your listening history into a styled "music receipt" that displays your top 10 artists and total minutes played over custom timeframes. You can fully personalize layout colors and data metrics, then click Customize to export formatted graphics directly to Instagram or TikTok.
- Find Your People, by Music: The Social tab pairs you with listeners who share your music taste, highlighting artists you both enjoy under the You both love tag. It allows you to view user profiles, send friend requests, and start direct chats to connect over shared tracks.
- Compare with Friends: Compare your listening metrics side-by-side with friends across specific periods, such as 4 weeks, 6 months, or lifetime. You can instantly evaluate total streams, minutes played, and unique tracks, albums, or artists discovered, while the Common Tracks section pinpoints the exact songs you and your friends both stream heavily.
Part 2. How to Set Up Stats.fm for Apple Music to See Real-time and Recent Stats
To start analyzing your listening habits in real time, you need to connect your Apple Music account to Stats.fm and enable live syncing the moment you download the app. Here is the step-by-step setup process.
- Step 1Install Stats.fm and Create an Account
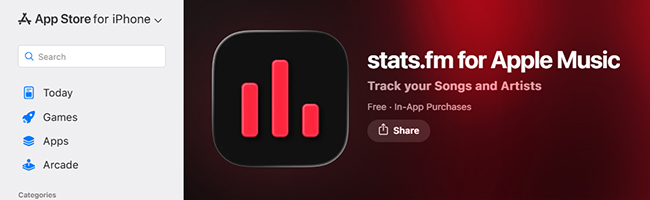
Start by downloading Stats.fm for Apple Music from the App Store and creating an account. After opening the app, follow the initial setup instructions and sign in.
- Step 2Connect Apple Music to Stats.fm
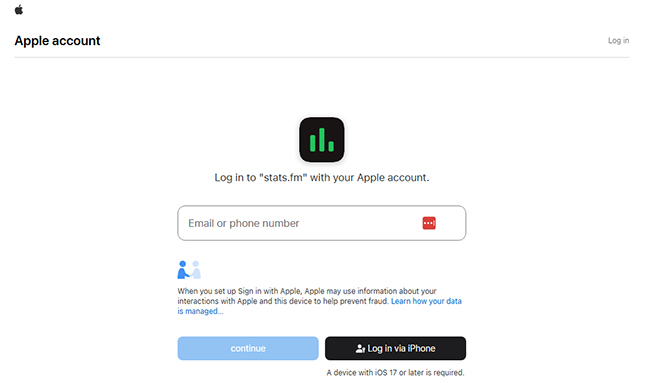
Inside Stats.fm, look for the Apple Music connection option, click the Login with Apple Music, and follow the instructions shown in the app. You may need to confirm permissions before your statistics become available.

Tips:
You can also access to stats.fm website to add your Apple Music account to Stats.fm.
- Step 3Enable Real-Time Stream Syncing Immediately
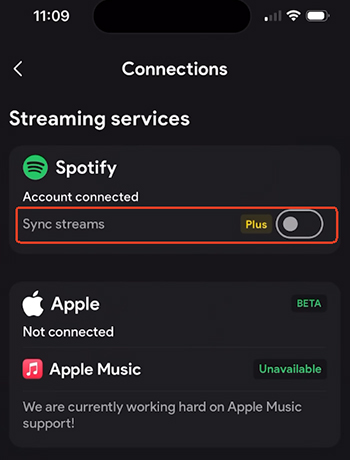
Navigate to the settings menu, locate the Sync streams option under the Connections section, and toggle it on to begin tracking your activity immediately.
Note:
At this stage, Stats.fm will only track music you listen to from this moment forward. To view past habits, you have to import your Apple Music history to Stats.fm.
Part 3. How to Import Your Apple Music Lifetime Listening History to Stats.fm
With your live tracking active, you can now safely ask Apple for your historical archives. Apple's privacy infrastructure requires users to manually request these files through their dedicated web portal. After receiving the data file, you can upload it to Stats.fm to analyze your older listening history. The system takes time to compile everything, meaning instant gratification is rarely possible here.
Note:
Before starting, note that historical data import requires a one-time purchase of Stats.fm Plus.
| Feature | Free Version | Stats.fm Plus (Paid) |
|---|---|---|
| Real-time Tracking | Yes (from setup onwards) | Yes |
| Basic Stats & Play Counts | Yes | Yes |
| Lifetime History Import | No | Yes |
| Advanced Analytics & Charts | Limited | Full Access |
- Step 1Request Your Data
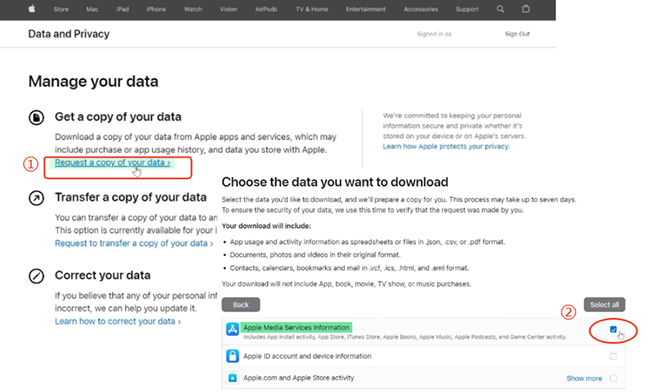
Go to Apple's Data and Privacy portal and sign in with your Apple Account. Choose Request a copy of your data, check the box for Apple Media Services information, and submit the request.
- Step 2Wait for Apple's Email
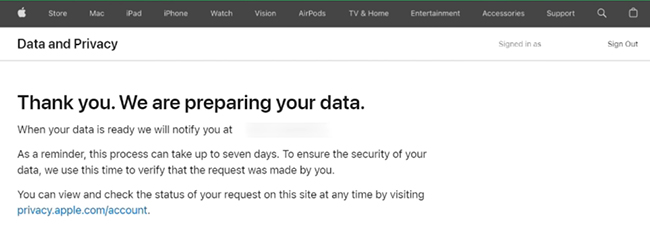
After submitting, Apple requires anywhere from a few days to a week to prepare the download. Apple will email you when your data package is ready.
- Step 3Download Your Apple Music Data
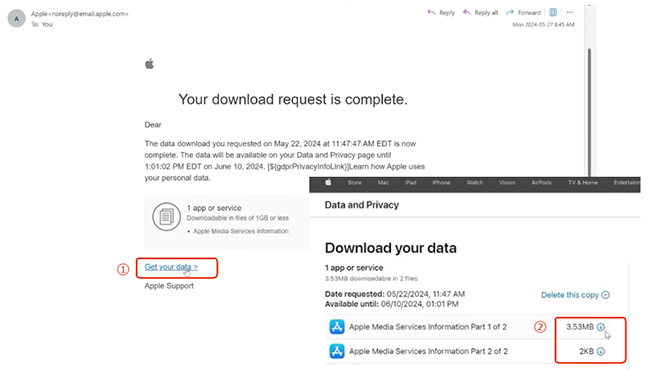
Once Apple sends the notification email, your lifetime data is ready to be merged into your Stats.fm profile. Click the Get your data link in Apple's email and download the ZIP file directly to your computer or mobile device.
Note:
The provided archive contains various files, but Stats.fm is designed to parse the specific listening history documents.
- Step 4Import Your Apple Music Data to Stats.fm
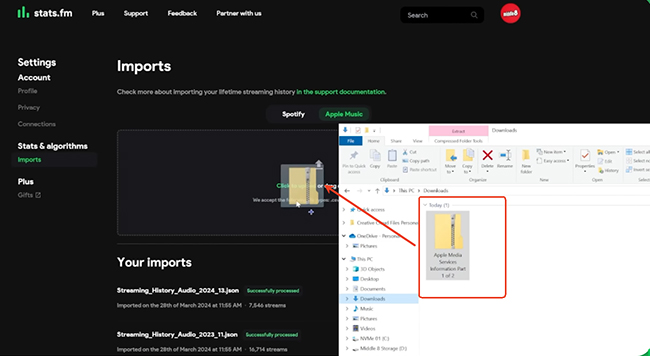
Navigate to the Stats.fm import section within your Stats.fm Plus account and upload the archive to begin the integration. Processing can take anywhere from a few minutes to a few hours depending on file size.
Pro Tips:
Occasionally, users encounter upload errors with particularly large files. If the standard upload struggles, you might try these alternative approaches:
-
Extract the main ZIP file manually on your device.
-
Locate the "Apple Music Activity" folder and upload only the Apple Music - Play History Daily Tracks.csv file.
Bonus Tip: Backup and Save Your Apple Music Songs Locally
While Stats.fm helps you analyze your streaming history, it doesn't allow you to keep your favorite tracks offline if your subscription ends. If you want to download your Apple Music library to local MP3 or FLAC formats for local playback on any device, try DRmare Apple Music Converter. It helps you preserve losslessly converted audio while keeping original ID3 tags intact.
Part 4. Stats.fm vs Apple Music Replay: Which One Should You Use?
Apple Music Replay and Stats.fm both provide listening statistics, but they serve slightly different purposes. Apple Music Replay works well if you only want a quick summary of your yearly and monthly favorites. Stats.fm may be more suitable if you want to regularly explore your listening history and analyze detailed statistics.
| Feature | Stats.fm | Apple Music Replay |
|---|---|---|
| Update Frequency | Real-time / Daily | Weekly / Yearly |
| Main purpose | Detailed listening analysis | Yearly or monthly music summary |
| Top songs and artists | Yes | Yes |
| Historical data import | Yes | No manual import |
| Continuous tracking | Designed for ongoing insights | Mainly focused on yearly recap |
| Detailed exploration | More statistics-focused | Simpler overview |
For many users, the two services can complement each other rather than being direct replacements.
Part 5. How to Fix Stats.fm Apple Music Not Working
Stats.fm Is Not Showing My Apple Music History
If your old listening activity does not appear, your Apple Music history may not have been imported yet. You can try the following solutions:
-
Verify under Settings > Imports in Stats.fm that your file status shows Completed.
-
Requesting your Apple Music data from Apple again
-
Uploading the original export file
-
Checking whether your Stats.fm Plus subscription is active
-
Waiting for processing to complete
Apple Music Import Failed in Stats.fm
Import errors can happen if the uploaded file is incomplete or has been modified. Make sure:
- You upload the original Apple data archive
- You do not edit or rename files inside the export
- Your Apple Music account is correctly connected
If problems continue, requesting a new Apple data export may help. After that, you can upload it without opening or renaming it.
Stats.fm Shows Incorrect Statistics
Statistics may look different from your expectations because:
- Your Apple Music history export may not include every type of activity
- Recent listening activity may not have been processed yet
- Imported data may require additional time to analyze
Checking the import status and waiting for processing to finish can often clarify the issue.
Part 6. FAQs About Using Stats.fm Apple Music Integration
Is Stats.fm Free for Apple Music Users?
Stats.fm offers both free and paid features. The free version can provide access to some basic statistics, while Stats.fm Plus unlocks additional features, including Apple Music history import and deeper analytics.
Does Stats.fm track my listening automatically?
Yes, once connected, Stats.fm tracks your streams continuously. However, past streams prior to app installation require the manual Apple Data Import.
Can I close the app during the import process?
It is often best to keep the application open and active until the upload progress bar completes.
Is my Apple account secure when importing data?
Yes. You are uploading standard streaming logs provided directly by Apple. You never need to share your Apple Account password with Stats.fm.
Part 7. Final Thoughts: Is Stats.fm Worth Using with Apple Music?
Stats.fm adds another layer of insight for Apple Music users who want more than a yearly or monthly Replay summary. The setup requires an extra step because complete listening history needs to be exported from Apple and imported manually, but this process can unlock more detailed statistics.
If you enjoy tracking your music habits, discovering your most-played artists, or exploring years of listening history, Stats.fm can be a useful companion tool alongside Apple Music.

 Home
Home





User Comments
Leave a Comment