


Poweramp is a popular music player app known for its robust equalizer, support for various music file formats, and customization options. It's a favorite among Android users for its ability to deliver high-quality audio and a personalized listening experience. However, if you're an Apple Music subscriber, you might have encountered some difficulties when trying to play your Apple Music tracks on Poweramp. No worries. In this article, you can learn how to use Poweramp with Apple Music and setup the Poweramp equalizer for the best audio experience. So let's get started!

Part 1. Is Poweramp Available for Apple Music
Poweramp is a powerful music player available for Android devices, but it doesn't have direct integration with Apple Music. This means you can't simply open the Apple Music app and play your songs on Poweramp. However, there are alternative methods to transfer and play Apple Music on Poweramp.
However, Apple Music tracks can be played on Poweramp for Android by using third-party tools to convert the tracks into formats that Poweramp can play, such as MP3 or FLAC. Once the tracks are converted, they can be added to Poweramp for playback.
Part 2. How to Get Poweramp Apple Music Work - Preparation
To open Apple Music with Poweramp, you'll need to convert the Apple Music songs to a compatible format that Poweramp can recognize. One of the best tools for this task is the DRmare Apple Music Converter. This software allows you to remove the DRM protection from Apple Music and convert the songs to a format supported by Poweramp, such as MP3.
With complex and varied customizability options in this software, you can convert Apple Music to MP3, AIFF, FLAC, WAV, and other common formats, adjust the output bitrate, sample rate and so on. It retains the original audio quality and ID3 tags, and it works at a 30X fast speed. Then, you are able to get the best Apple audio and listen to them with Poweramp Music Player.

- Convert Apple Music to MP3, AIFF, WAV, FLAC, etc. for Poweramp
- Batch converting with up to 30X speed
- Lossless output quality with original ID3 tags
- Support lifetime update and 24h customer help
How to Convert Apple Music to Poweramp Supported Format
Now, we will show you how to use DRmare Apple Music Converter on its simple and intuitive interface, then check the detailed steps to download and convert Apple tracks for Poweramp Music Player compatibility.
- Step 1Transfer Apple Music to DRmare Apple Music Converter
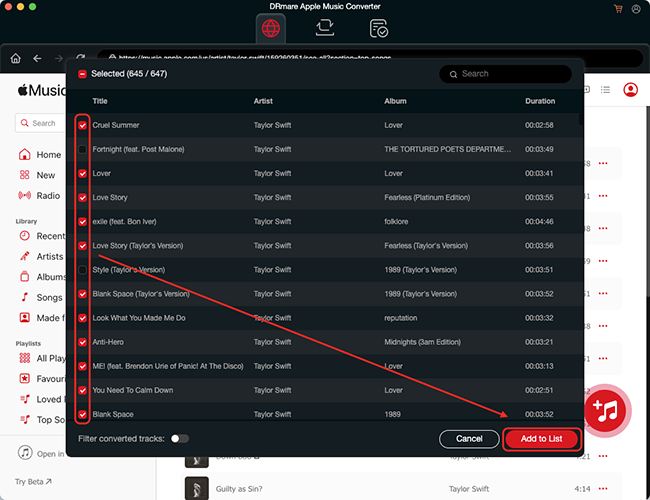
- Download and install the latest version of the DRmare Apple Music Converter on your computer. Launch the DRmare Apple Music Converter, and you will see a built-in Apple Music Web Player in the main interface. Use this player to sign in to your Apple account. Browse your library and click the "Add" > "Add to List" button to load them to the conversion queue.
- Step 2Reset the output settings of Apple tracks for Poweramp
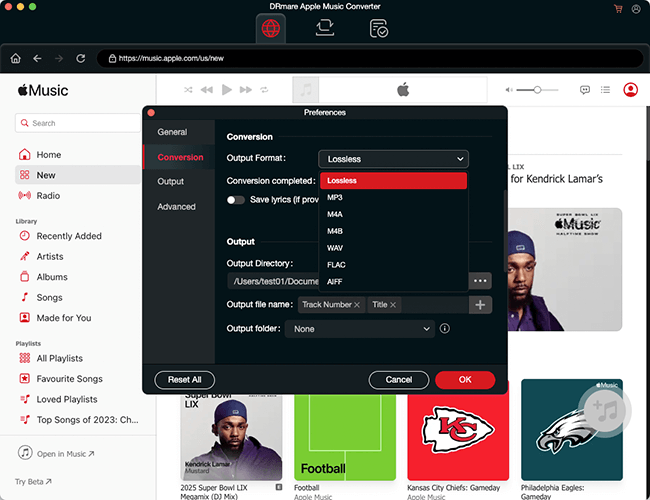
- Once the Apple Music songs are loaded to DRmare, you can prepare to customize the output settings. Hit the "Menu" or "DRmare Apple Music Converter" option to edit the output format and other parameters. Poweramp supports MP3, AIFF, M4A, WAV, and FLAC. So choose any one of them and save the setting by clicking the "OK" button.
- Step 3Download and convert Apple songs for Poweramp
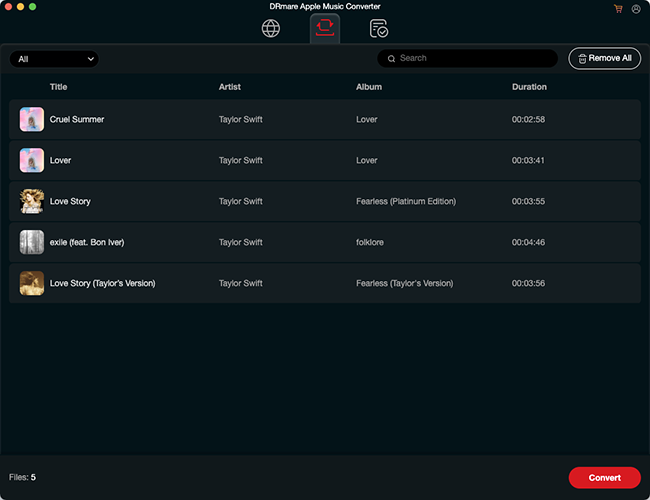
- Now, just click to "Convert" and wait for some time. After the conversion is accomplished, a red circle will show on the "Converted" icon on the interface. Click it to open the output folder. All downloaded unprotected Apple songs are displayed here for free use and you can listen to Apple Music offline on any device.
Part 3. How to Play Apple Music on Poweramp Music Player
Once you have converted your Apple Music songs to a compatible format using the DRmare Apple Music Converter, you can easily add them to Poweramp. By following a few steps, you can easily import and organize your Apple Music library within the Poweramp app.
Step 1. Transfer the converted Apple Music songs to your Android phone.
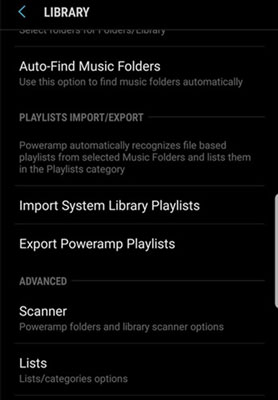
Step 2. Open the Poweramp Music Player app on your Android device and tap on the "Menu" icon to access the settings.
Step 3. In the settings menu, select "Library" and tap on "Music Folders" to choose the folder where your Apple Music is stored.

Step 4. Tap on "Select Folders" to confirm your selection and Poweramp will start scanning and loading your Apple Music files into its library.
Step 5. Once the scanning process is complete, you can access and listen to Apple Music with Poweramp Music Player.
Part 4. How to Set Poweramp Equalizer for Apple Music
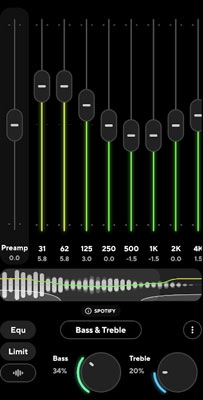
Poweramp has a built-in equalizer that allows you to customize the audio settings for the best sound quality. By adjusting the equalizer settings, you can fine-tune the Apple Music sound quality according to your preferences. To set up the Poweramp equalizer Apple Music, follow these steps.
Step 1. Start the Poweramp Music Player app on your Android device.
Step 2. Tap on the menu icon (three horizontal lines) to open the settings.
Step 3. Select "Equalizer" from the settings menu of this Apple Music equalizer.
Step 4. Adjust the equalizer settings according to your preferences. You can tweak the bass, treble, and other audio parameters to enhance the sound quality of your Apple Music songs.
Part 5. To Sum Up
Although Poweramp doesn't have direct integration with Apple Music, you can still enjoy your favorite Apple Music songs on Poweramp by converting them to a compatible format using the DRmare Apple Music Converter. Once converted, you can easily add the songs to Poweramp and customize the audio settings using the built-in equalizer. Now you can enjoy your Apple Music library on Poweramp and have the best audio experience on your Android device.


User Comments
Leave a Comment