


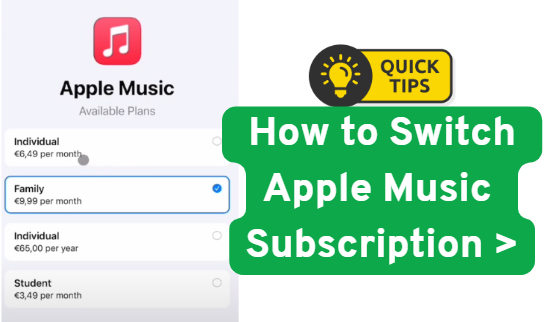
Apple Music's popularity has soared with the widespread adoption of devices like the iPhone, HomePod, Apple Watch, and AirPods. To cater to diverse listening needs, Apple Music offers three primary subscription tiers: the Individual Plan, the Family Plan (supporting up to six users), and the Student Plan. While you select a plan when you first subscribe, your needs might change over time.
What happens if you realize you've chosen the wrong subscription after a while, or just want to change Apple Music plan to optimize your costs? Do you have to start all over again? Can you easily switch to a different plan without being double-charged?
You can rest easy! Apple makes it simple to switch between Apple Music individual, student, and family plans for free. Even better, all your original playlists and saved songs remain untouched in your library. You won't lose a beat. Let's switch your Apple Music subscription across various devices.
Part 1. Understand Apple Music Subscription Tiers
Before you move from a student plan to an individual one, or bring the whole family on board, it's helpful to be familiar with the main Apple Music subscription options:
- Individual Plan ($10.99/Month): This is the standard plan for one user, offering full access to the Apple Music catalog, ad-free listening, downloads, and more.
- Student Plan ($5.99/Month): Available to eligible university students at a discounted rate, this plan includes all the benefits of the Individual Plan, often with additional perks like Apple TV+ access. Verification of student status is required periodically.
- Family Plan ($16.99/Month): Designed for households, this Apple Music Family plan allows up to six people to have their own individual Apple Music accounts, each with their own library, recommendations, and listening history. It's a cost-effective option for multiple users under one roof.
Note:
Apple One Bundles: For those who use multiple Apple services (like iCloud+, Apple TV+, Apple Arcade, etc.), Apple One bundles include Apple Music at a combined, discounted price. These bundles offer varying levels of services and storage, with prices typically starting around:
- Individual Apple One: $19.95 per month
- Family Apple One: $25.95 per month
- Premier Apple One: $37.95 per month
Tips:
Switching from an Individual Apple Music to a Family or Student plan won't affect your music library, or vice versa. If you choose to cancel your Apple Music subscription, your playlists will disappear automatically. It's highly recommended to backup your Apple Music playlists as local files via DRmare Apple Music Converter, which also helps you listen to Apple Music offline anywhere, even if you end your plan.
Part 2. How to Change Apple Music Plans on All Devices
The method for changing your Apple Music subscription varies slightly depending on the Apple device or platform you're using. Apple has streamlined this process across its ecosystem, making it relatively intuitive no matter where you access your account. Here's a detailed breakdown for each common device:
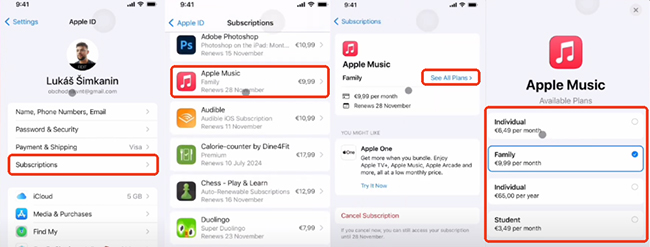
On iPhone, iPad, or Apple Vision Pro:
- Open the Settings app. This is the grey gear icon typically found on your home screen.
- Tap your name at the very top of the Settings screen. This will open your Apple Account, iCloud, Media & Purchases, and Family Sharing settings.
- Tap "Subscriptions". This will display a list of all active and expired subscriptions associated with your Apple Account.
- Locate "Apple Music" in your list of active subscriptions and tap on it.
- Tap "See All Plans". You'll then be presented with the available Apple Music subscription tiers, including Individual, Family, and Student (if eligible).
- Select the desired plan by tapping on it. A confirmation prompt will appear, outlining the new pricing and billing cycle.
- Follow the on-screen instructions to confirm your purchase. You may need to authenticate with Face ID, Touch ID, or your device passcode. Your new subscription will typically take effect at the end of your current billing period.
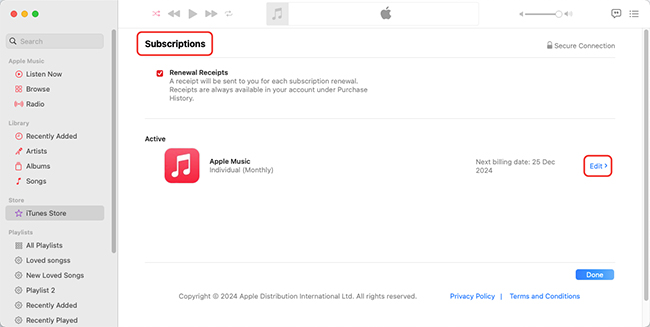
On a Mac:
- Open the Music app. This is the multicolored music note icon in your Dock or Applications folder.
- In the top menu bar, click on "Account", then select "View My Account." A new window will open, potentially prompting you to sign in with your Apple Account for security.
- Scroll down to the "Settings" section within your Account Information.
-
Next to "Subscriptions," click "Manage". This will open a dedicated window displaying your active subscriptions.

-
Find "Apple Music" in your list and click "Edit" next to it.
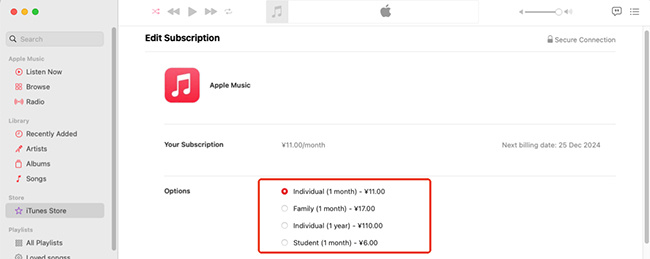
-
Choose the new subscription option (e.g., Individual, Family, Student) from the presented choices. Confirm your selection by following any additional on-screen prompts.
On a Windows PC:
- Open the Apple Music app or iTunes.
- In the Apple Music app, click your name at the bottom of the sidebar, then choose "View My Account". In iTunes, choose "Account" from the menu bar, then "View My Account". You might need to sign in with your Apple Account.
- Scroll down to the "Subscriptions" section.
- Click "Manage" next to "Subscriptions."
- Next to "Apple Music", click "Edit".
- Select a different subscription option from the available choices.
- Complete the process by confirming your change as prompted.
On the Web:
- Go to account.apple.com in your web browser.
- Sign in with your Apple Account and password. You may need to enter a two-factor authentication code if you have it enabled.
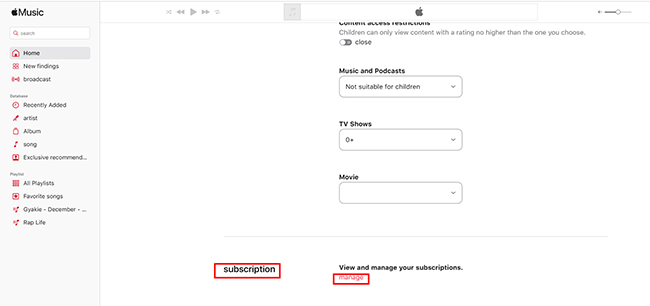
- Once logged in, scroll down to the "Subscriptions" section.
- Click "Manage."
- Find "Apple Music" in your list of subscriptions.
- Click "Edit" (or similar).
- Choose your desired plan and confirm the change.
Part 3. How to Switch Apple Music Subscription (Between Individual and Family Plan)
Switch Apple Music from Individual to Family Plan
If you and your loved ones, including your spouse, children, or other relatives, all enjoy Apple Music, there's no need for separate subscriptions. Upgrading to an Apple Music Family Plan is a smart way to save money and simplify access for everyone. With a Family Plan, up to six people can have their own individual Apple Music accounts, complete with their libraries, playlists, and recommendations.
To make this switch, you'll need to be the organizer of a Family Sharing group. This allows you to manage shared purchases and subscriptions for your family members.
How to Set Up Apple Family Sharing
- Launch your iPhone and then click "Settings" to enter the preferences window.
- Click the menu "iCloud" > "Set Up Family Sharing" and follow the screen wizard to create the Family Sharing group.
- Now you should see a new menu "Family" under the "iCloud" tab, you can click it and then add members to the group.

Switch to Apple Music Family Account
- Launch the Music app from your iPhone, iPad, or iPod.
- Go to the "For You" tab.
- Click the "profile" icon and then input your account name and password to log in.
- Click "Manage" under "Subscriptions".
- From there, you can click the "Apple Music Family plan" and complete the process.
- Now, you can add Family members to join this plan to listen to Apple Music without extra charge.
Switch Apple Music from Family to Individual Plan
If your family or friends are no longer using your Apple Music Family Plan, there's no need to pay for access they don't use. You can easily switch to an Apple Music Individual Plan in just a few steps.
Once you make the switch, all other members of your Family Sharing group will lose access to the Apple Music subscription. However, their playlists, liked songs, and preferences will be saved for a short period. This means if they decide to subscribe to Apple Music again later, their personalized libraries will still be there.
For the Holder
- Open the Apple Music app from your iDevice.
- Go to the "For You" tab.
- Click the "account" icon and log in with your account and password.
- Click the "Manage" menu under the "Subscriptions" tab.
- Click the option next to "Individual" plan to change to a personal subscription.
- You can also stop Family Sharing, it will remove all family members.
For the Member
- Go to the settings window of your iOS device.
- Click "iCloud" >"Family".
-
Click your name and click the "Leave Family Sharing" menu.
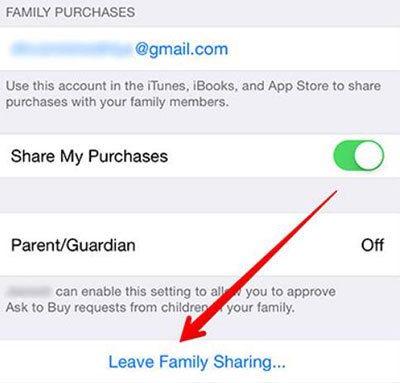
-
After leaving the Family Sharing group, your listening data will be stored on the Apple Music server for a short time. You can start over to sign up Apple Music individual plan as you want and restore your library.
Part 4. How to Switch Apple Music Subscription (Between Individual and Student Plan)
Whether you've just started university and want to take advantage of the discounted rate or you've recently graduated and are ready to transition to a standard individual plan, switching between Apple Music's Individual and Student subscriptions is a common and straightforward process. This section will guide you through the steps to seamlessly move between these two popular plans.
Switch Apple Music from Individual to Student Plan
Eligibility for Apple Music Student Plan
Before you start, make sure you meet the eligibility criteria:
- You must be enrolled in a degree-granting university or college (associate degree, bachelor's degree, post-graduate degree, or equivalent higher education course).
- Your student status will be verified through a third-party service, typically UNiDAYS or SheerID.
- You'll need a valid student ID and access to your student email for verification.
- The student discount is usually available for up to 48 months (four years), and you'll need to re-verify your student status periodically (usually once a year).
Switch to Apple Music Student Plan
- Open the Settings app. Tap your name at the top of the screen (your Apple Account).
- Tap "Subscriptions" and choose the "Apple Music" option.
- Tap "See All Plans" and select the "Student" plan.
- Tap "Verif Eligibility" (or "Verify Student Status"). This is the crucial step that will redirect you to the student verification service (usually UNiDAYS or SheerID).
- Follow the on-screen steps to verify your student status. Once your student status is successfully verified, you'll be redirected back to the Apple Music app.
- Confirm your new Student subscription. Your plan will change, and the new discounted rate will apply from your next billing cycle.
Switch Apple Music from Student to Individual Plan
- Under the "Subscriptions" section, you can choose the "Apple Music" option.
- Tap "See All Plans" and select the "Individual" plan.
- Confirm your selection. You'll be prompted to confirm the price change.
Part 5. Sum Up
Regardless of why you're switching your Apple Music plan, whether it's for a family upgrade, student discount, or individual access, the process is designed to be straightforward and can be completed in just a few simple steps. Simply follow the instructions provided for your specific device and desired plan change.
One of the most reassuring aspects of changing your Apple Music plan is that your personal playlists, saved songs, and listening data remain entirely intact. Apple Music securely stores this information under your Apple Account, ensuring a seamless and consistent experience no matter which plan you're on. You won't lose a single beat of your personalized music library.


Learn how to get the Apple Music Student Discount and enjoy Student Plan for just $5.99/month. Discover price, eligibility, and a step-by-step guide!