


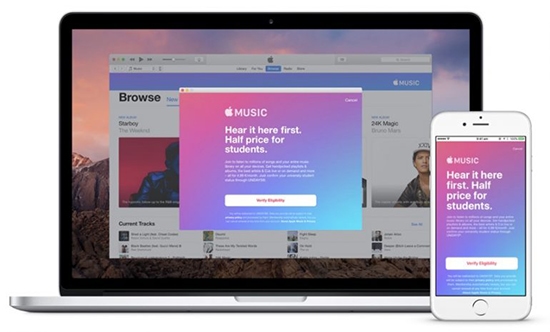
Apple Music offers a range of subscription plans to suit different needs, and students enjoy an exclusive perk with the Apple Music Student Plan. Designed for verified students, this plan provides affordable access to Apple Music's extensive library and additional benefits. With a generous discount, it ensures you can enjoy your favorite tunes without straining your budget while focusing on your education.
In this guide, we'll cover everything you need to know about the Apple Music student discount. Plus, we'll share a handy tip to keep enjoying Apple Music even after canceling your student subscription.
Part 1. What Is Apple Music Student Plan
Launched in May 2016, the Apple Music Student Plan offers 50% off the regular Apple Music subscription for eligible college and university students. This plan includes all the benefits of the Individual Plan but at a reduced price of just $5.99/month, valid for up to 48 months (four years). After 48 months, the subscription transitions to the standard Individual Plan, priced at $10.99/month.
One of the most attractive perks of the Apple Music Student Subscription is that it includes a free Apple TV+ subscription, a service valued at $9.99/month. This gives students access to exclusive Apple Originals, TV shows, and movies.
Eligibility Requirements to Get Apple Music Student Discount
- Must be actively pursuing a bachelor's, graduate, or equivalent degree at an accredited institution.
- Have a valid .edu email or credit card-style student ID from your school.
- Be at least 16 years old (depending on regional age restrictions).
Part 2. How to Get Apple Music Student Discount
To qualify Apple Music Student discount, students must be enrolled in an eligible degree-granting college or university and verify their student status through UNiDAYS, Apple's authorized verification partner. Now follow us to learn how to do this in two ways.
How to Subscribe to Apple Music Student Plan through UNiDAYS
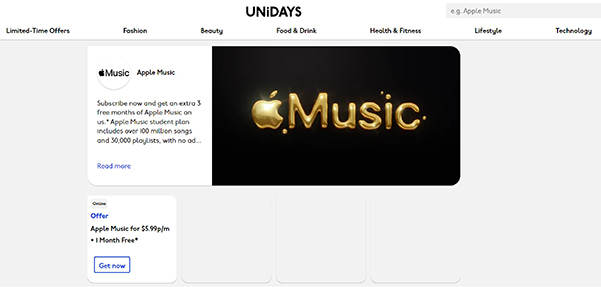
Step 1. Head to the official page of UNiDAYS Apple Music Offer.
Step 2. Click on the Get now button under the Apple Music student offer.
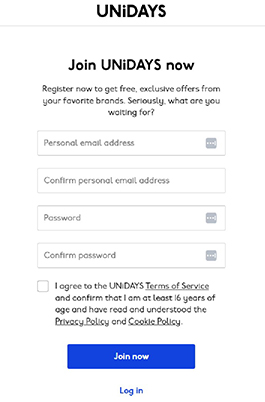
Step 3. You will be directed to create a UNiDAYS account or log in if you already have one, and click Join Now. (Provide your school email address and other required information, such as your university or college name.)
Step 4. UNiDAYS may require additional Apple Music student verification, such as:
- A student ID card.
- An official enrollment letter.
- A recent tuition receipt or class schedule.
Step 5. Once your student status is verified, you will be directed to Apple Music and provide your Apple Music account. Apple Music Student discount approval usually happens instantly but can take up to a few days if manual review is needed.
Step 6. Finally, fill in the billing details and complete the purchase to get Apple Music student membership.
Review Apple Music Student Verification
- Student status must be re-verified annually.
- UNiDAYS will send reminders before your verification expires.
How to Subscribe to Apple Music Student Subscription via App
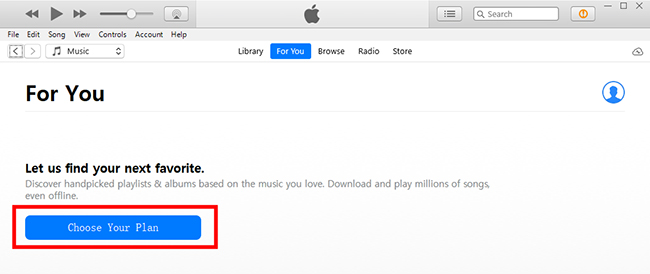
Step 1. Open the Apple Music app or iTunes on your device.
Step 2. Choose Music > For You and click on the Choose Your Plan button.
Step 3. Select the College Student option and click the Verify Eligibility button. You will be directed to the UNiDAYS website to verify your eligibility as a student.
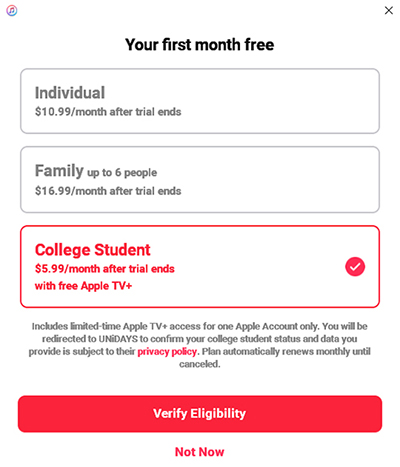
Step 4. Enter your academic (.edu) email and your school name. Click the Continue button to follow the prompts to confirm your student status through UNiDAYS.

Step 5. After you verify you are a student, UNiDAYS will notify Apple, and your Apple Music Student Plan will be activated. You may be asked to complete the payment method.
Tips:
- If verification fails, double-check your documentation for accuracy.
- Ensure your institution is listed in UNiDAYS.
- Contact Apple Support or UNiDAYS for further assistance.
- You can log in with the same Apple Account you used to get your Apple Music student account to watch Apple Originals movies and TV shows on Apple TV+ for free.
How to Get Apple Music for Student from Other Plans
If you already have an Individual Plan or Family Plan on Apple Music, you can switch to a Student Plan without losing your playlists or music library. Follow these steps:
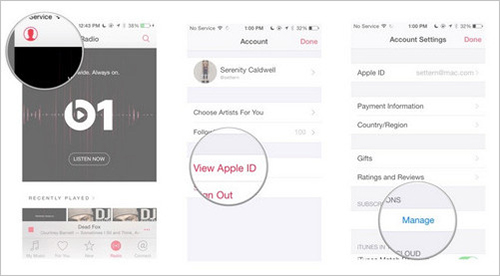
Step 1. Open the Apple Music app or iTunes.
Step 2. Log into your account and navigate to Account Info > View Apple Account > Manage to swtich Apple Music subscription.
Step 3. Select Student Subscription under renewal options. Complete the UNiDAYS verification process. Confirm your new subscription plan at a discount rate of 50%.
Note:
- If you are part of a Family Plan, switching to a Student Plan will remove your family members from the shared subscription.
- You can only rollover your student subscription after your current subscription expires and your renewal date is reached.
Part 3. How to Keep Apple Music Forever before Unsubscribing Student Plan
While the Apple Music Student Plan is an excellent deal, once your subscription ends, all downloaded songs will become inaccessible. To retain your library permanently, consider using DRmare Apple Music Converter.
During your Apple Music Student subscription period, you can use this software to convert Apple Music files to MP3, FLAC, or other popular formats. It can retain lossless sound quality and full ID3 tags. These downloaded files are yours to keep and use so you can listen to them even without a subscription. Even better, you can copy or move them to other devices for offline playback.
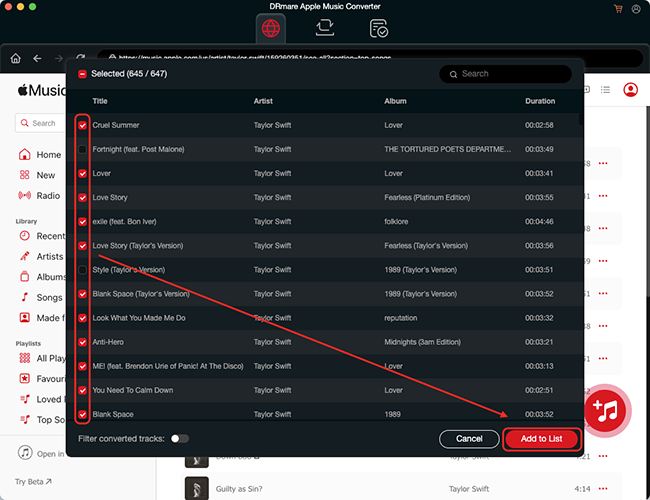
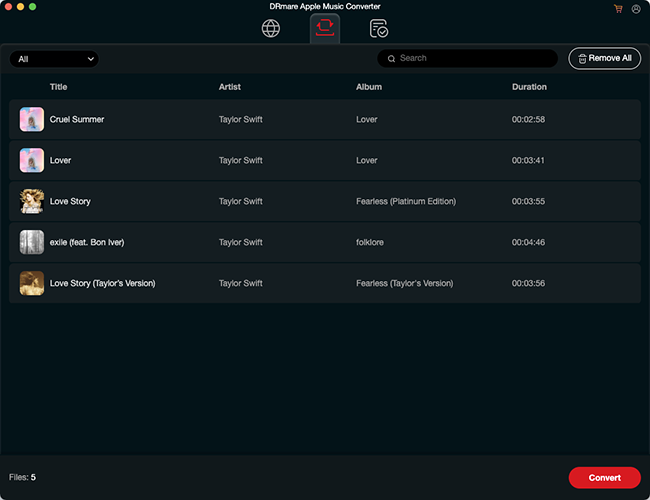
Step 1. Download and install DRmare Apple Music Converter on your Mac or Windows computer. When you launch the software, you will see its main interface with an integrated Apple Music Web Player. Click the Sign In button to log into your Apple Account and access your personal music library directly. Next, browse the built-in web player for the songs or playlists you want to download and click the red + > Add to List button to load them.
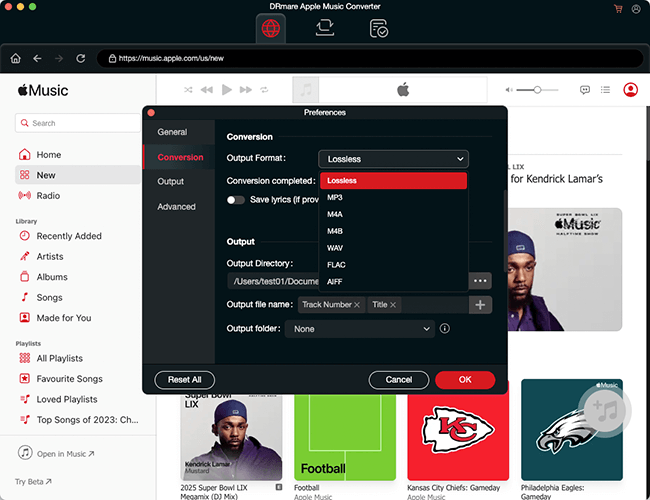
Step 2. Click the Menu icon at the top right of the screen and choose Preferences to set your desired output settings. Here, you can select a common audio format like MP3, FLAC, WAV, or M4A, and customize parameters such as the audio codec, sample rate, bit rate, and audio channel to achieve perfect quality.
Step 3. Now, you just need to hit on the Convert button and then DRmare Apple Music Converter will remove Apple Music's protection, and then you can get Apple Music free forever. These converted files will be saved on your device, allowing you to listen to Apple Music tracks even without an active subscription.
Part 4. FAQs about Apple Music Student Discount
Does Apple Music Have a Student Discount?
Yes, Apple Music offers a student discount through the Apple Music Student Plan. Eligible students can enjoy all the benefits of an Individual Plan at a reduced price.
How Much Is Apple Music for Students?
Who Is Eligible for the Apple Music Student Plan?
To qualify for the Apple Music Student Plan, you must:
- Be enrolled in a bachelor's degree, postgraduate degree, or equivalent higher education program at an accredited institution.
- Verify your student status through UNiDAYS or Apple's verification system.
What Happens If I Graduate or Am No Longer a Student?
Once you graduate or are no longer a student, your plan will automatically switch to the standard Individual Plan at regular pricing. To continue enjoying your favorite playlists after your subscription ends, consider using the DRmare Apple Music Converter to back up your music for offline listening.
What Happens If I Graduate Before Four Years?
Apple Music requires annual verification of your student status. If you graduate before the four-year eligibility period ends, your subscription will convert to an Individual Plan.
Can I Switch from Another Subscription to the Student Plan?
Yes, you can switch from an Individual or Family Plan to the Student Plan without losing your saved music or playlists.
Is the Student Discount Available Globally?
The Apple Music Student Discount is available in most countries where Apple Music operates, though pricing and availability may vary.
Does Apple Music Student Include Apple TV+?
Yes, the Apple Music Student Plan includes free access to Apple TV+ for eligible students, as long as your subscription remains active.
How Do I Verify Student Status on Apple Music?
You can verify your student status through the following steps:
- Sign up for the Apple Music Student Plan through the Apple Music app or iTunes.
- Select the Student Plan and proceed to verify your status via UNiDAYS.
- Provide your .edu email or personal email and confirm your enrollment at an accredited institution.
- Once verified, you can activate your student subscription and enjoy the discounted plan.
Part 5. In Summary
The Apple Music Student Discount is an exceptional offer for students looking to enjoy unlimited music streaming at an affordable price. With additional perks like free Apple TV+, it's an unbeatable deal for those balancing a tight budget with their love for entertainment.
If you're a student, don't wait—sign up now and take full advantage of this exclusive offer. And for those who want to keep their Apple Music library forever, consider using DRmare Apple Music Converter to enjoy your favorite songs without restrictions!


User Comments
Leave a Comment