


For audiophiles, combining Spotify's massive catalog with the superior audio engine of JRiver Media Center is the dream setup. You get endless music discovery paired with JRiver's powerful DSP, bit-perfect playback, and meticulous library management. Many users search for a JRiver Spotify plugin or a direct integration, hoping to bridge this gap easily.
However, the reality is that a direct JRiver Media Center Spotify connection doesn't exist out of the box. Due to Spotify's DRM-protected streaming model, there is no official support. But don't worry—achieving a high-quality JRiver Spotify experience is entirely possible. This guide details two proven workarounds: one for live streaming and one for building a permanent, integrated library.
Part 1. Does JRiver Support Spotify Natively?
No, JRiver Media Center does not have native support for Spotify streaming. You cannot log in to your Spotify account within JRiver. Instead, you must use one of the following methods to route Spotify's audio through JRiver or import its tracks into your library.
Part 2. Stream Spotify Live with the JRiver WDM Driver
If your main goal is to apply JRiver's powerful Digital Signal Processing (DSP)—like room correction, equalization, or VST plugins—to your live Spotify stream, this method is for you. It uses a built-in feature of JRiver called the WDM (Windows Driver Model) driver, which cleverly turns JRiver into a virtual sound card for your entire PC.
- Step 1Enable the WDM Driver in JRiver
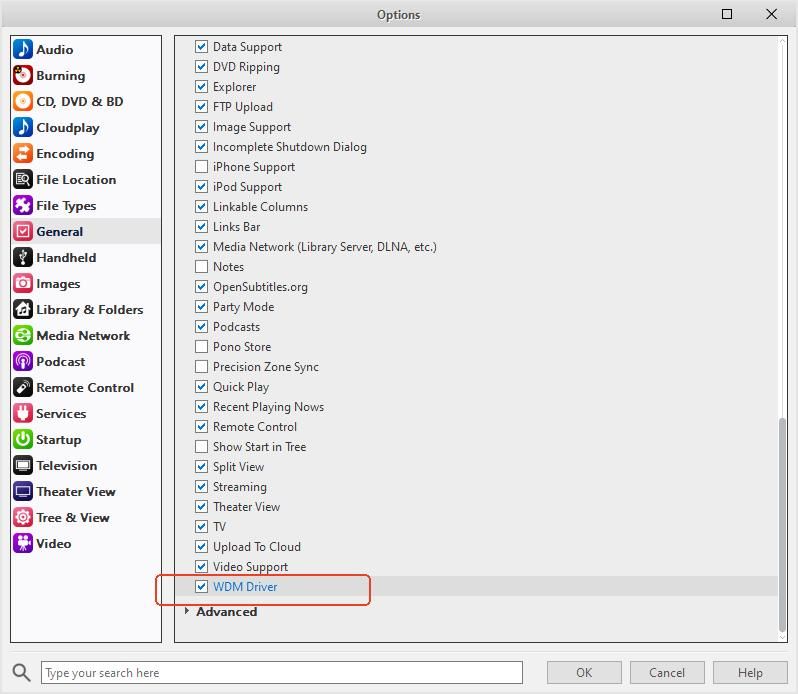
First, you need to make sure the driver is installed and active. Open JRiver Media Center and navigate to the options menu by clicking "Tools" > "Options". In the left pane, select General, then click the Features button. In the pop-up window, make sure the checkbox for "WDM Driver" is ticked. If it's not, check it and click OK; JRiver will install the driver.
- Step 2Set JRiver as Your Default Audio Device in Windows
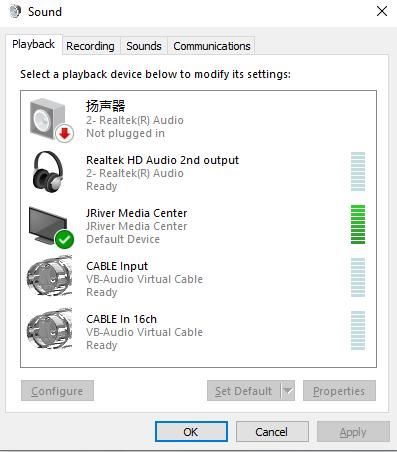
Next, you need to tell Windows to send all audio through this new virtual driver. Right-click the speaker icon in your Windows taskbar and select "Sound settings" or "Playback devices". In the list of devices, you should now see "JRiver Media Center". Click on it, and then set it as your default device.
- Step 3Play Music from Spotify

That's it! As long as JRiver Media Center is running, any audio you play from the Spotify desktop app (or any other application) will be automatically routed through JRiver's audio engine before being sent to your final output device (like your DAC). You can now use JRiver to apply DSP and control the volume.
Fixing Stuttering in Your JRiver Spotify WDM Setup
When streaming Spotify through JRiver, you might sometimes experience stuttering or audio glitches. This is usually caused by sample rate conflicts. The fix is simple.
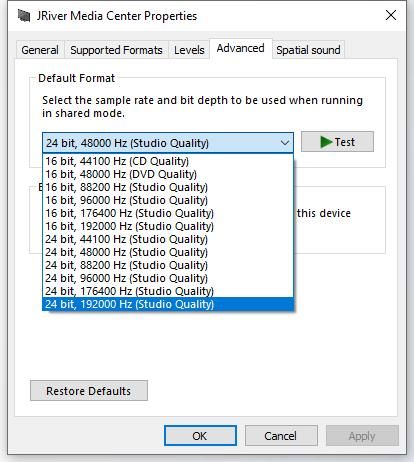
In the Windows Sound control panel, find the "JRiver Media Center" device again and right-click to select "Properties". Navigate to the "Advanced" tab. Here, under "Default Format," choose the highest quality setting your audio hardware supports, such as "24-bit, 192000 Hz." This creates a stable, high-resolution pipeline for the audio.
Pros and cons of this method
Pros
 Applies JRiver's full DSP suite to any live Spotify stream
- Works in real-time without needing to download files
Cons
 JRiver and the Spotify app must be running on your PC
- System sounds from Windows may also play through JRiver
Part 3. Add Spotify to JRiver Permanently by Converting Files
f your goal is to build a unified, offline library where Spotify tracks live alongside your other music, this is the definitive method. To add Spotify to JRiver permanently, you must first convert the DRM -protected tracks into a standard local format (like FLAC or MP3) that JRiver can import and manage.
The most effective way to do this is with a dedicated tool. DRmare Spotify Music Converter is designed specifically for this purpose. It allows you to convert any Spotify song, playlist, or album into high-quality, DRM-free formats while keeping all important metadata like song titles, artists, and album art intact.
Here's how to use DRmare Spotify Music Converter for DRM-free music in Jriver:
- Step 1Add Your Desired Spotify Music
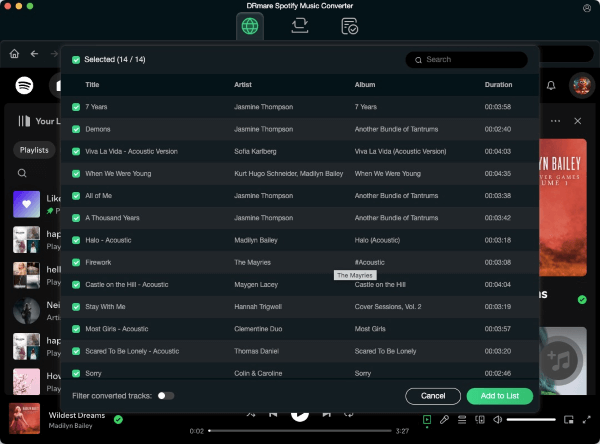
First, launch the DRmare Spotify Music Converter. The software features a built-in Spotify web player, so you will need to log in to your Spotify account directly within the DRmare application. Once logged in, navigate to any song, playlist, or album you wish to convert. As you select content, a prominent green icon, typically in the bottom-right corner, will become active. Click this icon to load your selected tracks into the conversion queue.
- Step 2Customize Your Output Settings
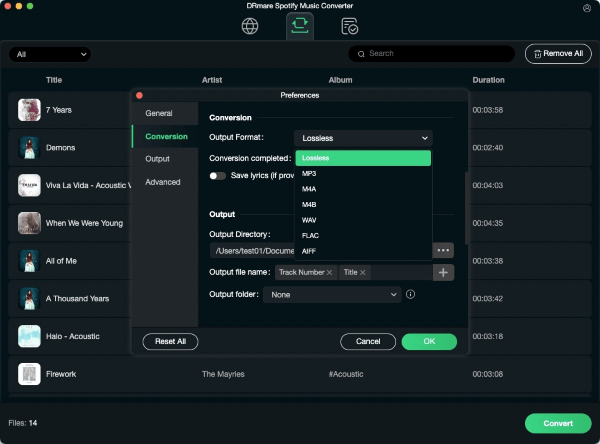
Before converting, you can tailor the output to your specific needs. Locate the "Menu" icon in the top-right corner of the application and select "Preferences." This will open a settings window where you can choose your desired output format, such as MP3, FLAC, WAV, or AAC. You can also adjust audio parameters like the bit rate, sample rate, and channel to ensure the files meet your quality standards for use in JRiver or other players.
- Step 3Download and Convert the Tracks
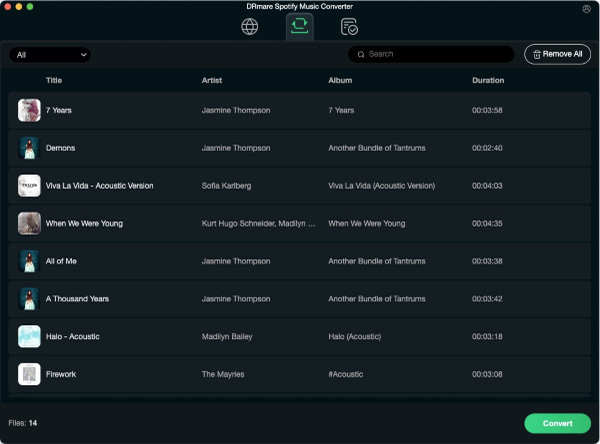
Once your settings are configured and your music is added to the list, simply click the "Convert" button. The software will begin downloading and converting the tracks to your specified format, saving them as local files on your computer. After the process is complete, you can find all your newly converted songs by navigating to the "Converted" tab within the application, where you can directly access the files.
- Step 4Import Your Converted Songs into JRiver
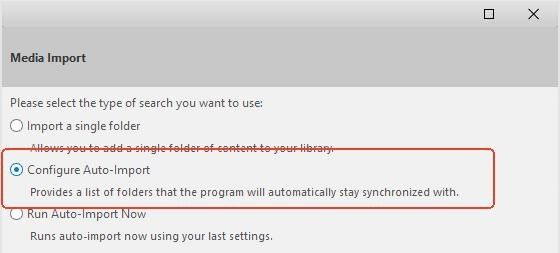
Once you have a folder of converted music, adding it to JRiver is simple. The best way is to use the "Auto-Import" feature. In JRiver, go to File > Library > Import. Select "Configure Auto-Import" and in the wizard, add the folder where you saved your converted Spotify tracks. JRiver will now monitor this folder and automatically add any new music to your library, complete with all its metadata.
Pros and cons of this method
Pros
- Creates a permanent, offline collection of your favorite Spotify music
- Tracks are fully integrated into your JRiver library for seamless management
- Files are portable and can be played on any device
Cons
- Is not a real-time streaming solution
- Requires a separate, third-party application like DRmare
Part 4. JRiver Spotify Integration: Which Method Is Right for You?
Choosing between these two methods depends entirely on your goal.
If you want the immediate satisfaction of applying JRiver's best-in-class DSP to live Spotify streams and don't mind being tethered to your PC, the WDM Driver method is a fantastic, free solution.
If your goal is to curate a permanent, offline music library, break free from DRM, and seamlessly blend your Spotify favorites with your existing local collection, then converting files with DRmare is the definitive answer.
Part 5. Conclusion
While a direct JRiver Spotify plugin may not be available, your goal of combining these two excellent audio platforms is completely achievable. Whether you choose the real-time processing of the WDM driver or the permanent library-building power of conversion, you now have two clear paths to finally play Spotify in JRiver with the high-fidelity quality your music deserves.


User Comments
Leave a Comment