As a music producer, DJ, or artist, your inspiration can come from anywhere. You might hear a drum break, a vocal chop, or a unique synth line in a Spotify track and immediately want to pull it into Ableton Live for sampling, remixing, or analysis. However, you quickly run into a frustrating roadblock: you can't just drag a song from Spotify into your Ableton project. This guide will show you how to get your "Ableton Live Spotify" workflow running smoothly.
This is a common challenge, but a solution is well within reach. This guide will walk you through three effective methods to get your favorite Spotify songs into Ableton Live, so you can get back to creating.
Part 1. Why Direct Ableton Live Spotify Integration Fails
The primary reason you can't use Spotify songs directly in a Digital Audio Workstation (DAW) like Ableton Live is due to Digital Rights Management (DRM). DRM is a form of copy protection that Spotify uses to prevent unauthorized copying and distribution of its music catalog. The songs are streamed in a protected Ogg Vorbis format, which is encrypted and tied to the Spotify app.
Ableton Live, on the other hand, needs clean, unprotected audio files. It natively supports formats like WAV, AIFF, and FLAC, and can also import M4A and MP3 files as long as they are DRM-free. To bridge this gap, you must first convert or record the Spotify track into one of these compatible formats.
Part 2. Convert Spotify to MP3 or WAV for Ableton Live
For producers who value speed, audio quality, and an efficient workflow, using a dedicated Spotify music converter is the most reliable approach. These applications are designed specifically to handle the conversion process, delivering high-quality, unprotected audio files ready for any project.
A standout tool for this job is DRmare Spotify Music Converter. It's built to download and convert any song, playlist, or album from Spotify into several Ableton-friendly formats. The main advantage here is that it preserves the original audio quality and all the song's metadata. It also allows for batch conversion, saving you immense time compared to manual recording.
Here's how to use it to get your tracks ready for Ableton Live with DRmare:
- Step 1Download and Set Preferences
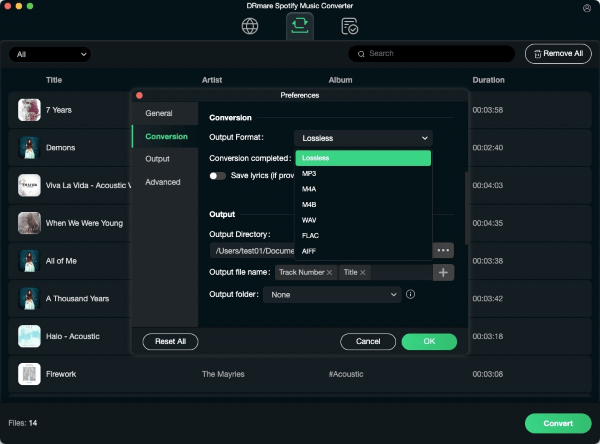
First, download and launch the DRmare Spotify Music Converter. You will be prompted to log into your Spotify account directly within the application's built-in web player. Before converting, you can open the "Preferences" from the menu to set your output options. For the best quality in Ableton, select WAV or FLAC. For a great "Spotify to MP3" conversion that balances quality and file size, choose MP3 and set the bit rate to 320 kbps.
- Step 2Add Songs to Download
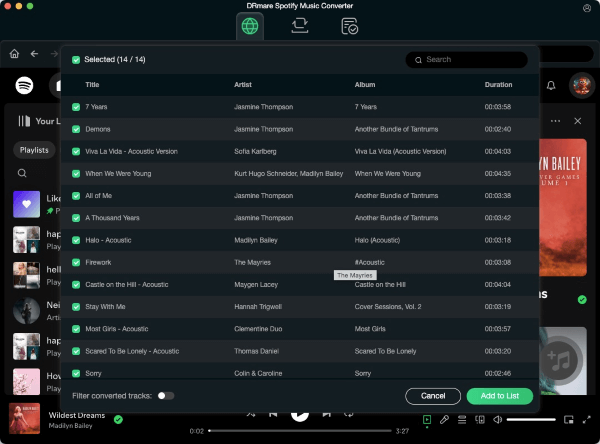
With the web player open inside DRmare, browse to find the songs or playlists you want. Drag your chosen tracks or albums directly onto the green music icon located in the bottom-right corner of the interface. Once you do, click "Add to list" to load them into the conversion queue.
- Step 3Convert Spotify Songs for Ableon
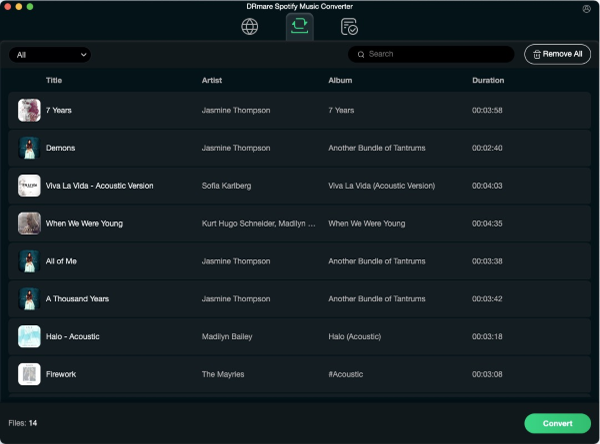
Once your tracks are loaded and the settings are configured, navigate to the "Converting" tab. Here, you will see a large "Convert" button. Click it to begin the process. The software will automatically download and convert your selected Spotify songs in a batch.
After the conversion is finished, you can find all your newly created audio files under the "Converted" tab. These files are now saved locally on your computer, free of restrictions and ready to be used in any Ableton Live project.
Part 2. Record Spotify in Ableton Live using Blackhole (macOS)
If you're a Mac user and prefer a free, hands-on approach, you can use a virtual audio driver called Blackhole to record Spotify's output directly into Ableton Live. This method is powerful but requires some initial setup.
Step 1. Install Blackhole. Download it from Existential Audio and run the installer.
Step 2. Create a Multi-Output Device. Open the "Audio MIDI Setup" app on your Mac. Click the '+' button in the bottom-left and select "Create Multi-Output Device". In this new device, check the boxes for both "BlackHole" and your "Built-in Output" or headphones. This lets you hear the audio while it's also being sent to Ableton.
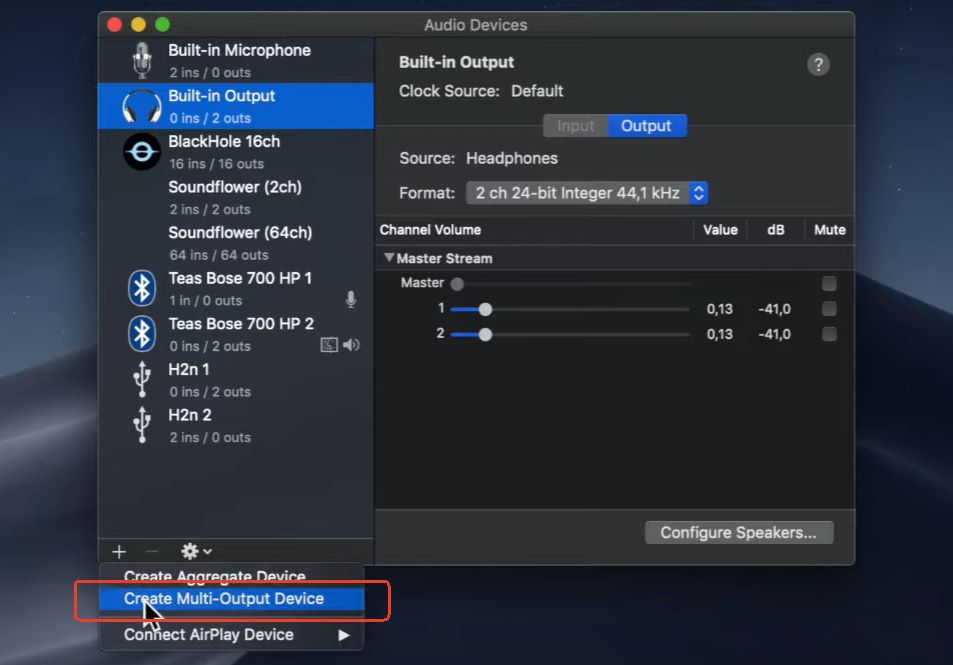
Step 3. Set your Mac's audio output. Go to System Settings > Sound and select the "Multi-Output Device" you just created as your output.
Step 4. Configure Ableton Live. Open Ableton's Preferences and go to the "Audio" tab. Set your "Audio Input Device" to "BlackHole".
Step 5. Record the audio. Create a new audio track in Ableton. Set its "Audio From" input to your chosen Blackhole channels (usually 1/2). Arm the track for recording, play the song in Spotify, and hit record in Ableton.
Part 3. Use Audacity to Record Spotify for Ableton Projects
Audacity is a free, open-source audio editor that is excellent for recording system audio on both Windows and macOS. This method involves recording the track in Audacity first, then exporting it as an audio file that you can import into Ableton.
How to Record on Windows with Audacity
Step 1. Configure Audacity's audio host. Open Audacity and in the device toolbar at the top, set the Audio Host to "Windows WASAPI".
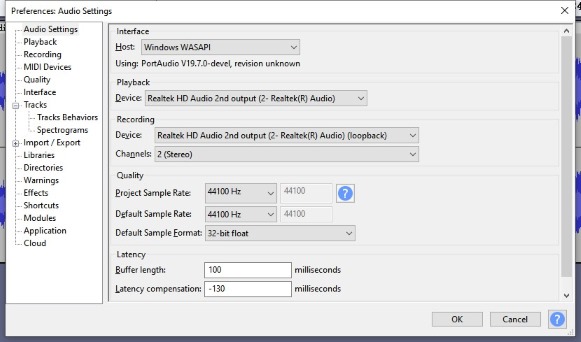
Step 2. Select the loopback device. Set the Recording Device to the "Speakers (loopback)" or "Headphones (loopback)" option. This tells Audacity to record exactly what you hear through your output.
Step 3. Record and export. Press the record button in Audacity, play your song on Spotify, and stop the recording when it's done. Go to File > Export and save the recording as a WAV or MP3 file.
Part 4. How to Import Songs into Ableton Live
Once you have your unprotected audio file from any of the methods above, the final step is simple.
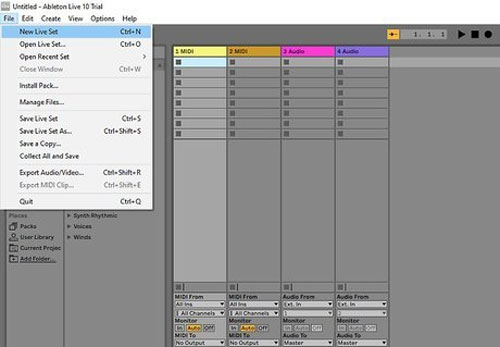
Step 1. Open an Ableton Live project.
Step 2. Locate your converted WAV or MP3 file on your computer using Ableton's Browser or your system's file explorer.
Step 3. Drag the audio file from the folder directly onto an audio track in Ableton's Arrangement or Session View. The audio waveform will appear, ready for you to warp, chop, and sample.
Part 5. Conclusion
While you can't import songs from Spotify directly, these workarounds give you the power to bring any sound into your creative space. For the best combination of quality and convenience, a dedicated tool like DRmare Spotify Music Converter is the superior choice. For those on a budget, Blackhole and Audacity are fantastic free solutions that get the job done with a little more manual effort.


User Comments
Leave a Comment