





Quick Summary:
To use Audacity to record from Spotify, set the Audio Host to Windows WASAPI (Windows), use an audio router like BlackHole (Mac), or use PulseAudio/PipeWire (Linux). Choose your system output as the recording device to capture internal audio. For batch processing without real-time waiting, an automated converter like DRmare Spotify Music Converter is the recommended efficiency alternative.
There are plenty of times when you might want to record or edit Spotify music, whether it's for offline listening, creating remixes, or working on personal projects. Unfortunately, Spotify only allows Premium users to download songs for offline listening, and even then, those downloads are locked within the Spotify app with no option to edit, share, or use them elsewhere.
That's where Audacity comes in. This free, open-source audio editor is capable of recording any sound playing through your computer, including Spotify audio in high quality. In this guide, we'll walk you through exactly how to record Spotify with Audacity, step by step, so you can save and use your favorite music the way you want.
Part 1. Is There Audacity Spotify Integration?
Technically, Audacity does not have direct integration with Spotify. You can't link your Spotify account to Audacity or import Spotify playlists into the app. This is largely due to Spotify's DRM protection (Digital Rights Management), which encrypts its music files to prevent unauthorized copying or distribution.
However, even without official integration, it can still record Spotify audio in high quality as it plays through your computer's speakers. It utilizes a loopback mechanism. It captures the signal sent to your soundcard after it has been decrypted for playback.
- It should only be done for personal use, such as offline listening, remix practice, or audio editing projects. Distributing or sharing recorded content, especially for commercial purposes, is prohibited.
- While this tool can capture high-quality sound, the recording won't be a perfect replica of Spotify's original audio stream. This is because you're recording what's played through your speakers, not extracting the source file.
- Audacity records in real time, meaning if you want to record a 3-minute song, it will take 3 minutes to capture it.
Part 2. How to Record Spotify with Audacity on All Platforms
Audacity is a great free, open-source, professional-grade audio recording and editing software that works seamlessly on Windows, Mac, and Linux. It enables users to record Spotify to MP3, WAV, and AIFF without spending a penny. Beyond recording, it also offers powerful features like multi-track editing, audio effects, and real-time waveform monitoring. One standout feature is its built-in noise reduction, which helps ensure clean recordings without unwanted background sounds. Curious how to use Audacity with Spotify? Let's walk through the full step-by-step process below.
How to Use Audacity to Record from Spotify on Windows
Windows users have the easiest path because the Windows WASAPI host allows Audacity to capture the digital stream directly from the soundcard.
Step 1. Open Audacity from your Windows computer desktop and configure the audio settings for recording. Click the "Edit" option from the top-left toolbar and choose "Preferences" from the dropdown list. Set the Audio Host to "Windows WASAPI" under the Audio Settings section.
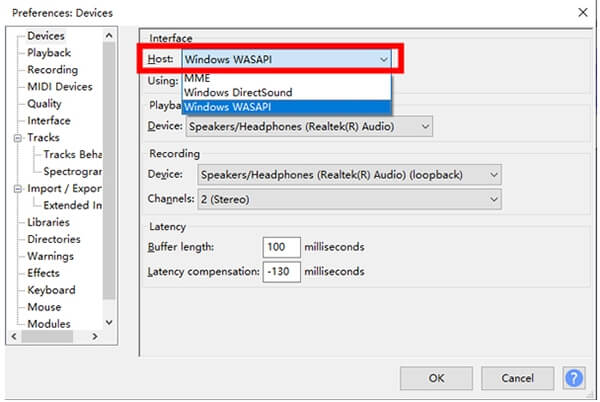
Step 2. Set the recording device to match your computer's output (e.g., Speakers or Headphones). Confirm the Project Rate is at least 44100 Hz for quality audio capture.
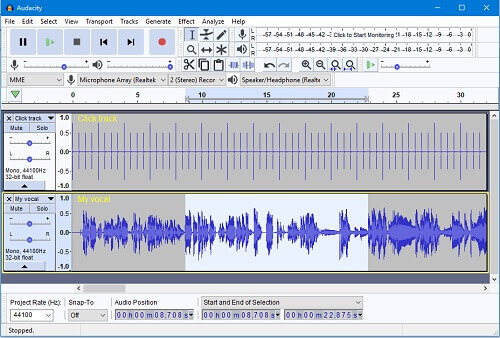
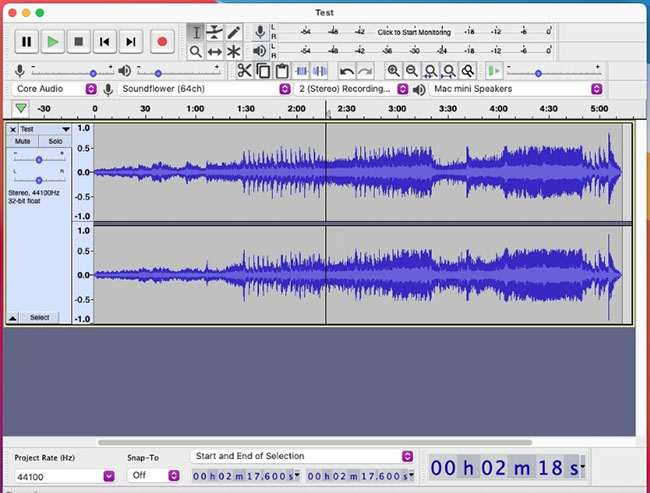
Step 3. Click the red "Record" button from the function buttons at the Audacity main interface. Open the Spotify app or Spotify Web Player to play the desired track. You can watch the waveform to ensure Spotify audio is being captured.
How to Record Music from Spotify with Audacity on Mac
Apple blocks internal audio recording for privacy. You must use a virtual bridge, like BlackHole and Sounflower, to send audio from Spotify to Audacity.
Step 1. Download and install BlackHole (2ch) on your Mac computer. And then open "Audio MIDI Setup". Click the "+" icon and create a Multi-Output Device. Check both "Built-in Output" and "BlackHole 2ch".
Step 2. Set your Mac's system output to the "Multi-Output Device. And in Audacity, set the Recording Device to "BlackHole 2ch". This allows you to hear the music through your speakers while Audacity records the stream internally.
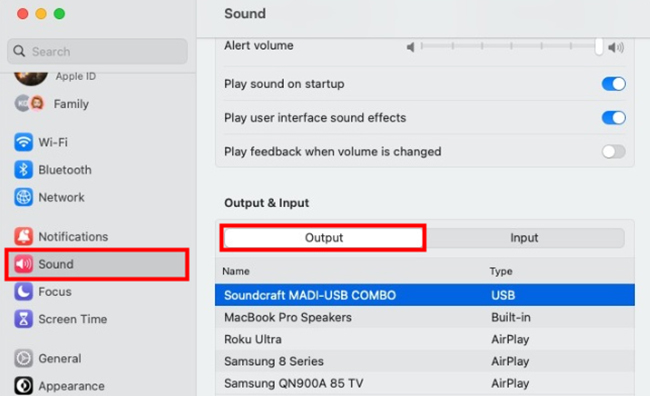
Step 3. Now, you can press the "Record" button in Audacity, then play your Spotify track, and watch the Recording Meter.
How to Record Spotify to MP3 with Audacity on Linux
Most modern Linux distributions (Ubuntu, Fedora) use PulseAudio or the newer PipeWire.
Step 1. Set the Host in Audacity to ALSA and start recording in Audacity (it may record silence initially).
Step 2. Open your terminal or app menu and launch pavucontrol (PulseAudio Volume Control).
Step 3. Go to the Recording tab. Find Audacity and change the "Capture from" dropdown to "Monitor of [Your Output Device]".
Recording Tips:
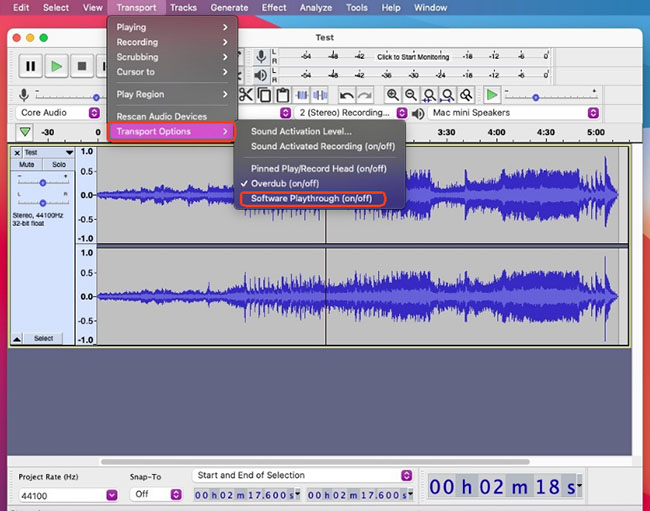
- Ensure "Software Playthrough" is turned OFF in Transport Options to avoid a feedback echo.
- Don't adjust volume mid-track; set it before recording.
- Close other apps to minimize notification sounds.
Part 3. How to Edit and Export Recorded Spotify Music in Audacity
Once the recording is complete, click the "Stop" button. You now have a raw waveform that needs refining to match professional streaming standards.
How to Refine with Basic & Advanced Edits
Basic Maintenance (Recommended for All Tracks)
- Precision Trimming: Spotify often has a split-second delay before and after a track. Highlight the silent "dead air" at the start and end of the waveform and press "Delete" to ensure your track starts instantly.
- Smooth Fading: To avoid abrupt "pops" or awkward stops, highlight the first 2 seconds and go to "Effect" > "Fading" > "Fade In". Repeat at the end with "Fade Out".
- Normalization (Volume Balancing): Since recording volume can vary, use "Effect" > "Volume and Compression" > "Normalize". Set the Peak Amplitude to -1.0 dB. This ensures your track is at its maximum safe volume without "clipping" (distorting).
Advanced Optimization (For Audiophiles)
- Intelligent Noise Reduction: If you recorded via an analog bridge or an older hardware loopback, you might hear a slight "hiss". Use "Effect" > "Noise Removal and Repair" > "Noise Reduction".
- Equalization (Filter Curve EQ): Use "Effect" > "EQ and Filters" > "Filter Curve EQ" to enhance the audio. A slight "Bass Boost" or "Treble Boost" can help restore the brilliance sometimes lost during real-time recording.
- Envelope Tool (Dynamic Shaping): If one part of the song is too loud (like a sudden drop), select the Envelope Tool (looks like two white triangles) to manually adjust the volume levels at specific points in the timeline.
Export and Save Your Edited Spotify Tracks
The final stage of the process is transforming your raw Audacity project into a portable audio file. Follow these steps to correctly encode your recording and ensure it's ready for any media player.
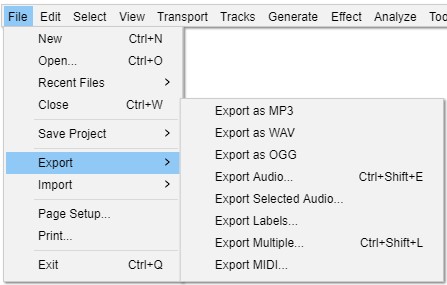
Step 1.Go to "File" > "Export" > "Export as MP3" (or WAV for higher quality).
Step 2. Choose bitrate settings; 192 kbps is a good balance.
Step 3. Name your file and click the "Save" button to save Spotify recordings to your computer.
Part 4. Efficiency Audacity Alternative to Record from Spotify
If you need to move an entire Spotify library (e.g., 100+ tracks), recording manually with Audacity would take hours. Fortunately, DRmare Spotify Music Converter solves this by interacting with the built-in web player to fetch data directly.
It works at 15X faster conversion speed to download Spotify music with zero quality loss and no Premium subscription required. With just a click, you can convert individual songs, entire playlists, albums, or podcasts from Spotify to MP3, WAV, AIFF, M4A, FLAC, and more.
Unlike Audacity, DRmare retrieves Metadata (ID3 tags) including Album Art, Year, and Genre automatically. Better yet, DRmare gives you full control over output settings, including bitrate, sample rate, channel, and even metadata tags, so you can create personalized audio files that are compatible with audio editing software, including Audacity.
Steps to Download and Add Spotify Songs to Audacity
To get started, download and install the free trial version of DRmare Spotify Music Converter using the "Download" button above. Then follow these simple steps to convert and import your Spotify tracks into Audacity:
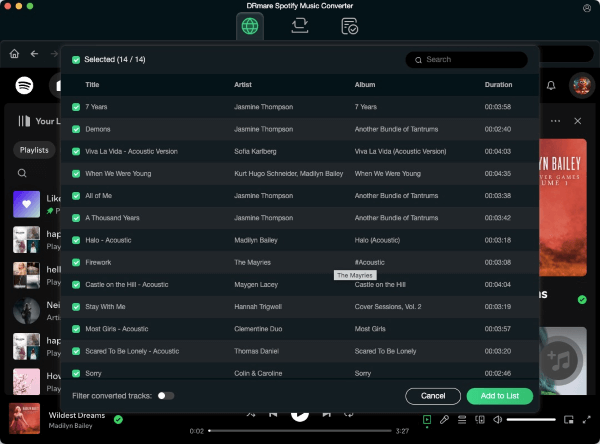
- Step 1Import songs from Spotify for downloading
DRmare Spotify Music Converter has the best integration with the Spotify Web Player. After opening the DRmare software, you can log into your free Spotify account to authorize DRmare to access your library. Search for favorite songs and click the "Add" to "Add to List" button to select songs to this converter.
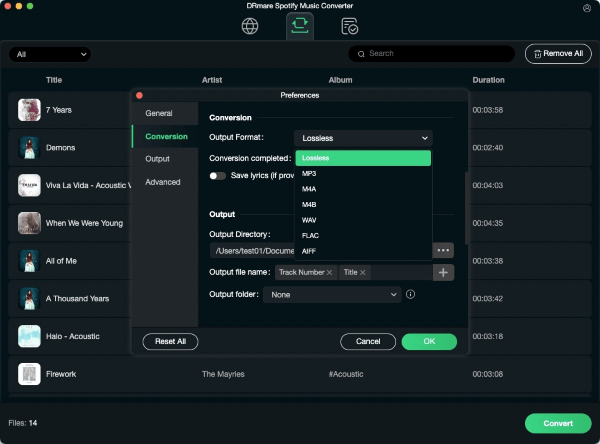
- Step 2Set Spotify output format for adding to Audacity
If you'd like to have the best compatibility with Audacity, you can adjust the Spotify output format to MP3, WAV, or AIFF. Also, you can adjust the audio channel, audio bitrate, and more for Spotify song recording. Once done, hit the "OK" button.
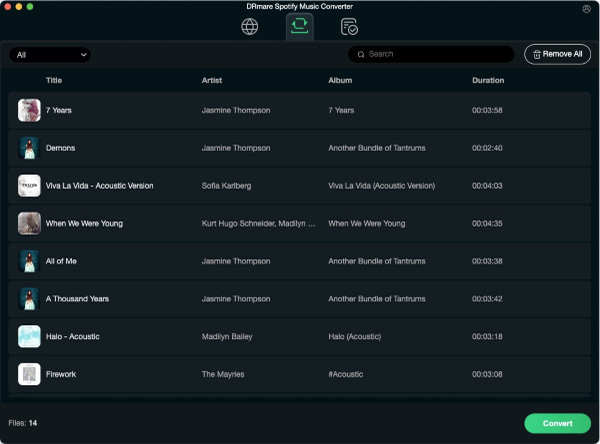
- Step 3Download Spotify music to local computer losslessly
Finally, click the "Convert" button. DRmare Spotify Music Converter will automatically begin downloading your selected Spotify tracks to your computer. If you're processing a large playlist or multiple albums, the software handles everything in the background. Once the conversion is complete, simply click the "Converted" icon to quickly locate all your downloaded songs on your device.
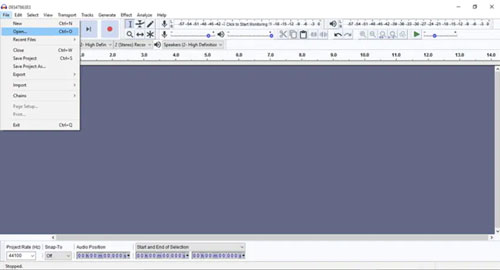
- Step 4Import Songs from Spotify to Audacity
Open Audacity on your Mac, Windows, or Linux computer. Click on "File" in the top menu to select "Import" > "Audio" from the dropdown. Now, you can browse your computer to find the converted Spotify files and select the song(s), and click "Open". The Spotify track will appear as a waveform in Audacity's timeline, ready for editing.
Audacity vs DRmare Spotify Music Converter: At a Glance
| Feature | Audacity (Manual Recording) | DRmare (Automated Conversion) |
|---|---|---|
| Speed | 1X (Real-time) | 15X (Fastest) |
| Audio Quality | System-dependent (Lossy) | Bit-perfect (Lossless) |
| System Sound Capture | Risks capturing notifications | Pure audio data only |
| ID3 Tags | Manual Entry Required | Automatic Preservation |
| Effort | High (Requires manual start/stop) | Low (One-click batch) |
| Best For | Single clips, snippets, or remixes | Full playlists and high-fidelity libraries |
| Rating | ⭐⭐⭐⭐ | ⭐⭐⭐⭐⭐ |
Part 5. FAQs about Recording Spotify with Audacity
Can Spotify detect Audacity?
No, Spotify cannot detect Audacity or know if you're recording audio from its platform. Audacity functions as a local audio recorder that captures sound from your system's output (e.g., what you hear through your speakers or headphones). It does not interact directly with Spotify's app or servers, so there's no data shared that would alert Spotify you're recording.
Can you screen record Spotify with Audacity on a Mac?
No. Audacity is not a screen recorder, but it can record Spotify audio on a Mac. To do this, you need to configure your Mac to capture internal audio. macOS doesn't allow internal recording by default, so you'll need to use a third-party audio routing tool like BlackHole or Loopback Audio.
Is it a legal way to use Spotify music in Audacity?
Recording Spotify music with Audacity for personal, non-commercial use, such as for offline listening or practice, is generally tolerated. However, Spotify's terms of service prohibit copying, redistributing, or modifying its content without permission.
Why is my Audacity recording so quiet?
When using WASAPI, the recording volume is tied to the Spotify app's volume slider. Set Spotify to 100% volume for the best Signal-to-Noise Ratio (SNR).
Part 6. In Conclusion
Audacity is a free, reliable tool to record Spotify music for personal use, offering clean audio capture and editing features for free. Though it doesn't integrate directly with Spotify, it lets you record any audio playing on your computer in real time. For faster, high-quality downloads, DRmare Spotify Music Converter is a great alternative, allowing you to batch-convert songs to MP3 and other formats without quality loss. Whether you're editing, remixing, or just listening offline, both tools make it easy to enjoy Spotify your way.

 Home
Home




User Comments
Leave a Comment