


Remember the mesmerizing geometric shapes of old Winamp or Windows Media Player visualizers? If you're a Spotify user, you've likely noticed that feature is missing. Despite years of requests, Spotify still lacks a native visualizer.

That is where Plane9 comes in. It is one of the best free 3D music visualizers for Windows, featuring over 250 scenes. While Spotify doesn't officially support visualizers anymore, you can absolutely use them together.
I've tested the setup, and it's easier than you might think. Here are two ways to get Spotify and Plane9 to work together: a quick fix for streaming, and a pro method for a glitch-free experience.
Part 1. How Plane9 "Hears" Spotify
Before we dive into the setup, it helps to understand how this works. Since Spotify has no "plugin" system, Plane9 cannot connect directly to the app.
Instead, Plane9 works by listening to your computer's System Audio (often called "Stereo Mix" or "What U Hear"). Essentially, whatever sound comes out of your speakers—whether it's Spotify, YouTube, or a game—Plane9 turns into visuals.
Part 2. Standard Way to Connect Spotify to Plane9
This is the method most users look for first. It uses your live Spotify stream. It is free, relatively fast to set up, and works great for casual listening.
Step 1. Download and install Plane9 from the official website. During installation, ensure you install the screensaver and the windowed version.
Step 2. Open Spotify and start playing a track so your computer has active audio running.
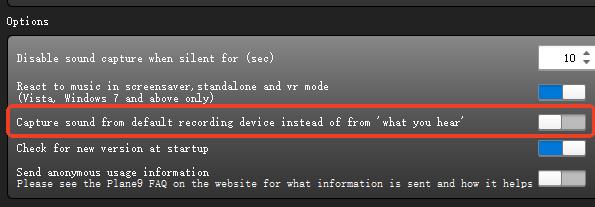
Step 3. Launch "Configure Plane9" from your Start menu. In the configuration window, look for the "Capture sound from default recording device instead of from 'what you hear', turn it off.
Step 4. Once configured, open the "Run Plane9 Windowed" application. You should immediately see the visuals reacting to the beat of your Spotify track.
Part 3. The "Immersion Breaker" Problem
While the method above works, you will quickly notice a few annoying downsides during extended listening sessions:
- The Ad Issue: If you are on Spotify Free, Plane9 will visualize the ads. There is nothing quite like having your psychedelic visual trip interrupted by a loud, jarring insurance commercial.
- System Interruptions: Because Plane9 listens to all system audio, it also visualizes your incoming email notifications, Discord pings, and Windows error sounds. These "spikes" in the visualizer ruin the flow.
- Resource Heavy: Streaming Spotify in high quality while rendering 3D graphics in real-time can sometimes cause micro-stutters if your internet hiccups.
If you are trying to set up a visualizer for a house party, a second monitor background, or a chill-out session, these interruptions can be a dealbreaker.
Part 4. The Best Way to Set up Spotify for Plane9
For a truly seamless experience—the kind where you can leave it running on a TV at a party without worrying about buffering or notification sounds—the best solution is to take your playlist offline.
By converting your Spotify tracks to local files, you can play them through a dedicated lightweight music player (like VLC or Foobar2000) that doesn't trigger ads or rely on an internet connection. This is where tools like DRmare Spotify Music Converter become incredibly useful.
This tool essentially bridges the gap between Spotify's vast library and Plane9's need for a clean, uninterrupted audio source. It allows you to download Spotify songs as standard audio files (MP3, FLAC, WAV) that you truly own.
How to Create a Dedicated Visualizer Playlist
- Step 1Log In and Set Output Preferences
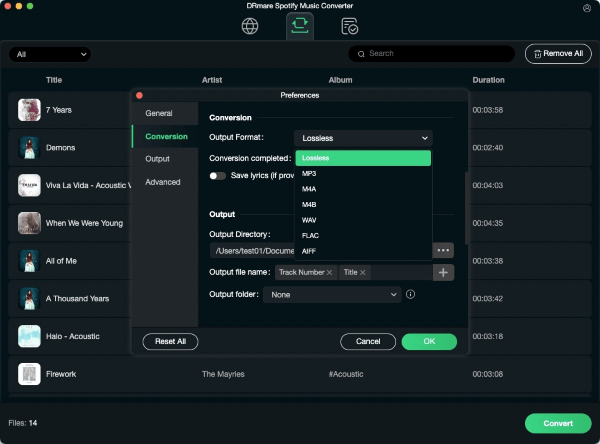
Launch DRmare and log into your account directly via the built-in Spotify web player. Click the menu icon in the top-right corner, select Preferences, and navigate to the "Conversion" section to set your desired audio format (like MP3 or FLAC) and quality to ensure the best audio input for Plane9.
- Step 2Select and Add Music
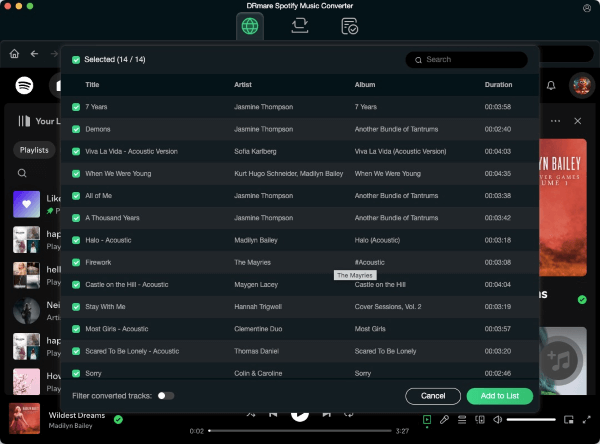
Browse the web player for the tracks or playlists you want to visualize. Simply drag and drop your selection onto the green Music icon in the bottom-right corner, then click "Add to list" to confirm the tracks you want to convert.
- Step 3Convert and Locate Offline Files
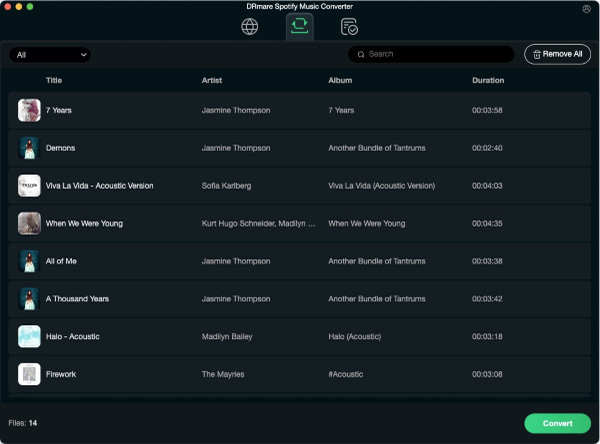
Click the "Convert" button to start the batch download. Once finished, navigate to the "Converted" tab to find your new local files. These are now stored offline and ready to be played in any media player for a smooth, interruption-free visualizer session.
- Step 4Visualize Spotify with Plane9
Open these new files in a standalone player like Windows Media Player or VLC. Since Plane9 listens to system audio, it will now visualize these tracks perfectly—with zero risk of buffering, ads, or internet lag.
Part 5. Final Thoughts
Using Spotify with Plane9 gives you the best of both worlds: the infinite library of the world's biggest streaming service and the retro-futuristic aesthetic of a classic visualizer.
For casual usage, the standard "System Audio" method works just fine. But if you are serious about your visuals—whether for a party atmosphere or creating content—taking the time to download your favorites via a converter like DRmare allows Plane9 to truly shine without the distractions.


User Comments
Leave a Comment