





Quick Answer (TL;DR):
The Apple Music Sync Library feature lets you access your entire music library (purchased, uploaded, and streamed) across all your Apple and Windows devices via iCloud. To turn it on:
- iPhone/iPad: Go to Settings > Music and turn on Sync Library.
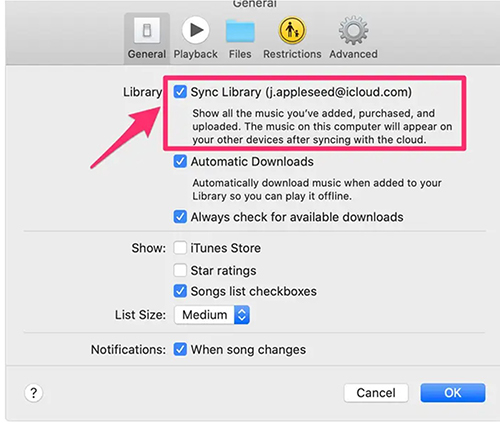
- Mac: Open Apple Music > Settings (or Preferences) > General, and check Sync Library.
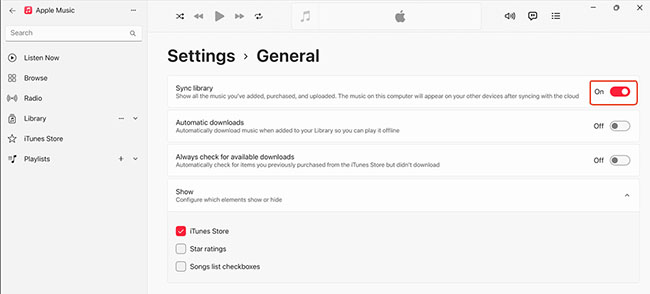
- Windows PC: Open Apple Music for Windows, go to Settings > General, and check Sync Library.
If your library fails to sync, ensure all devices use the same Apple Account, check your internet connection, or toggle the Sync Library switch off and back on. In this guide, you will learn how to enable Sync Library on Apple Music in details, fix common syncing problems, and keep your music collection accessible across devices.
Part 1. What Is Apple Music Sync Library & How Does It Work?
Apple Music Sync Library (formerly known as iCloud Music Library) is a feature that keeps your music collection available across all devices signed in with the same Apple Account. Once enabled, your songs, albums, playlists, and personal music files can automatically appear across your iPhone, iPad, Mac, Apple TV, Apple Watch, and Windows PC.
Sync Library does not work as a traditional cloud backup. Instead, Apple uses iCloud to keep your Apple Music library information synchronized, including matched songs, uploaded music, playlists, and library changes.
Key Features of Sync Library at a Glance
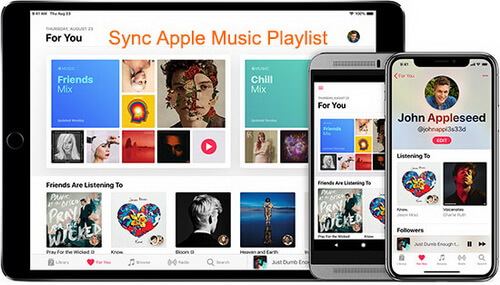
- Unified Access: Combines tracks from Apple Music's catalog, your iTunes purchases, and personal audio files uploaded from your computer.
- Cross-Device Syncing: Library changes normally appear automatically on your other devices, although larger libraries or unstable connections may cause delays.
- Cloud Storage: Eliminates the need to manually transfer music files using USB cables.
Note:
Sync Library requires an active Apple Music or iTunes Match subscription. It is designed as a synchronization service, not a permanent offline backup solution.
Part 2. How to Turn On Sync Library on Apple Music Across Devices
Want to access your favorite playlists, albums, and imported tracks no matter which device you are using? Enabling Sync Library is the key to keeping your entire Apple Music collection perfectly unified across your iPhone, iPad, Mac, and PC. Here is how to get started.
Before enabling Sync Library, make sure:
- You have an active Apple Music or iTunes Match subscription.
- All devices use the same Apple Account.
- Your devices are connected to the internet.
- Your operating system and Apple Music app are updated.
How to Turn On Sync Library on iPhone/iPad
Step 1. Open the Settings app on your iPhone or iPad and scroll down and tap on 'Music'.
Step 2. Locate the 'Sync Library' under the Library section and toggle the switch to 'On'.
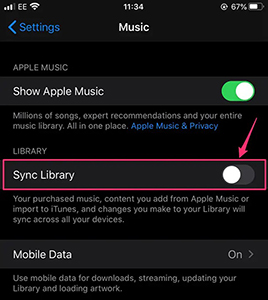
Step 3. Wait for your library to sync. This process might take a while depending on the size of your library and internet connection. After that, you can see your full Apple Music library on other devices.
How to Enable Sync Library on Mac
Step 1. Open the Apple Music app on your Mac computer.
Step 2. In the top menu, click on 'Music' > 'Settings' (or Preferences on older macOS versions) and then choose the 'General' tab.
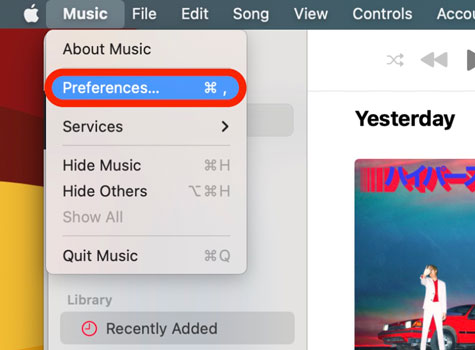
Step 3. Toggle on 'Sync Library' option and click on 'OK' to save your preferences and initiate the sync.
How to Enable Sync Library on Apple Music on PC
Step 1. Open the Apple Music app on Windows computer.
Step 2. From the sidebar at the top of your screen, click on the '...' option and select 'Settings'.
Step 3. Under the General tab, check the option for 'Sync Library'. Click 'OK' to enable the feature and begin syncing your music.
Part 3. Why Is Sync Library Apple Music Not Working
Apple Music's Sync Library feature is designed to work seamlessly in the background, keeping your playlists, albums, and imported tracks unified across all your devices. However, when songs fail to appear, playlists refuse to update, or the sync gets stuck, it can be incredibly frustrating.
Before diving into the settings, it helps to understand why this happens. Most syncing issues boil down to account mismatches, subscription status, network hiccups, or software bugs. Here is a comprehensive guide to diagnosing and fixing your Apple Music Sync Library.
Common Reasons of Apple Music Sync Library Not Working
- Your Subscription Expired: Sync Library requires an active Apple Music or iTunes Match subscription. If your payment failed or your plan expired, syncing stops immediately.
- Mismatched Apple Accounts: Your library will only sync across devices signed into the exact same Apple Account. If your Mac is on a work Apple Account and your iPhone is on a personal one, they won't communicate.
- Sync Library is Disabled on One Device: Syncing must be turned on individually for every device. If it's on for your Mac but off for your iPhone, your mobile library will look incomplete.
- Network Issues: Syncing relies heavily on iCloud. A slow or unstable Wi-Fi or cellular connection will cause tracks to get stuck "waiting" to upload or download.
- Outdated Software: Running older versions of iOS, macOS, or the Apple Music app can cause compatibility glitches that break background syncing.
- Problematic Audio Files: Extremely large libraries take a long time to sync. Furthermore, unsupported audio formats, corrupted local files, duplicate tracks, or broken metadata can stall the entire process.
Part 4. How to Fix Apple Music Sync Library Not Working
After identifying possible causes, you can follow these step-by-step troubleshooting solutions to restore proper synchronization across your devices:
1. Verify Your Apple Music Subscription Status
The first step is ensuring your Apple Music or iTunes Match subscription is active. Without a subscription, Sync Library won't function.
On your iPhone/iPad:
- Open Settings.
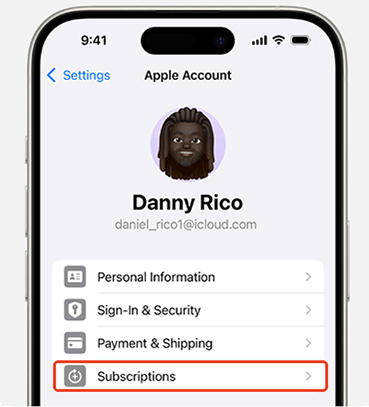
- Tap [Your Name] at the top and go to Subscriptions to check your Apple Music subscription status.
On Mac/PC:
- Open Music app on your computer.
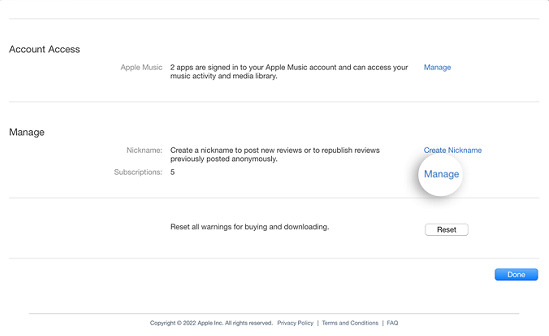
- Click on Account > Account > Manage and check your subscription details.
2. Confirm Apple Account Alignment
Double-check that your iPhone, Mac, and PC are all logged into the same Apple Account. On iOS, check under Settings > [Your Name]. On Mac/PC, check under Account in the top menu bar.
3. Toggle Sync Library Off and On All Devices
Force-refreshing the cloud connection often resolves temporary syncing loops. You can refer to the complete steps in Part 2 to do this.
4. Check Your Internet Connection
A weak or unstable internet connection can disrupt the Apple Music playlist syncing process. Make sure you're connected to a stable Wi-Fi network or have sufficient cellular data.
- Switch to a different Wi-Fi network if available.
- Try toggling Airplane Mode on and off to reset the connection.
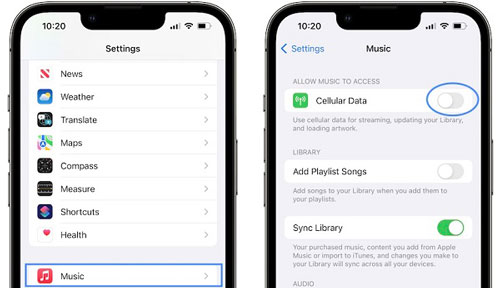
- Ensure cellular data is enabled for Apple Music under Settings > Music > Cellular Data.
5. Re-Authenticate Your Apple Account
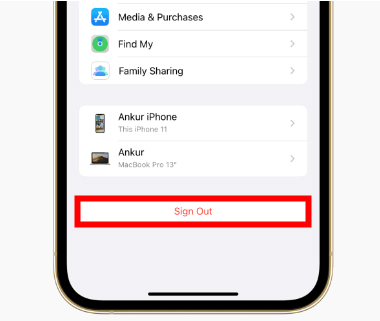
Signing out of your Apple Account and signing back in can refresh your account and resolve Apple Music syncing problems.
On iPhone/iPad:
- Go to Settings > [Your Name].
- Scroll down and tap Sign Out.
- Sign back in with your Apple Account.
On Mac/PC:
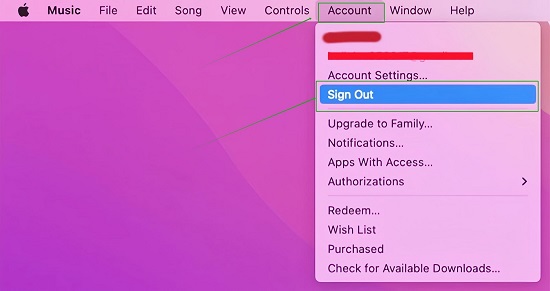
- Open Apple Music app.
- Go to Account > Sign Out.
- Sign back in with your Apple Account.
6. Clean Up Oversized Playlists or Corrupted Files
If a specific playlist fails to update, try splitting large playlists into smaller segments. Besides, Corrupted files or duplicates can act as a roadblock for the sync engine. Look for songs that are grayed out, refuse to play, or lack artwork. Delete the problematic tracks from your library and re-add them.
7. Check Your Local Storage Space
Even though Sync Library lives in the cloud, your device needs local storage to manage metadata, cache files, and download tracks.
- iPhone/iPad: Check Settings > General > iPhone Storage.
- Mac: Check System Settings > General > Storage.
If your device is completely full, delete unused apps or media to give Apple Music room to breathe.
8. Give It Time
If you just enabled Sync Library on a collection with thousands of imported MP3s and Apple Music tracks, it is not going to finish in five minutes. Plug your device into a charger, connect to a strong Wi-Fi network, open the Music app, and let it run overnight.
Part 5. How to Back Up Apple Music Library Locally and Sync Anywhere
Apple Music Sync Library is convenient for accessing your music collection across Apple devices, but it is not designed to be a permanent backup solution. If your Apple Music subscription ends, some Apple Music tracks may no longer be available. Likewise, Sync Library does not provide a traditional folder containing your songs that you can freely move to any device.
For users who manage large music collections, create personal archives, or want more flexibility with playback devices, keeping a separate local Apple Music backup can provide additional protection. You can use third-party software like DRmare Apple Music Converter to convert and back up your Apple Music playlists locally on your computer. It allows you to convert Apple Music tracks to MP3, AIFF, FLAC, and other formats with lossless quality. It ensures lossless sound quality and complete ID3 tags. This way, you can sync and access your Apple Music across devices even if your subscription ends.
How to Convert and Sync Apple Music Library Without Subscription
- Step 1Add Apple Music files to DRmare Apple Music Converter
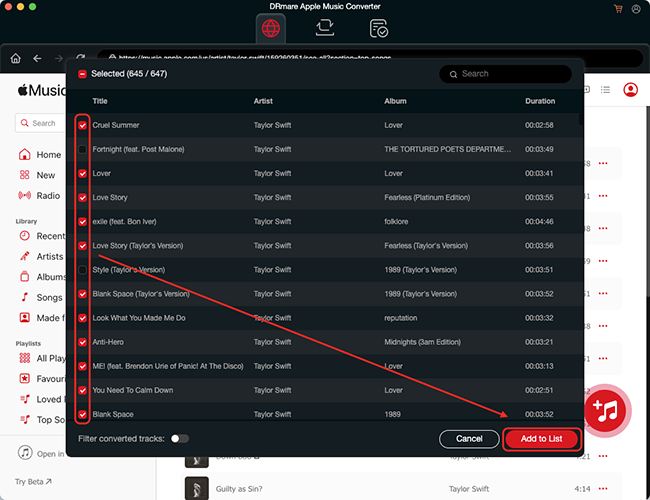
Click the "Download" link to install the free trial version of DRmare Apple Music Converter. Then open it and you will see the integrated Apple Music Web Player. You can then click the "Add" > "Add to List" button to select and import them from your music library to the conversion queue.
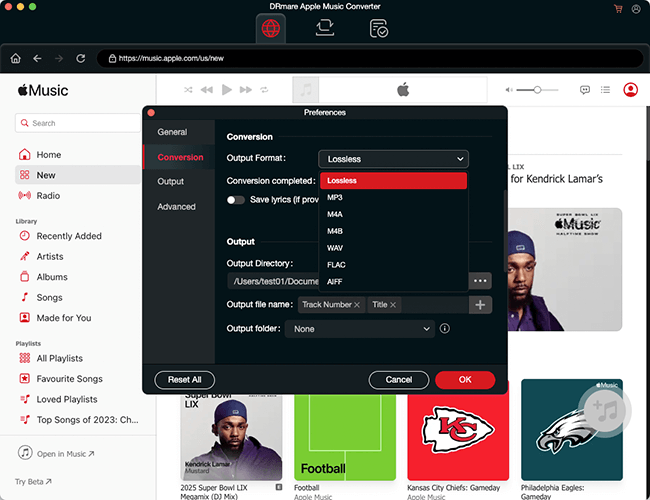
- Step 2Customize Apple Music output format
You can reset the output format and other parameters before converting Apple Music. To do this, click the "Menu" > "Preferences" > "Conversion" button to select the desired output format, sample rate, audio rate, etc. Then click the "OK" button to apply the changes.
- Step 3Download and back up Apple Music anywhere
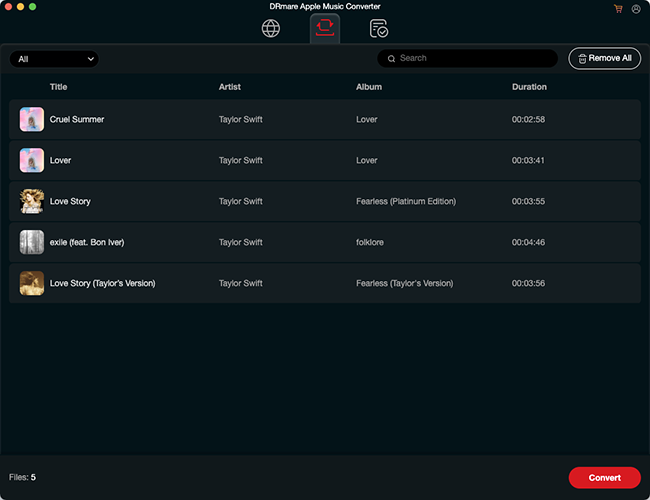
Click the "Convert" button and it will batch convert all the Apple Music songs you added. When it's over, you'll have a copy of Apple Music on your local drive. You can find them in your computer's folders by clicking on the "Output" folder. Or, you can directly click the "Converted" tab to find and listen to Apple Music offline. Now, you can connect your device to your computer and sync Apple Music downloads to it without any problem.
Disclaimer:
Always use converted music files according to applicable copyright laws and Apple Music terms. This type of tool is intended for personal music management and backup purposes.
Part 6. In Conclusion
Apple Music Sync Library remains the easiest way to keep your music collection available across iPhone, iPad, Mac, and Windows devices. Once enabled, your playlists, albums, and added songs can stay synchronized without manual transfers. However, Sync Library is designed for convenience rather than permanent storage. It depends on your Apple Account and Apple Music subscription, and it does not replace a true backup system.
For everyday listening, Sync Library is the best choice. For users who want additional control over their music collection, maintaining a separate local backup can provide extra flexibility. By combining Sync Library with a reliable backup strategy, you can enjoy your Apple Music collection with fewer syncing issues and greater control over how your music is managed.

 Home
Home





User Comments
Leave a Comment