


Did your Apple Music playlists suddenly disappear? Imagine spending years curating the perfect playlists, rating thousands of songs, and organizing your music library, only to have it vanish due to a glitch or a lapsed subscription. If you don't want to re-encounter this situation, it's time to back up your Apple Music library now! Read on to discover three reliable methods to back up your Apple Music tracks and keep your entire library forever, regardless of your subscription status.
Way 1. How to Back Up Apple Music Library on Local Device Forever
The biggest obstacle to keeping your Apple Music tracks forever is Digital Rights Management (DRM). While you can download songs for offline use as an Apple Music subscriber, the files are encrypted (typically M4P format). This protection prevents you from playing the audio files after your subscription lapses or from moving them to unauthorized devices. You cannot back up these Apple Music tracks on your local device forever.
The Solution: Use a Dedicated Apple Music Converter
To create a permanent backup of your Apple Music library, you must download and convert them to local files without protection. Here, you can use the excellent DRmare Apple Music Converter for this task. It specializes in stripping the copyright protection from all Apple Music songs, playlists, and albums and converts Apple Music to MP3, FLAC, WAV, M4A, and more.
During conversion, it preserves the original, lossless audio quality and retains all import ID3 tags (like artist, album art, title, and track number). Once converted, these Apple Music files are saved directly onto your computer, allowing you to move them to any external drive, cloud storage, or media player for a forever backup, one that you can keep and access forever.
How to Download and Back Up Apple Music Forever on Computer
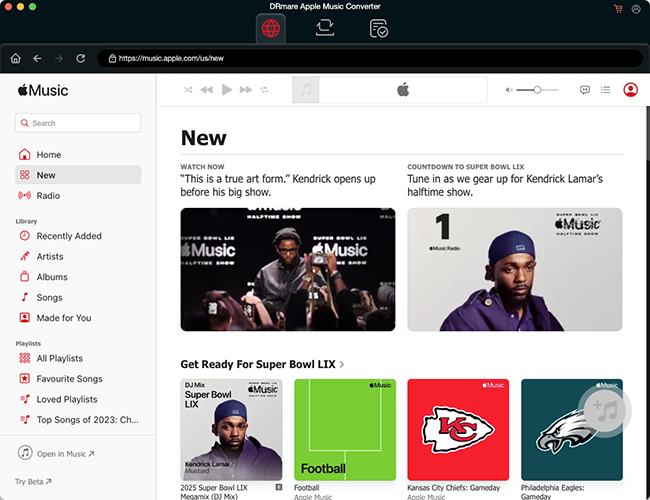
Step 1. Install DRmare Apple Music Converter on your Windows/Mac computer first by clicking the "Download" button above or navigating to the official website of DRmare. Open it and tap the "Sign In" button to authorize your account and browse your Apple Music library.
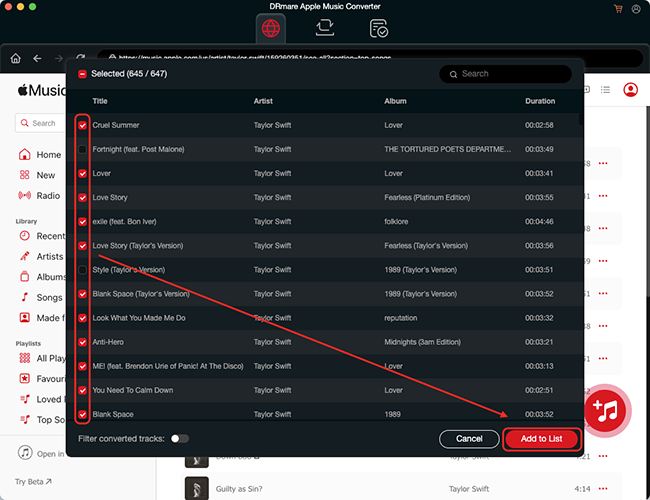
Step 2. Now, you can search for favorite songs and playlists that you'd like to keep forever. Once found, tap the "Add" button. A new window will pop up showing all the tracks from the album/playlist. Click the "Add to List" button to load the selected tracks into the conversion queue.
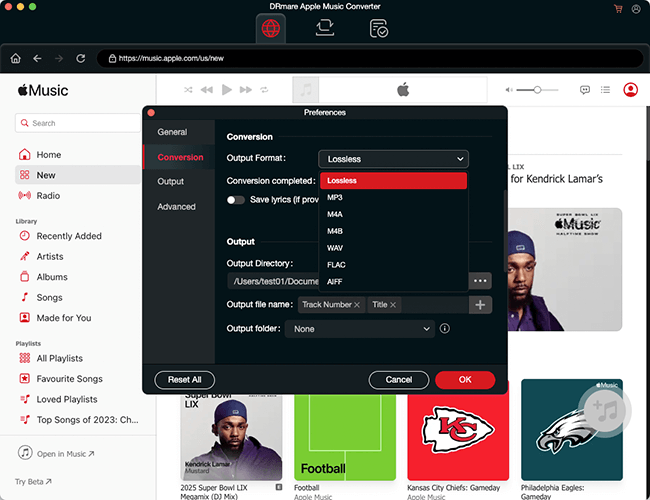
Step 3. Reset Apple Music output parameters if needed. Just click the "menu" icon or "DRmare Apple Music Converter" from the Apple menu bar to choose the "Preferences" option, and you can change the output format, channel, bitrate, and sample rate.
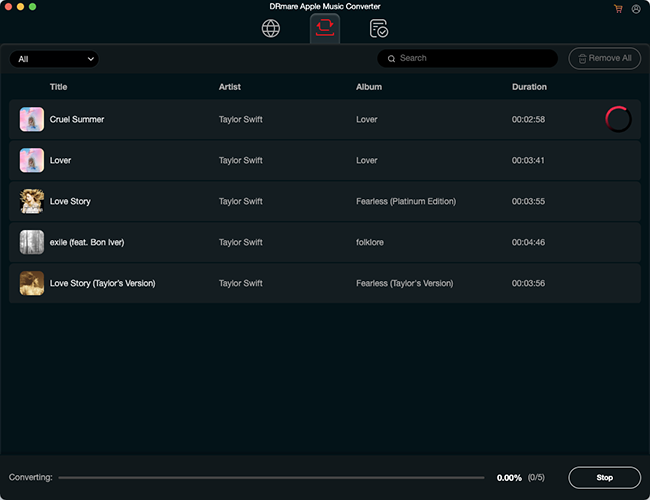
Step 4. Click the big "Convert" button under the "Converting" tab to start downloading Apple Music to your PC/Mac. It will download and back up these Apple Music songs on your device with a super-fast 30X speed.
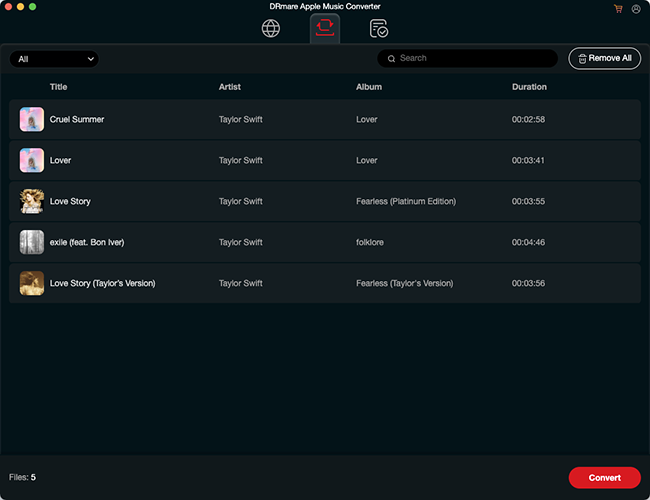
Step 5. After the conversion is complete, all songs will be saved on your local computer. Click the "Converted" buttons to find them. You can keep Apple Music forever as it belongs to you now. If necessary, you can transfer Apple Music downloads to any other device or external hard drive for backup.
Way 2. How to Back Up Apple Music to XML Files
If you don't want to use a third-party software, another way to secure your library structure is by exporting it as an XML file. This file is a lightweight text document that Apple (and many third-party apps) can read to rebuild your playlists if they are corrupted or lost. You can use the Music app or the iTunes app to make this process straightforward on your macOS and Windows computer.
For Mac Users
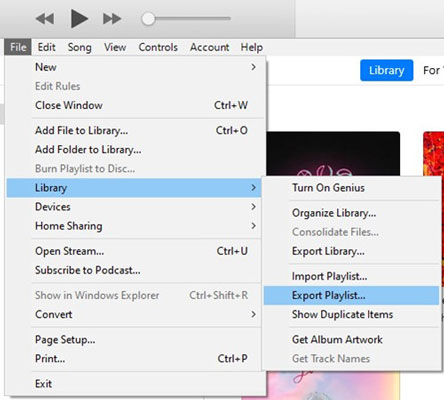
Step 1. Open the Music app on your Mac.
Step 2. In the top menu bar, navigate to "File" > "Library" > "Export Library…".
Step 3. A save dialog will appear. Name your file something descriptive, such as AppleMusicBackup_Date.xml, and save it to a secure location (like an external hard drive or cloud storage like Dropbox/Google Drive).
Step 4. If you want to back up specific playlists rather than the whole library, select the playlist in the sidebar first, then go to "File" > "Library" >"Export Playlist…".
For Windows Users
Step 1. Launch the iTunes app on your Windows computer.
Step 2. Click on "File" in the top-left corner, select "Library", then choose "Export Library".
Step 3. Save the resulting .xml file to your computer.
Way 3. How to Back Up iTunes Music to an External Hard Drive
If you have already purchased music through iTunes, imported your own CDs, or successfully converted your Apple Music streaming tracks, those files are stored locally in your iTunes/Music Media folder. Backing up this master folder to an external drive is the most straightforward way to secure your entire collection against computer failure, accidental deletion, or data loss.
How to Back Up Music on iTunes to an External Hard Drive
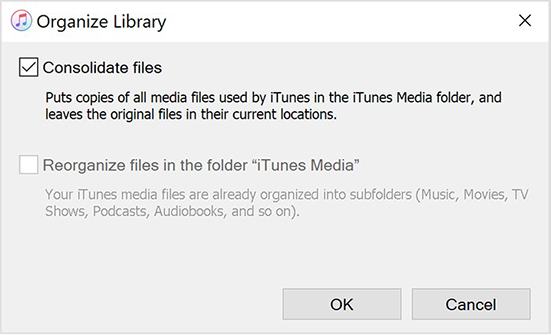
Step 1. On your computer, open iTunes and click on 'File' > 'Library' > 'Organize Library'.
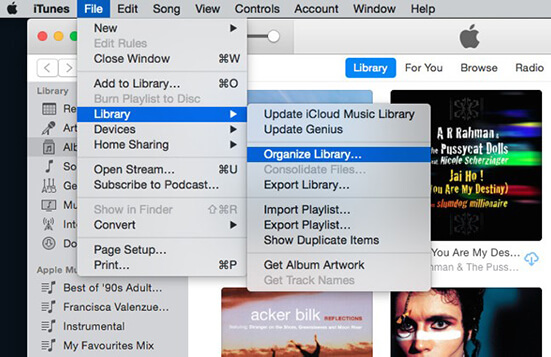
Step 2. Turn on 'Consolidate files' and click on the 'OK' button.
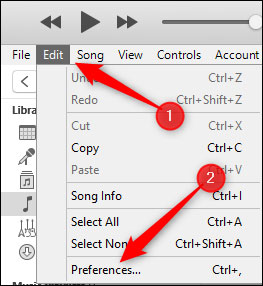
Step 3. Now back to the main interface and click on 'Edit' > 'Preferences'.
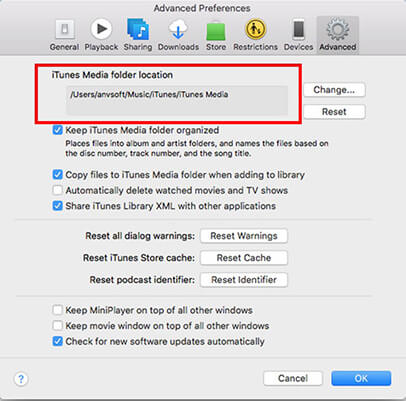
Step 4. Click on the 'Advanced' tab to find the 'iTunes Media folder location'.
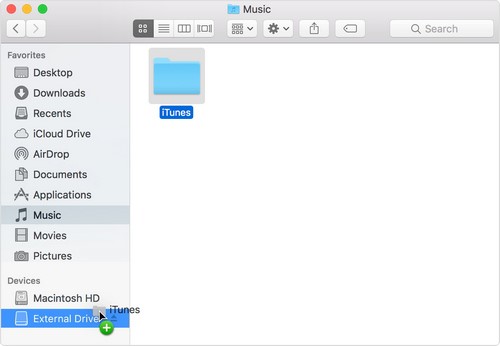
Step 5. Quit iTunes and find your iTunes folder (iTunes Media folder location) on your computer.
Step 6. Right-click on your iTunes folder and select 'Copy'. Then paste it into your external hard drive. Or you can drag and drop the iTunes folder directly to external drive folder.
Part 4. Comparison of the 3 Best Ways to Back Up Apple Music Playlist
We've explored three distinct approaches to securing your Apple Music collection, each offering a different type of protection and file access. While all three are valuable, they serve different purposes.
So, which method is the best fit for your needs? Below is a comparison table that highlights the main differences, benefits, and drawbacks of each approach, helping you decide how to achieve the most permanent and accessible backup.
| Feature | Way 1: DRM Removal & Conversion | Way 2: Export to XML | Way 3: External Drive Backup |
|---|---|---|---|
| What File to Back Up | Apple Music and iTunes songs | Library metadata, ratings, play counts | Local Music Media Folder (owned files) |
| Subscription Required? | No (files are permanent) | No (saves structure data) | No (only for owned/converted files) |
| Access After Unsubscribing | Permanent access | Yes (can restore playlist structure later) | Permanent access |
| File Quality | Lossless/High Quality (Original) | N/A (metadata only) | Varies based on source |
| Purpose | Ultimate permanence & flexibility | Preserving playlist structure and stats | Data loss prevention (physical copy) |
| Best For | Users who want to own their music forever and play it anywhere. | Backing up playlist logic, ratings, and play history. | Creating a secure, restorable copy of the local library. |
Part 5. FAQs about Backing Up Apple Music Library
Can You Back Up Apple Music with the Sync Library Feature?
The short answer is No. You can use Apple Music Sync Library to keep your library updated across all your devices, but it's not a backup function. Syncing is a mirror; if you accidentally delete a playlist on your iPhone, it is instantly deleted from your Mac, your iPad, and the cloud. To truly protect your collection, you need a static, offline backup.
Does cancelling my subscription delete my Apple Music library?
Yes, but not immediately. If you cancel your subscription, you lose access to the streaming catalog immediately after the billing cycle ends. Apple retains your library data for a short period (often 30–90 days) in case you resubscribe, but after that, it is permanently deleted.
Part 6. In Conclusion
Losing years of playlists, ratings, and listening history can be devastating, but it doesn't have to happen again. By taking time to properly back up your Apple Music library, you ensure your songs, playlists, and data stay safe no matter what happens to subscriptions, devices, or software glitches.
Using DRmare Apple Music Converter is the best way to back up Apple Music playlists. Because it saves real Apple Music files to your computer, you can use them anytime and anywhere.


User Comments
Leave a Comment