


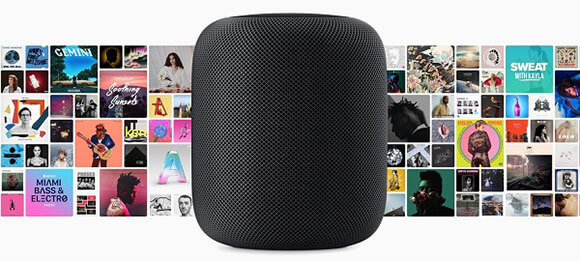
For a seamless home listening experience with Apple Music, the HomePod and HomePod mini are top choices. Designed to integrate deeply with the Apple ecosystem, they prioritize exceptional audio quality. The larger HomePod uses a high-excursion woofer, a custom array of seven beamforming tweeters, and an A8 chip to deliver rich, immersive sound.
Once your HomePod is set up, your entire Apple Music library is instantly available. While the integration is intuitive, using the right control method can enhance your experience. Whether you prefer using Siri with hands-free voice commands or controlling playback directly from your iPhone, this guide will walk you through four simple methods to play Apple Music on your HomePod.
Part 1. How to Ask Siri to Play Apple Music on HomePod without iPhone
The HomePod is a versatile device that can manage your music, handle personal requests, and control your smart home. You can operate it using the touch screen, the Home app, or your device's Control Center.
However, the most intuitive way to play Apple Music on HomePod and HomePod mini is with your voice. Here's how to set up your HomePod devices:
Set Up Apple Music for HomePod
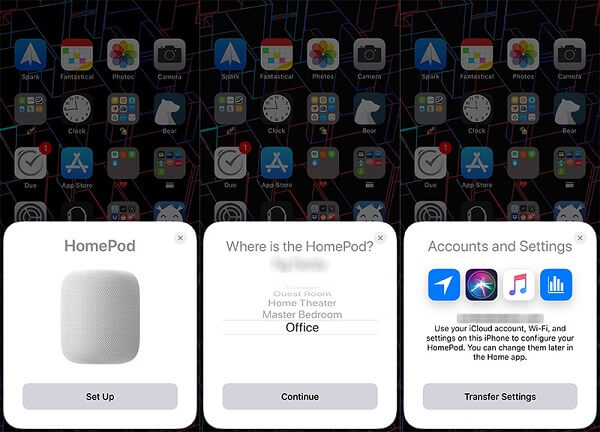
Step 1. Power on HomePod, you will hear a chime and see a pulsing white light on the top.
Step 2. Swipe up to unlock your iPhone and then hold it near your HomePod. You will see the "Set Up" menu. Please simply tap on it.
Step 3. It will prompt you to do a few settings, such as which room your HomePod is in, terms and conditions, to read your messages, set a reminder, and more. Click the "Enable Personal Requests".
Step 4. To access Apple Music, please tap "Transfer Settings". You are required to input your Apple Account and password to identify your account during the process. It takes a few seconds to connect Apple Music to HomePod.
Ask Siri to Listen to Apple Music on Apple HomePod
Since your HomePod is already connected to the Apple Music account linked to your Apple Account, you can start using it immediately. Simply say "Hey Siri," followed by your request.
Essential Siri Commands for Playback
- To play a specific song or artist: "Hey Siri, play Flowers by Miley Cyrus." or "Hey Siri, play something by Taylor Swift."
- To play an album or playlist: "Hey Siri, play the album Renaissance." or "Hey Siri, play my Workout playlist."
- To play genres or moods: "Hey Siri, play some relaxing music." or "Hey Siri, play the top hits from the 90s. or "Hey Siri, play some chill music."
- To control playback: "Hey Siri, volume up." "Hey Siri, pause the music." or "Hey Siri, skip this song." or "Hey Siri, turn on repeat."
Manage Apple Music Library with Siri
You can also use Siri to tailor your Apple Music recommendations and build your library without ever touching your phone.
- While a song is playing, say: "Hey Siri, I like this song." to improve your future suggestions.
- To add the current track to your collection, say: "Hey Siri, add this to my library."
- You can even add a song to a specific playlist: "Hey Siri, add this song to my Road Trip playlist."
Part 2. How to Play Apple Music from iPhone/Mac to HomePod
While the HomePod's design is sleek and minimalist, its true power lies in its deep integration with the Apple ecosystem. For times when you want to control your Apple Music from your device, AirPlay 2 offers a simple and effective solution.
This is a great option when you prefer to browse your Apple Music library visually on your iPhone, iPad, or Mac. AirPlay 2 allows you to easily cast whatever you're listening to directly to your HomePod, which is also a perfect workaround if Siri has trouble understanding a complex song or artist name.
AirPlay Apple Music from an iPhone or iPad to HomePod
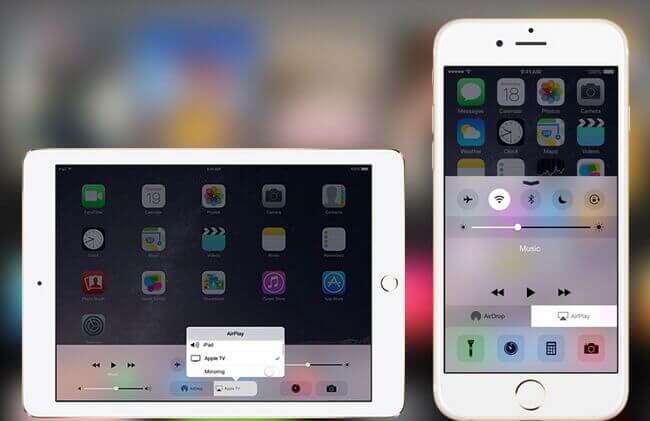
Step 1. Open the Apple Music app on your iPhone or iPad and start playing a favorite song.
Step 2. Tap the "AirPlay" icon at the bottom of the Now Playing screen. It looks like a triangle with concentric circles.
Step 3. In the list of available devices, tap the name of your HomePod. The Apple Music audio will instantly switch from your device to the HomePod speaker.
AirPlay Apple Music from a Mac to HomePod
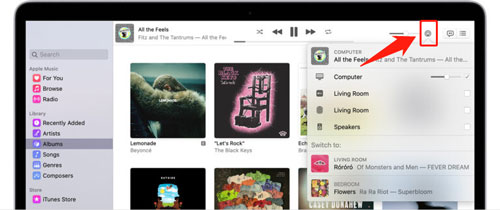
Step 1. Launch the Apple Music app on your Mac computer.
Step 2. Click the "AirPlay" icon at the top and select your HomePod device.
Step 3. Now you will listen to Apple Music playing on your HomePod.
Part 3. How to Listen to Apple Music on HomePod via Handoff
For a truly seamless experience between Apple Music and HomePod, you can use the Handoff feature. It allows you to instantly "pass" music between your iPhone and your HomePod mini or HomePod (2nd generation) by bringing them close together. It's a simple and magical way to transfer your audio with just a single tap.
Step 1. Ensure your iPhone is on the same Wi-Fi network as your HomePod and has Bluetooth enabled.
Step 2. Go to your iPhone's "Settings" > "General" > "AirPlay & Handoff" and make sure "Transfer to HomePod" is turned on.
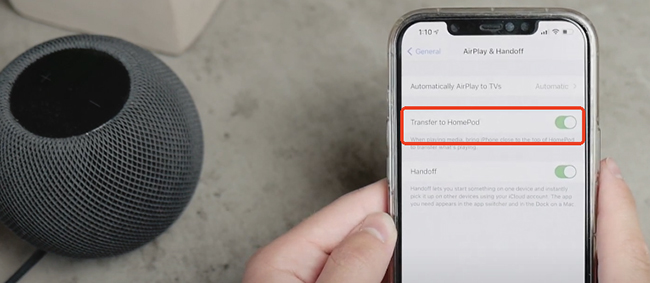
Step 3. Open the Music app and play a loved song on your unlocked iPhone.
Step 4. Bring your iPhone close to the top of the HomePod. You will feel a haptic vibration, and a notification will appear on your iPhone, confirming the audio has been transferred.
Part 4. How to Play Music on HomePod without Apple Music Subscription
While an Apple Music subscription grants you access to millions of songs on HomePod, it also means your music is tied to that service. If you've ever wanted to truly own your music and play it on a HomePod without a subscription, a powerful converter tool like DRmare Apple Music Converter can help.
This software allows you to convert Apple Music tracks to MP3, FLAC, WAV, and other unprotected audio files. Once converted, these files can be transferred and played on any device, including your HomePod, without any restrictions. This gives you the freedom to build your own personal music library that you can enjoy anytime, anywhere, even if you cancel your subscription.
How to Play Music on Apple HomePod without Apple Music
- Step 1Add Apple Music tracks for HomePod
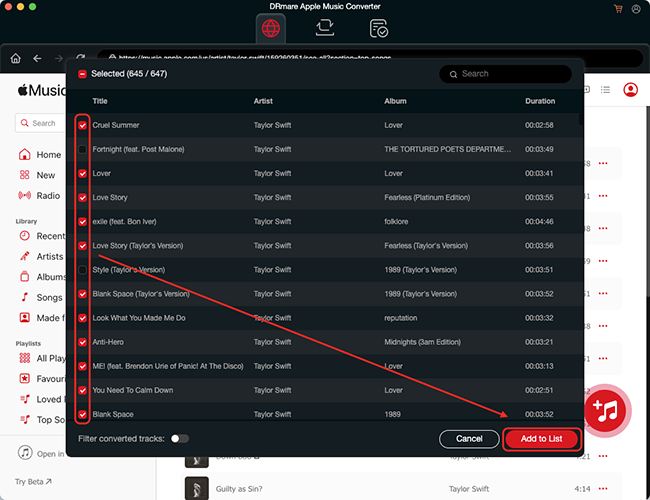
Please download, install, and open the DRmare Apple Music Converter on your computer. Then click the "Sign In" button at the top-right corner within the built-in Apple Music Web Player to authorize your Apple Account. Now, you can search and add Apple Music by clicking the "Add" > "Add to List" button.
- Step 2Set Apple Music output format for HomePod
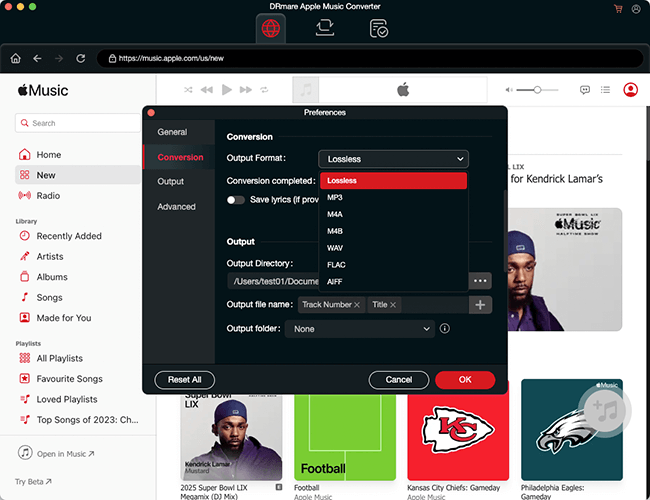
To make Apple Music playable with HomePod, you need to convert Apple Music M4P to a commonly-used audio format. Click on the "DRmare Apple Music Converter" or "menu" icon to choose the "Preferences" > "Conversion" option. You can customize Apple Music output format, sample rate, bit rate, etc., for HomePod.
- Step 3Convert Apple Music for HomePod
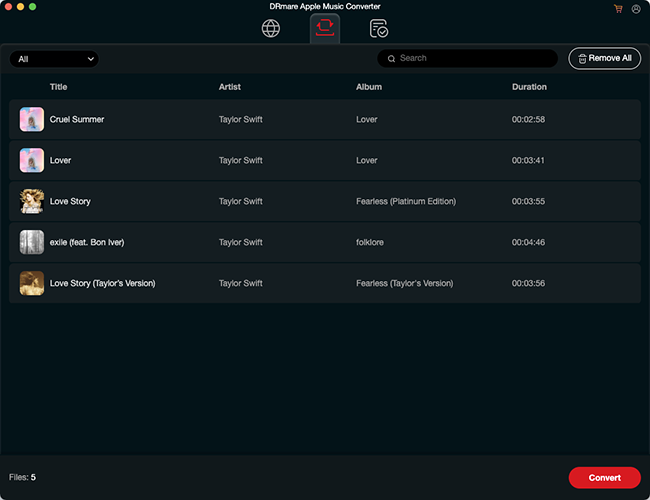
Finally, just click the "Convert" button to start converting Apple Music files for HomePod. When the conversion is finished, you can click on the "Converted" > "Folder" icon to locate and listen to the converted Apple Music files. You can keep and listen to these common Apple Music audio files on any device you want.
- Step 4Transfer and Play Music on HomePod
-
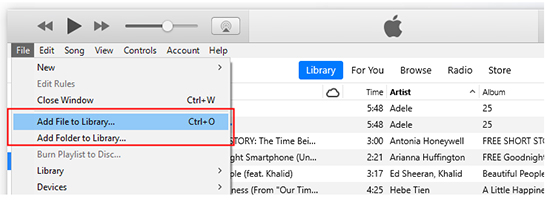
Open the Apple Music app on your Mac or iTunes on your PC. Drag and drop your converted Apple Music files directly into the Music app window. Alternatively, you can go to the "File" menu and select "Add File to Library" to import the songs.
-
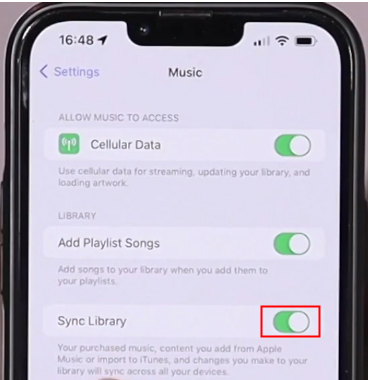
Make sure "Sync Library" is enabled in your Apple Music settings. This will upload the new songs to your iCloud Music Library, making them available on all your devices.
- Once the converted files are in your library, you can use either your computer or a synced iPhone/iPad to play them. Use the "AirPlay" icon within the Music app on your device to select your HomePod as the playback speaker.
Part 5. How to Fix Apple Music Not Working on HomePod
If you're encountering an issue with Apple Music not playing on HomePod, there are some troubleshooting steps you can take to resolve the issue.
1. Check your Internet connection:
Make sure your HomePod is connected to a stable Wi-Fi network. If your connection is weak or unstable, it may cause problems with streaming music in Apple Music.
2. Restart HomePod:
Sometimes, a simple restart can help resolve any temporary glitches or issues with HomePod. To restart HomePod, unplug it from the power source, wait a few seconds, then plug it back in.
3. Update your HomePod and Apple Music app:
Make sure your HomePod and the Apple Music app on your iOS device are both running the latest software versions. Updates often include bug fixes and improvements that can help resolve compatibility and performance issues.
4. Check for restrictions:
If you have restrictions set on your HomePod or iOS device, it may be preventing Apple Music from functioning properly. Go to the Settings app on your iOS device, navigate to "Screen Time" > "Content & Privacy Restrictions", and make sure Apple Music isn't restricted.
5. Reset HomePod:
If none of the above steps work, you can try resetting HomePod to factory settings. Keep in mind that this will wipe all settings and data on your device, so make sure you back up any important information before proceeding.
To reset HomePod, open the Home app on your iOS device, press and hold the HomePod tile, tap "Settings", then tap "Reset HomePod". Follow the on-screen instructions to complete the reset process.
If you've tried all of the above steps but Apple HomePod or HomePod mini still is not playing Apple Music, you may want to contact Apple Support for further assistance. They can provide personalized troubleshooting and support to help get your HomePod back up and running with Apple Music.
Part 6. FAQs about Using Apple Music for HomePod
Does HomePod come with Apple Music?
No, a HomePod does not include a permanent Apple Music subscription. However, Apple frequently offers a promotional free trial of Apple Music (often up to 6 months) for new subscribers who have purchased an eligible audio device like a HomePod, AirPods, or Beats headphones.
Do you need Apple Music for HomePod/HomePod Mini?
Can HomePod play Apple Music without an iPhone?
Yes, absolutely. Once the HomePod is set up and connected to your Wi-Fi network, it can stream Apple Music directly from the internet. You can use Siri voice commands to request songs, playlists, or albums, and the HomePod will play them without needing your iPhone to be nearby or even turned on.
Can I Listen to Apple Music Lossless on HomePod?
Yes. All HomePod models—the original HomePod, HomePod mini, and HomePod (2nd generation)—support Apple Music's Lossless Audio format. To enable it, you need to open the Home app, go to Home Settings > Your Profile > Apple Music, and toggle on "Lossless Audio".
Additionally, the original HomePod and HomePod (2nd generation) also support Spatial Audio with Dolby Atmos.
Does HomePod only work with Apple Music?
No, it does not. While it has the deepest integration with Apple Music, you can use other streaming music services, such as Spotify, Pandora, or YouTube Music.
Part 7. In Conclusion
Today's discussion provided a comprehensive guide on playing Apple Music on your HomePod, covering multiple methods. We explored how to use the HomePod's built-in controls, voice commands with Siri, and Handoff for seamless transitions. We also discussed using AirPlay 2 to stream music from your iPhone or Mac and learned that DRmare Apple Music Converter can be used to convert Apple Music tracks for playback without a subscription. Hope you can get the best possible Apple Music listening experience from your Apple HomePod.


User Comments
Leave a Comment