


Spotify's queue feature is designed to give you control over what plays next, but it can sometimes feel like it has a mind of its own. If you've ever found yourself wondering why certain songs won't go away or how to simply start fresh, you're not alone. This guide will cover everything you need to know about managing and clearing your Spotify queue on desktop, mobile, and the web, putting you back in charge of your listening experience.

We'll walk through the official methods to clear Spotify queue, a pro-level trick for wiping the slate clean, and solutions to common problems.
Part 1. What Is the Spotify Queue, Really?
At its most basic, the Spotify queue is a temporary, on-the-fly playlist that a user can build and modify during a listening session. It is designed to be distinct from permanent, saved playlists.
However, the reality for many users is far from this ideal. Instead of providing control, the queue often seems to have a mind of its own, repopulating with unwanted songs, making it difficult to remove tracks, or continuing to play long after a user expected it to stop. This experience is not due to user error but is a direct result of the queue's layered design, which combines user-selected tracks with Spotify's own automated selections in a way that is not always transparent.
The Core Conflict: "Next in Queue" vs. "Next Up"
The primary source of confusion for most users is the fact that what appears as a single "queue" is actually composed of at least two distinct, invisible lists that operate under different rules: "Next in Queue" and "Next Up" (sometimes labeled "Next from").
"Next in Queue"

It represents the portion of the queue that the user directly controls. This section contains only the songs that have been manually added using the "Add to Queue" function. These tracks are given the highest priority by the Spotify app and will always play before any other music. The "Clear Queue" button, a feature that many users struggle to find, is exclusively tied to this section. If there are no manually added songs, this section—and its corresponding "Clear Queue" button—will not be visible.
"Next Up" (or "Next from")

It is the part of the queue that Spotify controls. It is automatically populated with the remaining tracks from the album or playlist that is currently being played. If the "Autoplay" feature is enabled in settings, this section will also be filled with Spotify's algorithmic recommendations after the current context (the album or playlist) concludes.
Crucially, there is no button to "clear" the "Next Up" list. Instead, its contents are entirely replaced when a user starts playing new content from a different source, such as a new album, a different playlist, or a single track from the search page.
This fundamental difference in how the two lists are managed is the key to understanding and controlling the queue. To provide a clear, scannable reference, the table below summarizes the critical differences between these two components of the Spotify queue.
| Feature | Next in Queue | Next Up / Next From |
|---|---|---|
| Source | Songs you manually add using "Add to Queue". | Songs from the album/playlist you're playing, or from Autoplay/Radio. |
| Control | Full control: Add, remove, reorder (Premium only). | Limited control: Cannot be "cleared" directly. Replaced when you play new content. |
| Priority | Highest. These songs will always play first. | Lower. Plays after "Next in Queue" is empty. |
| How to Clear | Use the "Clear Queue" button or remove individually. | Turn off Autoplay and play a new song/playlist to reset the context. |
Part 2. How to Clear Spotify Queue on Mobiles
Navigating the Spotify app to clear your queue can feel different depending on whether you're using an iOS or Android device. Let's start with the procedure for clearing your queue on an iPhone and iPad.
Clear Spotify Queue on iPhone and iPad
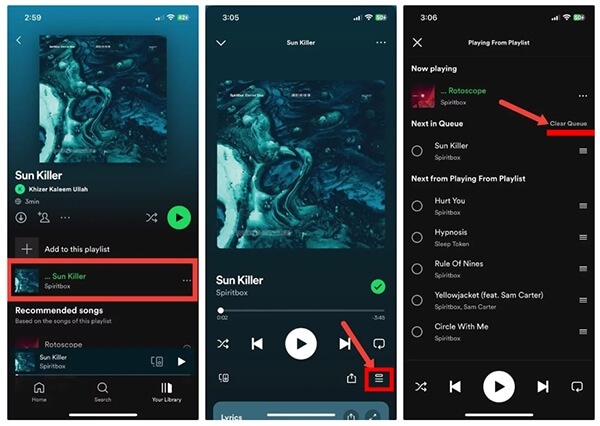
Step 1. Turn on the Spotify app on your iPhone. And input your Spotify ID and password.
Step 2. Start to play any song. Then click the playing song to enter the "Now Playing" screen. A queue icon will show up on the bottom right corner.
Step 3. Tap the "Queue" icon, usually represented by a list icon and view the entire Spotify queue playlist.

Step 4. Find the option to clear the queue, often labeled as "Clear Queue," and tap on it to remove all queued songs on iOS devices.
Clear Spotify Queue on Android
Step 1. Open the Spotify app on your Android phone. Then log in to your Spotify account.
Step 2. Tap the current playing track from the bottom. Start to play any track if no song is playing.
Step 3. The "Queue" icon is on the bottom right corner. Click it.
Step 4. Look for the option to delete queue on Spotify, usually labeled as "Clear Queue", next to the "Next in Queue" section. Click on it to remove all songs from the queue on Android phones.
Remove Individual Songs on Spotify Queue on iOS and Android
If you don't want to remove all songs and playlists from queue on Spotify, you can choose to remove something from the Spotify queue, such as individual songs. Here's how to.
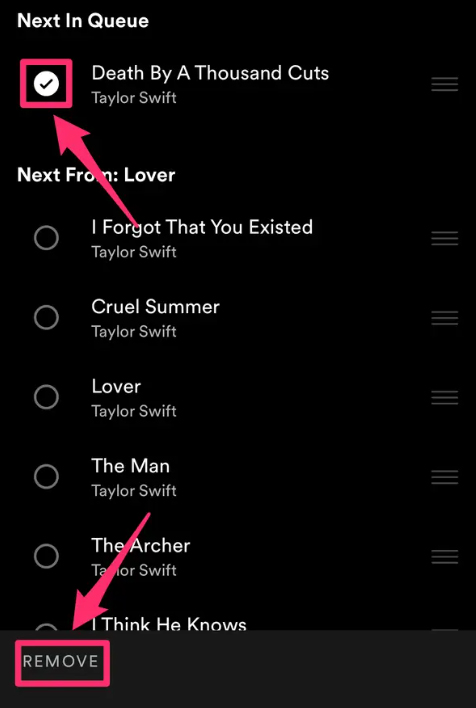
Step 1. Navigate to the bottom of the screen where the currently playing track is displayed. Click on the "Queue" option to view the list of queued songs.
Step 2. There is a circle option box next to each track. Tap the song you want to delete and choose "Remove" from the left corner.
Part 3. How to Clear Queue on Spotify Desktop
The Spotify queue feature is also available on Mac and Windows computers. It's a simple task to delete the queue on the Spotify desktop app. Here, we will walk you through the steps on how to do it:
Erase Queue on Spotify Desktop
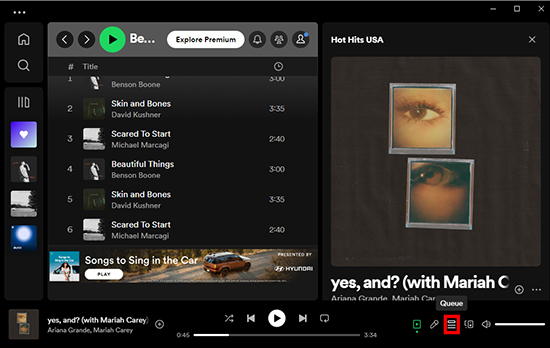
Step 1. Enter the Spotify app on the desktop. Choose the song that is currently playing. On the right side of the playing bar, you can see a Queue icon, often represented by three horizontal lines or a list icon.
Step 2. Click the "Queue" icon and it will open a new window. You can view the queue on Spotify.
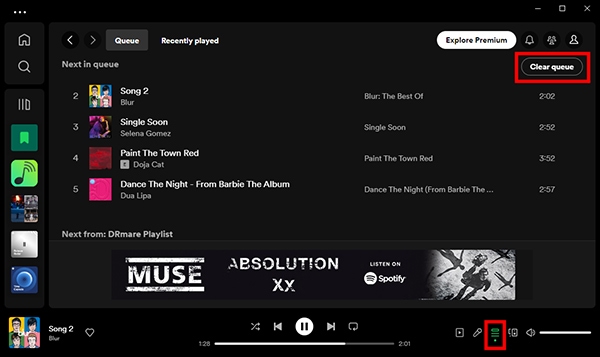
Step 3. Next to the "Next in Queue", you can find the "Clear Queue" button. Click it and delete the entire playlist songs on computer.
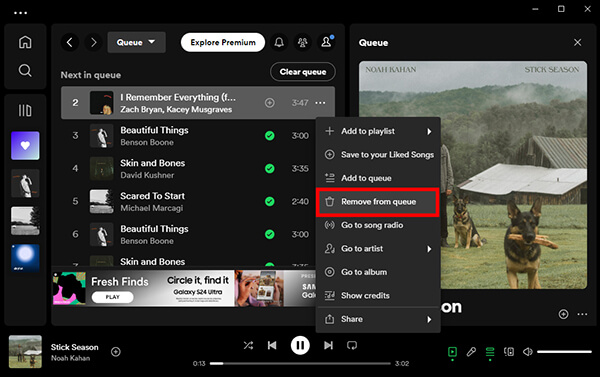
Remove Individual Songs from Queue on Spotify Desktop
If you find that your queue is filled with songs you'd like to remove or rearrange, Spotify makes it easy for you to erase specific songs in the queue. You can follow the steps to do it on computer.
Step 1. In the Now Playing screen, locate the "Queue" option. It will bring you into the queue window.
Step 2. In the queue, identify the song you want to remove. Right-click on the specific song you wish to eliminate from the queue. Or click the "three-dots" icon next to each track.
Step 3. Scroll down and look for the option that says "Remove from Queue" and click on it to delete a specific song.
Part 4. Wiping the "Next Up" Spotify Queue
The "Clear Queue" button works perfectly for songs you've manually added, but as we learned in Part 1, it has no effect on the automated "Next Up" list. This is why music often continues playing from your original album or playlist even after you've cleared your queue. To stop this never-ending playback and achieve a truly clean slate, you need a different approach.
Step 1. In the Spotify desktop app, click on the user's profile picture in the top-right corner and select "Settings".

Step 2. Scroll down to the "Playback" section and locate the toggle for "Autoplay". Ensure this feature is switched off to prevent Spotify from adding recommended songs after the queue ends.
Part 5. Taking Your Playlists Offline for Total Listening Freedom
Managing the queue is one thing, but what if you could bypass online streaming limitations altogether for a truly seamless listening experience? If you're tired of battling Autoplay or just want your music available anytime without surprises, the best approach is to create your own offline library.
This is where a tool like DRmare Spotify Music Converter becomes invaluable. It allows you to download any song, playlist, or album from Spotify and convert it into a standard MP3 or other audio file on your computer. The primary benefit is that you gain complete control. Once downloaded, these files are yours to keep, and you can play them on any device, in any order, without needing an internet connection or worrying about a live queue. This works for both Spotify Premium and Free users.
This method is perfect for ensuring your favorite playlists are always available for flights, road trips, or workouts without relying on the Spotify app's behavior.
Part 6. Conclusion
Clearing your Spotify queue is easy once you understand how it works. You can use the dedicated Clear queue button for any songs you've added yourself, or simply play a new track to override the entire list. By turning off Autoplay and clearing your cache when needed, you can solve the most common issues. And for those who seek ultimate control over their listening, tools like DRmare offer a path to a truly personal and uninterrupted offline music library. You are now fully equipped to manage your Spotify music, not the other way around.


User Comments
Leave a Comment