


Sharing a great playlist with friends during a gaming session is a fantastic experience. While you can easily play Spotify on Discord, you've probably noticed that getting your favorite tunes to play on TeamSpeak isn't as straightforward. If you've been searching for a "TeamSpeak Spotify plugin," you know by now that there isn't an official one.
But don't worry. It's absolutely possible to stream Spotify through your TeamSpeak server. This guide will walk you through three effective methods to get the music playing, from using bots to a more advanced local setup.
Method 1: Use a TeamSpeak Music Bot to Play Spotify
One of the most popular ways to play music on TeamSpeak is by using a dedicated music bot. These are essentially automated users that sit in your channel and stream audio from various sources, including Spotify.
There are two main types of music bots you can use:
- Commercial Bots: Services like TS3MusicBot and TS3AudioBot offer bots that you can rent for a monthly fee. This is the easiest option, as the setup is handled for you. You get a web interface to manage your music, queue up Spotify playlists, and control playback with simple chat commands.
- Self-Hosted Bots: For the more technically inclined, you can host your own music bot using free, open-source projects. These bots often provide a more "legit" Spotify integration by using the official API, meaning you get better audio quality and no workarounds. This requires a bit more setup on a home server or a VPS.
How to Use a Rented TeamSpeak Music Bot
Using a rented music bot is the most direct way to play music on your TeamSpeak server. You pay a small monthly fee to a hosting service, and they provide a fully managed bot that you control through a web panel and simple chat commands.
- Step 1Rent the Music Bot

First, choose a hosting provider that offers TeamSpeak music bots, such as ZAP-Hosting or TS3MusicBot.net. Browse their subscription plans and select one that fits your needs. After you complete the purchase, the provider will give you access to a web control panel.
- Step 2Configure the Bot
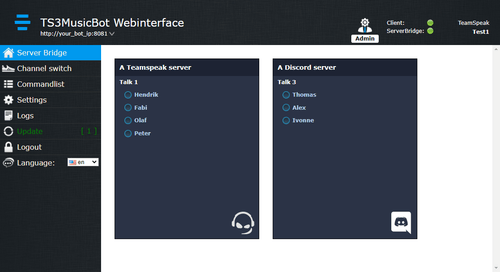
In the web control panel, you will need to enter your TeamSpeak server details, including the server address and password (if it has one). You can also set a custom name for your bot, like "Jukebox" or "DJ." This web panel is also where you will manage settings and permissions.
- Step 3Control the Bot with Chat Commands
Once configured, the bot will join your specified channel on your TeamSpeak server. You and other users can now control it using simple chat commands typed directly into the TeamSpeak channel.
- !play [song name]: Searches for and plays a song.
- !link: Plays audio directly from a supported URL (e.g., YouTube, SoundCloud).
- !queue: Displays the current song queue.
- !stop: Stops playback.
- !volume +/-: Adjusts the bot's volume.
Method 2: Play Spotify on TeamSpeak via Virtual Audio Cable
If you prefer a free, hands-on approach, you can turn your own computer into a music source using a virtual audio cable. This method tricks TeamSpeak into thinking your Spotify audio is a microphone input. It's clever, powerful, and gives you full control.
- Step 1Install a Virtual Audio Cable

First, you need software to create a virtual audio device. The most popular choice is VB-CABLE Virtual Audio Device. Download and install it on your computer; it will create a new input and output device without needing any complex configuration.
- Step 2Configure Spotify and Windows Sound Settings
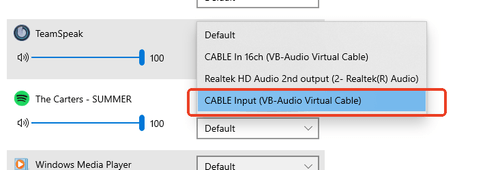
Next, you need to tell Spotify to send its audio to the new virtual cable. In your Windows sound settings, find the "App volume and device preferences" page. Set the output for the Spotify app to CABLE Input (VB-Audio Virtual Cable). Now, all sound from Spotify will be routed through this virtual device instead of your headphones.
- Step 3Create a Separate "Bot" Identity in TeamSpeak (Crucial Step)
This is the most important step for a good experience. To avoid mixing your voice with the music, you'll connect to the server twice: once as yourself and once as a "music bot."
Step 1. In TeamSpeak, go to Settings > Identities and click "Add" to create a new identity. Name it something like "MusicBot."
Step 2. Go to Tools > Options > Capture. Click the "+" icon to create a new capture profile, also named "MusicBot." Set its Capture Device to CABLE Output (VB-Audio Virtual Cable) and set the activation to Continuous Transmission.
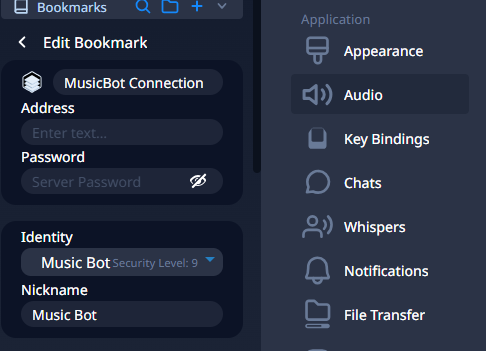
Step 3. Finally, go to Bookmarks > Manage Bookmarks. Add a new bookmark for your server, name it "MusicBot Connection," and under "Identity," select the "MusicBot" identity you just created.
Step 4. Now you're ready. First, connect to your server using your normal bookmark. Then, open a new tab and connect again using your new "MusicBot Connection" bookmark. You will now see two versions of yourself in the channel. Start playing a song on Spotify, and the "MusicBot" user will broadcast it to the channel for everyone to hear. Other users can now individually mute the music bot if they choose.
Method 3 (Recommended): Download Spotify Music for Safe Sharing
While the streaming methods above work, they come with potential drawbacks. Music bots can sometimes play low-quality versions or the wrong song entirely by grabbing a faulty search result from YouTube. Streaming with a virtual cable requires you to be online and running Spotify constantly.
For the most reliable, high-quality experience, the best approach is to download your Spotify music as local MP3 files. This gives you a permanent library of your favorite tracks that you can play on TeamSpeak anytime, even offline, without any streaming errors.
This is where a tool like DRmare Spotify Music Converter becomes essential. It's designed to download any song, playlist, or album from Spotify and convert it into a standard audio file, giving you complete control for a perfect listening experience on TeamSpeak.
How to Use DRmare to Download Spotify Music for TeamSpeak
- Step 1Install and Set Up DRmare
First, download and install DRmare Spotify Music Converter on your computer (Windows or Mac). Launch the program. The built-in Spotify web player will open, log in to your Spotify account there.
- Step 2Add Spotify Music to DRmare
Once logged in, find the song, playlist, or album you want to convert. Select it, then drag and drop the music directly onto the green music icon located at the bottom-right corner of the DRmare screen. A list will pop up showing the tracks; click "Add to list" to confirm.
- Step 3Adjust Output Settings
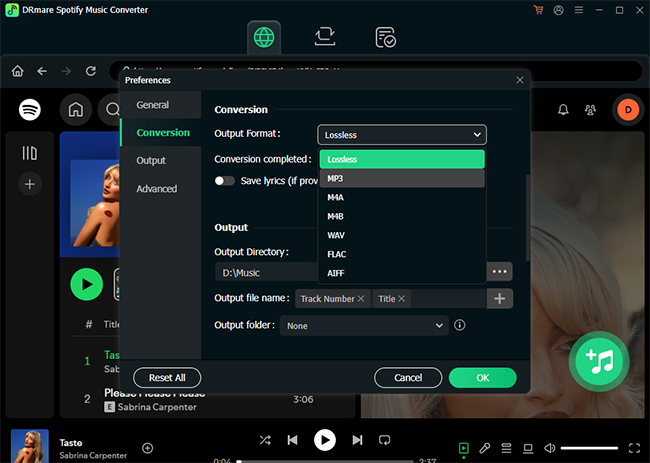
Before converting, you can set your preferred format and quality. Go to the menu icon in the top-right corner and select "Preferences." In the new window, under the "Conversion" section, you can choose the output format (like MP3, FLAC, etc.) and adjust the audio quality. Click "OK" to save your changes.
- Step 4Convert and Access Your Music
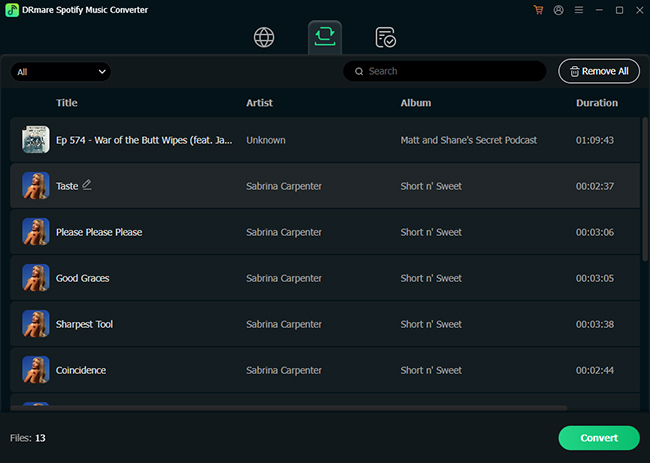
Click the "Convert" button to begin downloading the tracks. After the conversion is finished, you can find all your downloaded songs listed under the "Converted" tab. From there, you can open the folder on your computer to access the local MP3 files.
FAQs About Using Spotify on TeamSpeak
Do I need Spotify Premium for these methods?
Not necessarily. Both the virtual audio cable method and most music bots will work with a Spotify Free account, though you and your listeners will hear ads. DRmare Spotify Music Converter also works with both Free and Premium accounts, but it has the added benefit of removing ads from songs downloaded from a Free account.
Why did the music bot play the wrong song?
This is a very common issue. Most bots don't stream directly from Spotify. When you provide a Spotify link, the bot reads the song title and then searches for it on YouTube. If the top YouTube result is a cover, a live version, or an unrelated video with a similar name, the bot will play that instead. This is the main reason downloading the track first is more reliable.
Is it safe to use bots or stream audio to TeamSpeak?
Streaming audio from Spotify to a group using bots or a virtual audio cable is technically against their Terms of Service, which state the service is for "personal, non-commercial use." While action against small, private groups is uncommon, using a method that doesn't re-broadcast the stream, like playing downloaded local files, is the safest approach that fully respects the terms.
Is there a completely free way to play Spotify on TeamSpeak?
Yes. The virtual audio cable (VAC) method is 100% free, as it only requires free software downloads. However, it is the most hands-on method and requires careful setup to ensure it works correctly without interfering with your own microphone's audio.
Conclusion
While TeamSpeak may not have a direct "Connect to Spotify" button, there are plenty of powerful ways to share your favorite music. Music bots offer convenience, and virtual audio cables provide a free, hands-on solution.
However, considering Spotify's terms of service, the safest and most reliable method is to first download your music using DRmare Spotify Music Converter. This approach not only respects the platform's rules but also gives you permanent, high-quality copies of your songs that you can use on TeamSpeak or any other device. You get the shared listening experience without any of the complications.


User Comments
Leave a Comment