





Quick Answer:
To play Spotify through your mic, route the Spotify desktop app into a virtual audio device, then select that virtual device as the microphone input in Discord, Zoom, OBS, or another app. Windows users can use VoiceMeeter or Stereo Mix, while Mac users can use Loopback or BlackHole.
Making Spotify play through your mic can be useful when you want friends in Discord, a game chat, or another voice app to hear your music. However, the music does not actually pass through your physical microphone. Instead, a virtual audio device routes Spotify into the receiving app as though it were microphone input.
On Windows, VoiceMeeter can mix Spotify with your real microphone and send both to Discord or another program. On Mac, Loopback offers a more direct application-level setup, while BlackHole provides a free but more technical alternative. In this guide, we will walk you through how to play Spotify through your microphone step by step.

Part 1. The Basics of Playing Spotify Through Your Mic (Virtual Audio Routing)
When you set up a virtual audio device, you are essentially creating a digital mixing board inside your computer. On Windows, software like VoiceMeeter mixes your physical microphone with Spotify and sends the combined signal to your chat app. Mac users rely on tools like Loopback or BlackHole to perform this same application-level audio routing.
Your music and voice remain completely separate inside this digital mixer. This allows you to adjust their volumes independently, avoiding the echoes and poor sound quality that happen when you simply play music out loud near a physical microphone.
Which Spotify Through Mic Method Should You Use?
| System | Recommended method | Spotify and mic mixing | Application-only routing | Difficulty |
|---|---|---|---|---|
| Windows 11/10 | VoiceMeeter Banana | Yes | Yes | Medium |
| Windows 11/10 | Stereo Mix | Limited | Usually no | Easy |
| Mac | Loopback | Yes | Yes | Easy to medium |
| Mac | BlackHole | Requires additional mixing for mic audio | Usually system-level | Medium to advanced |
Part 2. How to Play Spotify Through Your Mic on Windows
For most Windows users, VoiceMeeter Banana provides the best balance between control and flexibility. It can receive Spotify and microphone audio, let you monitor the result through headphones, and send the combined signal to Discord as a virtual microphone. Before beginning, make sure you have the Spotify desktop app, VoiceMeeter Banana, a physical mic, and headphones ready to go.
Step 1. Download and install VoiceMeeter Banana from the VB-Audio website, then restart your PC. Once your computer has rebooted, launch the application to reveal its hardware and virtual input channels.
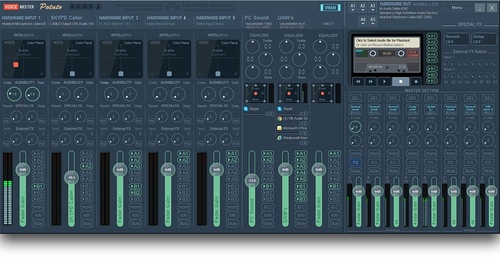
Step 2. Click on "Hardware Input 1" in the top-left corner and select your physical microphone from the dropdown list. Speak into the mic to ensure the green level meter is reacting to your voice.
Step 3. Route your headphones by clicking "A1" in the top-right corner and selecting your preferred playback device. This step ensures you can monitor the audio yourself without creating a unwanted feedback loop for your listeners.
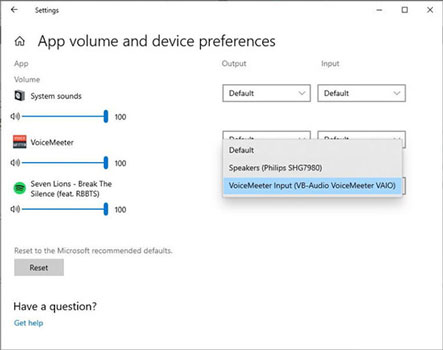
Step 4. Open the Windows 11 Volume Mixer (Settings > System > Sound > Volume mixer) while playing a song on Spotify. Locate Spotify in the app list and change its output device to "VoiceMeeter Input (VB-Audio VoiceMeeter VAIO)".
Step 5. Return to VoiceMeeter, find the virtual input strip where Spotify is playing, and enable both the "A1" and "B1" buttons. Enable "B1" on your physical microphone strip as well, which combines both audio sources into a single virtual output.
Step 6. Open Discord (or your chosen chat app), navigate to your Voice & Video settings, and select "VoiceMeeter Output" as your input device.
How to Play Spotify Through Mic and Talk at the Same Time
To send both signals, keep B1 enabled on:
-
The physical microphone channel
-
The Spotify virtual input channel
Discord will then receive the combined B1 mix as one virtual microphone. You still retain separate volume controls inside VoiceMeeter. Lowering the Spotify fader will not affect your microphone, and muting the microphone strip will not stop the music.
Part 3. How to Play Spotify Through Your Mic on Mac
Mac users cannot use VoiceMeeter, but macOS supports several virtual audio-routing tools. Loopback is generally the simpler option because it can combine Spotify and a physical microphone inside one virtual device. BlackHole is a free alternative, although its basic configuration is better suited to transferring audio than mixing multiple sources.
How to Play Spotify Through Your Mic on Mac with Loopback
Loopback can combine sound from applications and physical input devices, then make that combination available to Discord, recording software, or another destination.
Step 1. Install and launch Loopback, making sure to grant any necessary macOS permissions for system audio and microphone access.
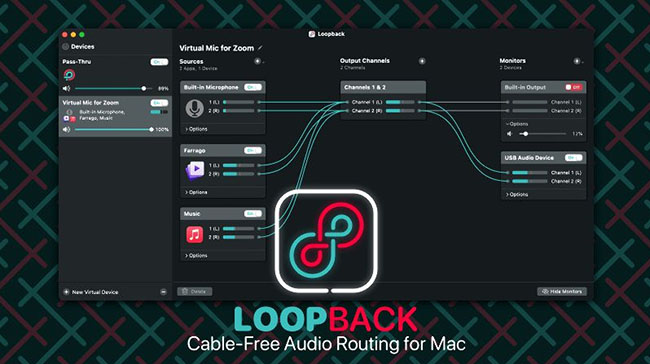
Step 2. Create a new virtual device within the Loopback interface and give it an easy-to-remember name like "Spotify + Mic Mix".
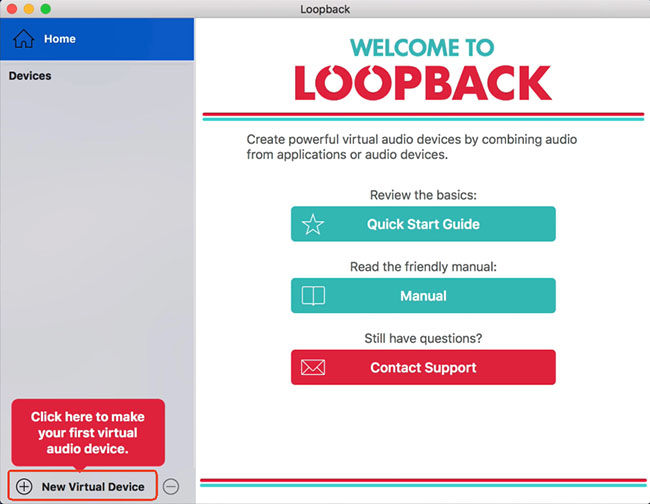
Step 3. Click the plus button under the Sources column to add both the Spotify application and your physical microphone. Start playing a song on Spotify to confirm that the audio activity meters are moving inside the app.
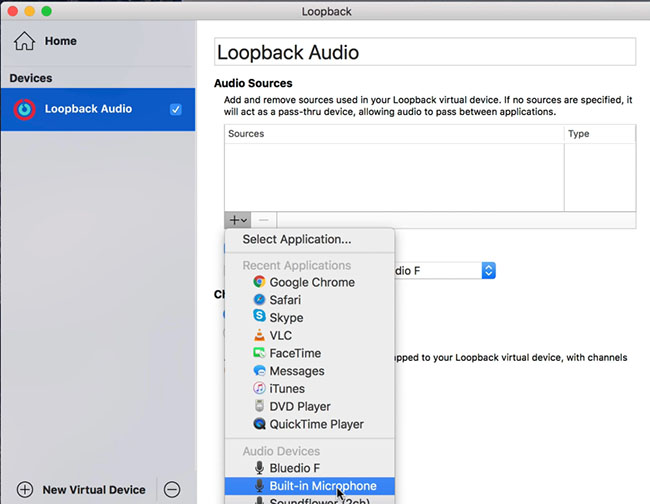
Step 4. Add your headphones under the Monitors section so you can hear the music while it broadcasts to your friends.
Step 5. Open Discord's Voice & Video settings and select your newly created "Spotify + Mic Mix" as the main input device.
How to Play Spotify Through Your Mic on Mac with BlackHole
BlackHole is a virtual macOS audio loopback driver that passes audio between applications. It may be a suitable option when you prefer a free setup and do not mind configuring the routing manually.
A basic BlackHole setup can send Mac system audio to Discord. However, BlackHole does not provide a complete visual mixer like Loopback. Combining Spotify with your physical microphone may require an additional application such as a DAW, broadcasting tool, or audio mixer.
Step 1. Download and install the two-channel version of the BlackHole driver, which easily handles most standard streaming needs. Once the installation finishes, open your Mac's Audio MIDI Setup (found in Applications > Utilities) to verify the setup. "BlackHole 2ch" should now be clearly visible in your device list.
Step 2. Click the small plus icon at the bottom of the Audio MIDI Setup window to create a new "Multi-Output Device". This configuration allows you to hear the music through your headset while simultaneously sending the feed to your voice application. You will need to check the boxes to include two specific items:
- Your physical headphones or speakers
- BlackHole 2ch
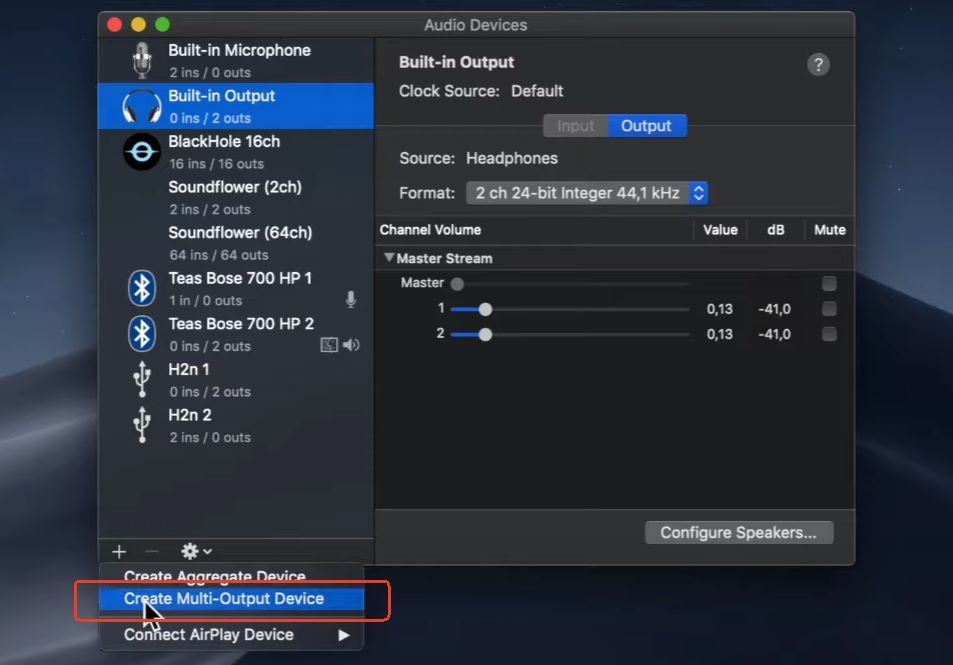
Set your headphones as the primary playback device and enable drift correction for BlackHole to keep everything perfectly synchronized.
Step 3. Navigate to your Mac's system settings and designate the newly created Multi-Output Device as your primary sound output. Your Spotify audio is now routed to both your headphones and the virtual driver.
Note:
This method captures all system audio. Notification pings, game sounds, and browser videos will broadcast alongside your music if you aren't careful.
Step 4. Launch Discord and head straight over to the Voice & Video settings panel. Simply select "BlackHole 2ch" as your designated Input Device and run a quick mic test to confirm the audio is flowing properly.
Step 5. Remember that BlackHole acts purely as a transfer cable and will not automatically mix your physical voice with the music. To speak and play songs at the same time, you must route both sources through a secondary program like OBS Studio or a dedicated digital audio workstation.
Loopback vs. BlackHole for Playing Spotify Through Mic
| Feature | Loopback | BlackHole |
|---|---|---|
| Capture Spotify only | Straightforward | Usually requires extra routing |
| Mix Spotify and microphone | Built-in | Additional mixer may be needed |
| Headphone monitoring | Built-in | Multi-Output Device required |
| System notifications included | Usually avoidable | Often included in system-level setup |
| Cost | Paid | Free |
| Best suited to | Regular voice chat and content creation workflows | Users comfortable with manual audio routing |
Part 4. How to Play Spotify Through Mic with Stereo Mix on Windows
If you want to play Spotify through your mic without VoiceMeeter, Stereo Mix provides a simpler Windows alternative. It allows you to send computer audio to a voice application only. It records the sound currently being played by the computer's audio device. However, availability depends on the sound card and driver, and many computers do not show Stereo Mix.
Step 1. Open Settings > System > Sound and select More sound settings.
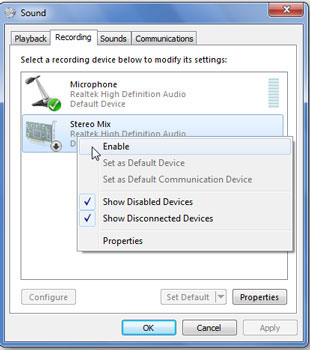
Step 2. Open the Recording tab. Right-click an empty area and enable Show Disabled Devices.
Step 3. If Stereo Mix appears, right-click it and choose Enable. Now, you can select Stereo Mix as the input device in Discord.
Note:
This method may send all computer audio rather than Spotify alone. It can also be awkward when you need to combine system sound with a physical microphone.
Part 5. Spotify Through Mic Not Working: Common Fixes
Virtual audio routing involves several applications and audio devices. When something goes wrong, follow the signal path from Spotify to the final app rather than changing multiple settings at once.
| Problem | Likely cause | What to check |
|---|---|---|
| Spotify is visible in VoiceMeeter but Discord cannot hear it | B1 is disabled | Enable B1 on the Spotify strip |
| Discord receives Spotify but not your voice | Mic is not routed to the virtual output | Enable B1 on the microphone strip |
| You cannot hear Spotify yourself | Hardware monitoring is disabled | Enable A1 or add a Loopback monitor |
| Other people hear an echo | Speakers are feeding the microphone | Use headphones and review monitoring |
| Music is cut off during quiet sections | Voice processing treats music as noise | Review noise suppression and input sensitivity |
| Spotify is missing from Volume mixer | Spotify is not actively playing | Start playback and reopen the mixer |
| BlackHole works but you hear nothing | No physical output is included | Create or correct the Multi-Output Device |
| Audio sounds robotic or distorted | Sample rates or buffer settings differ | Match sample rates and lower audio levels |
Note:
Keep in mind that public broadcasting or recorded streams may involve music licensing requirements. Always verify the rules of your streaming platform before sharing copyrighted music publicly.
Part 6. Bonus Tip: Simplify Routing with Local Audio Files
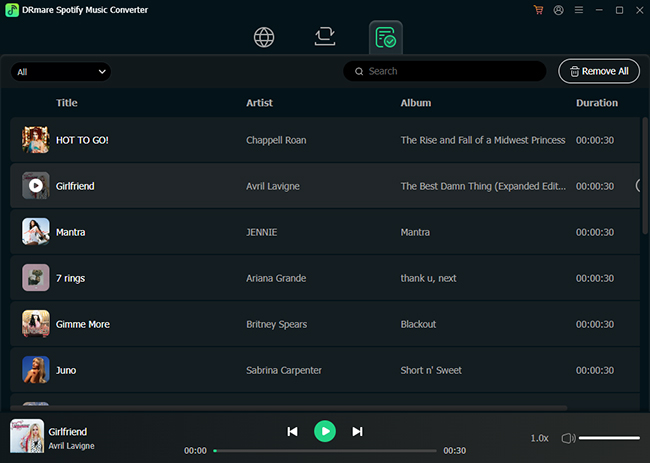
If dealing with virtual audio cables and system-wide routing feels too complicated, using local music files offers a much more straightforward alternative. You can use a tool like DRmare Spotify Music Converter to easily download and convert your favorite Spotify playlists into standard local formats, such as MP3 or FLAC.
Once your music is safely saved to your hard drive, you can play the tracks directly through standard media players or load them directly into broadcasting software like OBS Studio. This completely bypasses the need for complex application-level routing. It guarantees a smoother, more stable audio experience for your listeners without worrying about app crashes or routing errors.
Part 7. Conclusion
Routing Spotify through your microphone setup is a fantastic way to transform ordinary voice calls into engaging, shared listening experiences. While the initial digital configuration requires a bit of patience, establishing a solid virtual audio route is absolutely worth the effort.
Whether you choose VoiceMeeter on Windows or Loopback on Mac, you now have the knowledge to flawlessly mix your favorite background tracks with your own voice. Take your time dialing in the perfect volume balance, always respect the copyright rules of your chosen streaming platform, and enjoy your newly upgraded audio setup!

 Home
Home




User Comments
Leave a Comment