


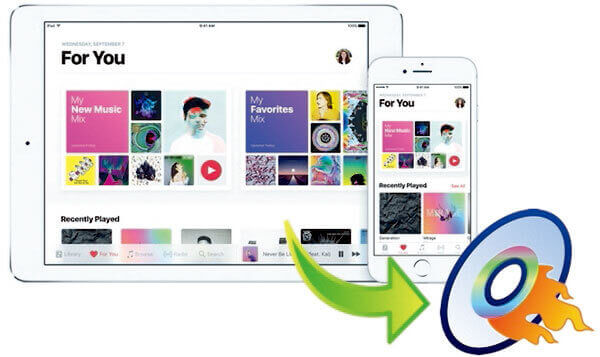
While Apple Music makes streaming incredibly convenient, many audiophiles and drivers prefer storing their curated playlists on physical media. Burning Apple Music to a CD allows you to enjoy your favorite music offline on vintage sound systems, high-end home switchboards, or older car stereos.
Quick Answer: Can You Burn a CD from Apple Music?
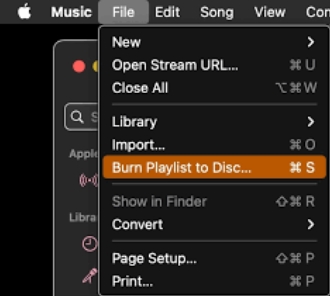
Directly burning Apple Music playlist to a disc via iTunes or Music app will result in a greyed-out "Burn Playlist to Disc" option due to FairPlay DRM restrictions. The only viable solution is to use DRmare Apple Music Converter to decrypt and convert Apple Music into standard MP3 or WAV files first, then write them to a blank CD-R using iTunes, Mac Music App, or Windows Media Player. This article covers the step-by-step guide.
Part 1. Why Is Apple Music "Burn Playlist to Disc" Greyed Out
If you attempt to select the burn function to burn Apple Music playlist to CD, the option will appear greyed out. Apple removed the burn feature for Apple Music subscribers.
It enforces strict Digital Rights Management (DRM) on its entire 100-million-song streaming catalog. When you pay the subscription fee, you are licensing the right to stream and temporarily cache content for offline playback within the proprietary Apple Music app ecosystem. You do not own the underlying audio tracks.
According to Apple, allowing direct CD duplication would enable users to retain permanent copies even after canceling their subscriptions. It would undermine the control they have over their streaming service.
Crucial Exception:
If your iTunes library contains songs purchased individually from the iTunes Store (unprotected AAC format) or local audio files imported from your hard drive, these tracks are DRM-free and can be burned directly without any third-party conversion.
Part 2. Pre-requisites & How to Convert Apple Music for Burning
To create an audio CD from Apple Music that works on any standard disc player, you need to prepare your hardware and convert the audio files into an unprotected file. In the following part, we will show you how to remove DRM from Apple Music and burn them to CD in details.
Hardware & Software Checklist for Apple Music CD Burning
- Blank Disc: Choose a CD-R instead of a CD-RW. CD-R discs offer maximum reflectivity and are highly compatible with sensitive car stereo lasers.
- CD/DVD Drive: Ensure your PC/Mac has an integrated disc drive or attach an external USB optical burner drive.
- Decryption Software: DRmare Apple Music Converter is recommended to strip encryption blocks while preserving 100% lossless audio tracks.
- Media Player: iTunes or Windows Media Player (Windows) or the native Music App (macOS Catalina and later).
- An activate Apple Music subscription. Allows you to access your Apple Music library.
How to Download Apple Music Playlists for Burning to CDs
DRmare Apple Music Converter stands out for its fast conversion speed and superior audio quality. Additionally, it allows you to customize the audio parameters of your Apple Music files, such as bit rate, sample rate, volume, and pitch. Now, let's explore how to convert your desired Apple Music playlists or songs into the common format for burning to CD.
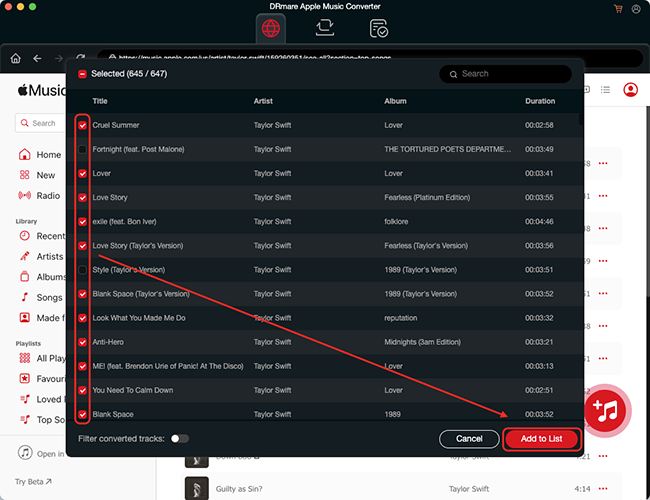
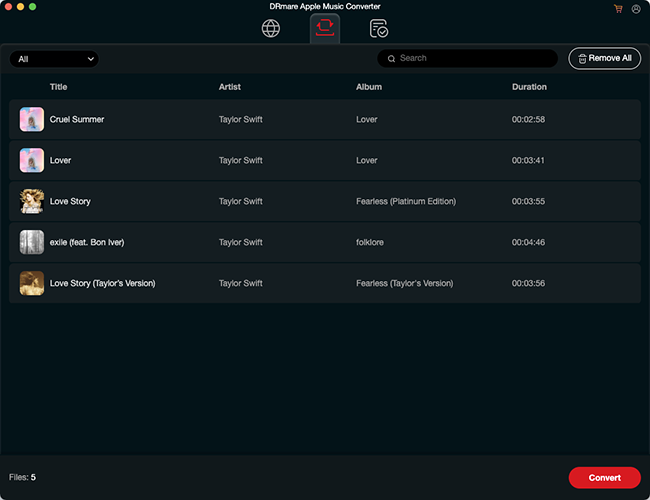
- Step 1Add Apple Music playlists to DRmare Software
Open DRmare Apple Music Converter and authorize your account to access Apple Music library. Now, you can browse and find favorite songs that you'd like to burn to CD. Click the '+' > 'Add to List' button to import them to the conversion queue.
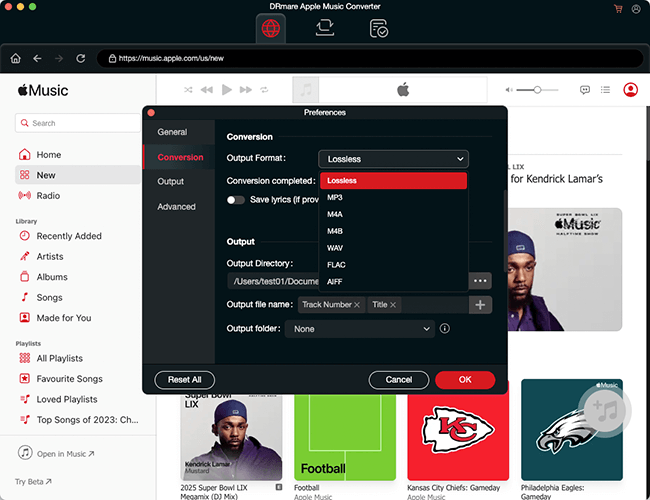
- Step 2Adjust the audio parameters of Apple Music(optional)
DRmare Apple Music Converter has set "Lossless" as the default output format. If you'd like to make the songs more personalized, you can click the 'Preferences' > 'Conversion' to open the setting window, where you can adjust the codec, channel, sample rate, bit rate, and much more.
- Step 3Export Apple Music to unprotected files
At last, you can choose an output folder and slightly tap the 'Convert' button. DRmare Apple Music Converter will start to strip DRM protection and encode M4P format to new common audio files you set before. When it is done, you can click the 'Converted' > 'Open Folder' icon to locate and use them as you want.
Video Tutorial: How to Burn Music from Apple Music to CD
Part 3. How to Converted Apple Music to CD via iTunes (Windows) or Music App (Mac)
With your unprotected Apple Music files ready, the complex part is over. The final step is writing these standard audio files to your physical disc. Depending on your operating system, you will use either iTunes or the native Apple Music application.
Note for Mac users:
Since macOS Catalina, Apple has phased out the traditional iTunes software. The burning process is now handled by the native Music app, but the steps and interface remain virtually identical.
How to Burn Apple Music Playlist to CD
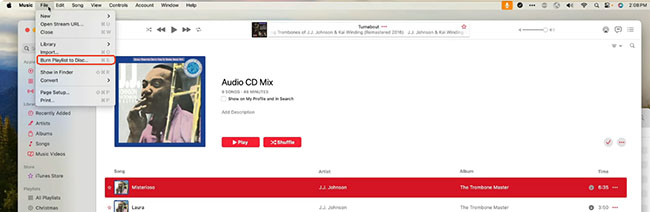
- Step 1Create a Dedicated Burning Apple Music Playlist
Open iTunes (Windows/macOS Mojave or earlier) or the Music app (macOS Catalina or later). Go to File > New > Playlist in the top menu bar. Name your playlist (e.g., "Audio CD Mix") and drag your newly converted MP3/WAV files into this list.

- Step 2Configure Pro-Level Burn Settings
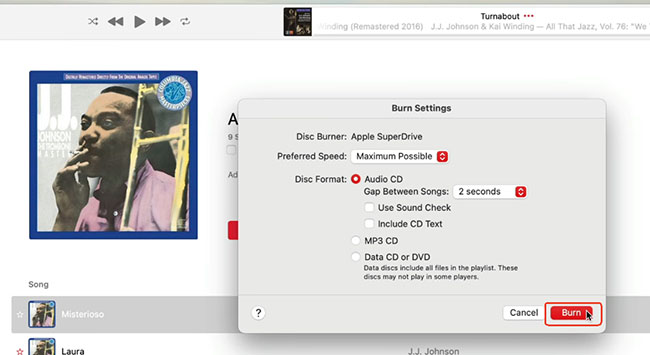
Insert a blank CD-R into your optical drive. Right-click the playlist you just created in the left sidebar and select Burn Playlist to Disc. A settings menu will appear.
Expert Tip for Car Audio Compatibility:
To avoid playback errors, configure your burn settings carefully:
- Disc Format: Always select Audio CD instead of Data CD. Data CDs act like USB drives and will only play in modern computers or highly specific MP3-compatible car stereos. An Audio CD works universally.
- Preferred Speed: Change the burn speed from "Maximum Possible" to 8X or lower. Slower burn speeds create deeper, more accurate laser pits on the disc, significantly reducing the chances of skipping on bumpy roads.
- Gap Between Songs: Leave the standard 2 Seconds for natural transitions.
- Step 3Initiate the Burn Process
Click Burn and wait for the software to finish writing and finalizing the disc. Once you hear the completion chime and the disc ejects, it is ready to play.
Part 4. How to Burn a CD from Apple Music on Windows (Without iTunes)
If you are on a Windows PC and prefer a lightweight, native solution without installing Apple's software, the built-in Windows Media Player (WMP) is a highly reliable alternative for burning your converted Apple Music files onto an audio CD.
How to Burn Apple Music Playlist to CD via Windows Media Player
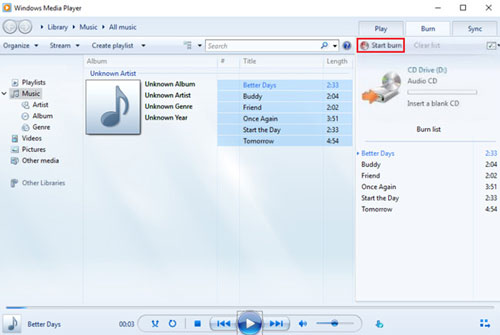
Step 1. Open Windows Media Player from your Start menu. Click the Burn tab located in the upper-right corner of the interface.
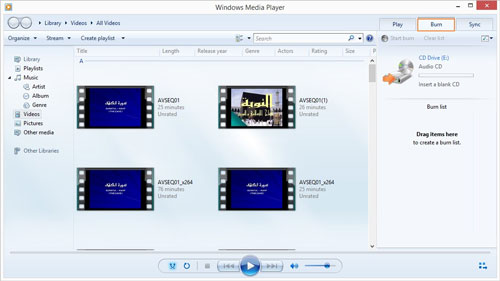
Step 2. Insert a blank CD-R into your computer's optical drive. Open your Windows File Explorer, locate the folder containing your converted Apple Music MP3s, and drag the tracks directly into the "Burn list" sidebar in WMP.
Step 3. Click Burn > Audio CD > Start Burn to begin writing the Apple Music to the CD without iTunes.
Part 5. FAQs About Burning Apple Music to CD
Why is my burned CD skipping in my car stereo?
Older car stereos feature sensitive optical readers. Skipping usually occurs if you used a CD-RW (which has lower reflectivity than a CD-R), burned the disc at too high a speed, or if the disc surface is scratched. Stick to high-quality CD-R discs and cap your burn speed at 8X.
Can I burn a mix of purchased iTunes songs and converted Apple Music tracks?
Yes. Once you have used a converter tool to turn your Apple Music streams into standard MP3 or WAV files, you can seamlessly mix them into a single playlist with your legacy iTunes Store purchases (unprotected AAC/M4A) and burn them to the same disc.
Is it legal to burn Apple Music to a CD?
Bypassing DRM violates Apple Music's Terms of Service. However, from a legal perspective in many jurisdictions, creating a physical copy of digital media you subscribe to, strictly for personal, non-commercial offline backup (like listening in your own car), falls under fair-use exceptions. Distributing, selling, or sharing these CDs remains strictly prohibited.
Part 6. In Conclusion
Although Apple's FairPlay DRM strictly blocks the direct "Burn Playlist to Disc" function, professional tools like DRmare Apple Music Converter easily solve this problem. By taking a few minutes to convert your Apple Music into universal formats like MP3 or WAV, you regain full control over your library. It enables you to create custom Audio CDs for your car stereo, vintage home theater, or personal physical archive.


User Comments
Leave a Comment