





 I successfully downloaded an audio file from Apple Music with an active subscription. But I failed to add Apple Music downloads to iMovie and got a DRM error message in iMovie Audio import, saying "Song Unavailable. This song is DRM protected and can't be used by iMovie". What does DRM protected mean in iMovie? How to solve it?
Apple protects its streaming library to ensure songs are only played within the Apple Music app, preventing them from being directly edited into videos. If you try to add a downloaded Apple Music track to iMovie, you will meet Apple Music not showing in iMovie or get prompts: files are protected and unavailable in iMovie. Here is exactly how to add and use DRM-protected songs in iMovie on iPhone, iPad, or Mac and bring your favorite tracks into your video projects.
The Truth About Apple Music DRM and iMovie Compatibility
What Does DRM Protected Mean in iMovie?
This means that the songs you want to add to iMovie are protected by Digital Rights Management (DRM). It is a technology used by Apple to protect digital content, including Apple Music, from unauthorized copying or distribution. This means that DRM-protected content can only be used on authorized devices and platforms. While this helps protect artists and their work, it can be inconvenient for users who want to use the music in personal projects, like iMovie videos.
Can You Add DRM Protected Songs to iMovie?
Not directly in the usual iMovie workflow. Apple's current iMovie documentation explains that protected files in the Music library are unavailable and don't appear in iMovie's browser. iMovie accepts compatible local audio files, including M4A, MP4, MP3, WAV, and AIFF. But if a DRM lock is present, the file remains unreadable to the editor. To use these files, you have to remove DRM protection.
How to Add Music to iMovie?
Method 1: Purchase Non DRM Protected Songs for iMovie
Unlike Apple Music service, songs purchased from the Music app are non-DRM-protected AAC files. In this case, you can use iTunes purchases directly in your iMovie projects. If you have older DRM-protected tracks, you can upgrade them to DRM-free versions through iTunes Match or by repurchasing them from the iTunes Store.
Method 2: Convert Apple Music to DRM-Free Music for iMovie
To add DRM music to iMovie, you can also use third-party software, like DRmare Apple Music Converter to remove DRM protection from Apple Music and convert songs to an iMovie-compatible format.
Method 3: Leverage iMovie's Built-in Soundtracks
If you just need high-quality background ambiance and aren't tied to a specific mainstream hit, save yourself the headache and use iMovie's built-in audio library. It's completely royalty-free and instantly accessible within the app under the "Audio" tab.
| Music Source | Check Whether Your Song Is DRM-Protected | Add Music to iMovie: Test Result |
|---|---|---|
| Apple Music subscription download | Protected | Cannot directly use in iMovie |
| Current iTunes Store song | DRM-free | Can potentially import/use if rights requirements are met |
| Older protected iTunes purchase | May be DRM-protected | Protected copy won't work directly. Have to redownload unprotected tracks. |
| Personal DRM-free MP3/M4A/WAV | No DRM | Can import if format is supported |
| iMovie soundtracks/effects | Designed for iMovie | Built-in feature |
Note:
The first and third methods are ready to use with minimal setup. Since the second method involves a more detailed process, we'll focus on it in the following sections and guide you through each step.
How to Get Non DRM Protected Songs for iMovie
To add DRM-protected music to iMovie from Apple Music, you need to convert your music to one of compatible local formats. You can use DRmare Apple Music Converter to do them easily. This Apple Music to iMovie converter features a built-in Apple Music Web Player, completely eliminating the need to install or synchronize with the clunky desktop Apple Music app. You simply log in directly within the software and start selecting tracks.
Based on our latest hands-on testing in September 2026, the efficiency is remarkable. Operating at up to 30X speed, it processed a standard 4-minute track into an iMovie-compatible format in under 10 seconds. Crucially, it retains lossless audio quality and all original ID3 tags, giving you clean, high-quality MP3, WAV, AIFF, or M4A files ready for an immediate drop into your video timeline without any compatibility errors.
| Platforms | Audio Formats |
|---|---|
| iMovie-supported Audio format | AAC, AIFF, MP3, M4A, and WAV |
| Apple Music Audio Format | DRM-protected M4P |
| DRmare Output Format | MP3, AIFF, WAV, M4A, M4B, and FLAC |
How to Convert Apple Music to Non-DRM-Protected Songs for iMovie
Now, we will guide you on how to convert Apple Music to iMovie-compatible audio files. (Make sure you've installed the DRmare Apple Music Converter on your computer in advance.)
- Step 1Run DRmare Apple Music Converter
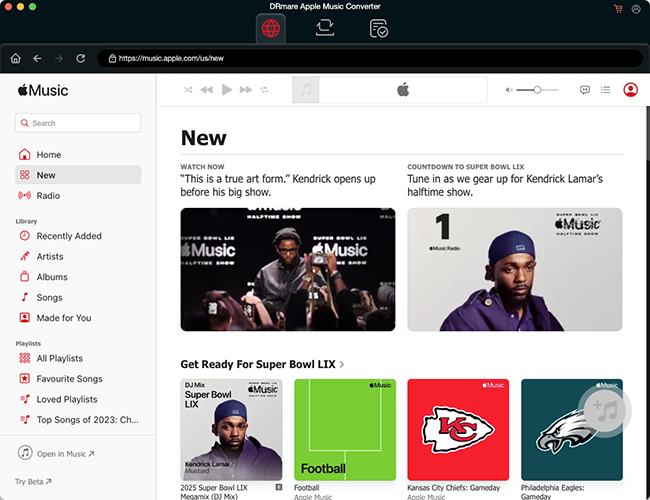
- After installation, open DRmare Apple Music Converter on your computer. Then you can get its intuitive interface. As shown above, there is a built-in Apple Music Web Player, allowing you to browse your library directly.
- Step 2Import Apple Music/iTunes songs to use in iMovie
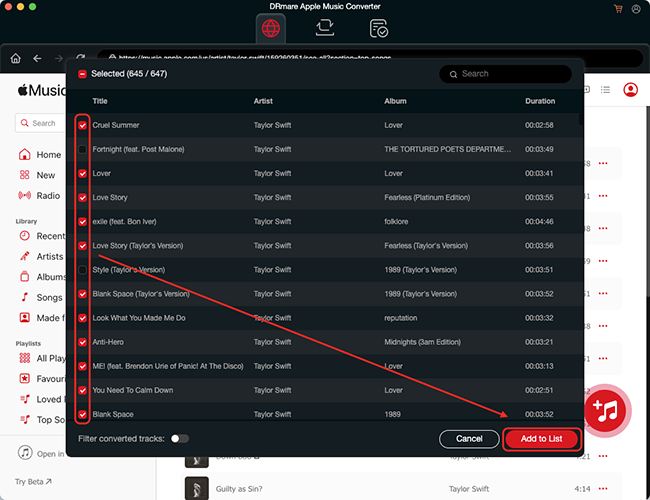
- Once you found your favorite songs, you can click the 'Add' > 'Add to List' button to load them to the conversion queue of DRmare Apple Music Converter. You are also allowed to copy and paste music URL into the address bar and click the 'Download' button to load them.
- Step 3Set output audio format of Apple Music for iMovie
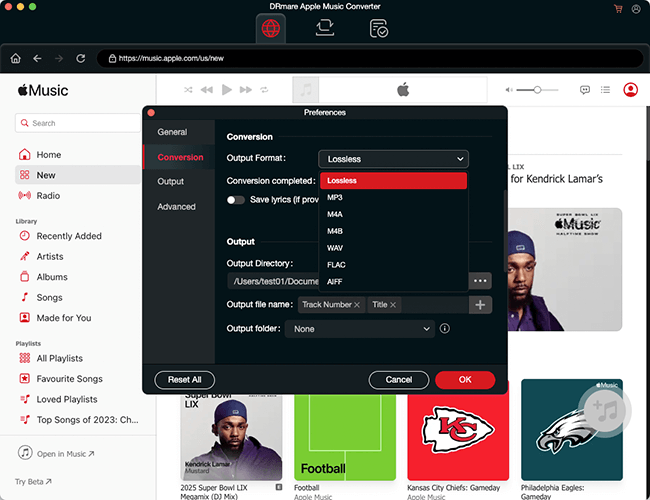
- To launch the output settings window, click on the 'DRmare Apple Music Converter' icon from the Apple Menu bar and choose 'Preferences' > 'Conversion' option. To use Apple Music on iMovie, you can choose MP3, AIFF, WAV, or M4A format. You can also personalize other Apple Music output parameters according to the iMovie movies you want to create.
Tips:
If you use Apple Music Lossless, select AIFF or WAV in DRmare Apple Music Converter to preserve every bit of audio detail for high-end video productions.
- Step 4Convert DRM protected Apple Music for iMovie
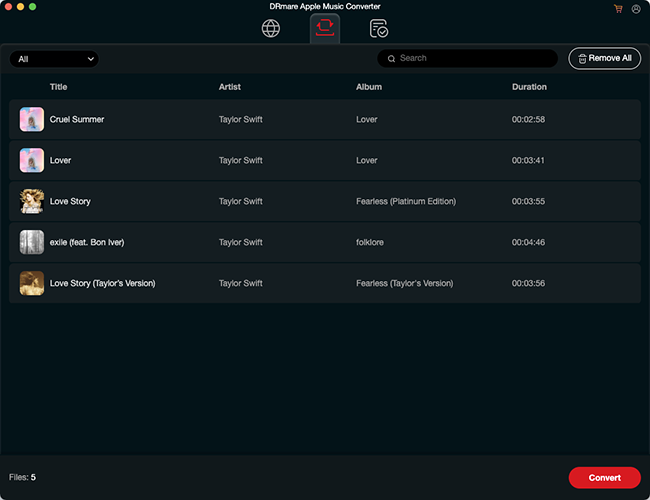
- Now press the 'Convert' button. It will start to convert the protected Apple Music to MP3 or other plain formats you set before. Once it is done, all your music files will become non-protected songs and they can be easily added to iMovie. You can find the converted songs via the 'Converted' > 'Folder' icon on your computer. Now, you can transfer these DRM-free songs to iMovie or any other platform without any hassle.
How to Add Non-DRM Protected Songs to iMovie on iPhone/iPad
When you got non DRM protected songs via the above steps or purchased favorite tracks from iTunes Store, they are ready to be imported into iMovie. And below is a tutorial on how to get non-DRM protected songs on iMovie on iPhone and iPad.
Sync Non-DRM Protected Songs to iPhone/iPad
Forget the clunky USB cables and desktop app syncing. In the modern Apple ecosystem, the fastest and most efficient way to get your converted DRmare tracks onto your iPhone for mobile editing is wirelessly via AirDrop or iCloud Drive.
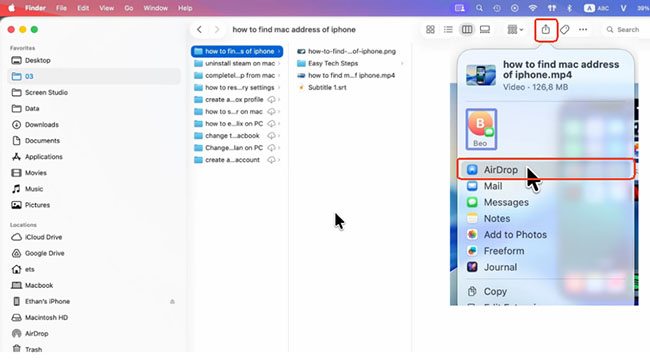
Method 1. The Lightning-Fast AirDrop (Mac to iPhone/iPad)
Step 1. Ensure Wi-Fi and Bluetooth are enabled on both your Mac and iOS device. On your Mac, locate the converted DRM-free music files, right-click, and select Share > AirDrop.
Step 2. Select your iPhone or iPad from the available devices. Once accepted on your iPhone or iPad, the audio files will automatically save directly to your native Files app, ready for iMovie integration.
Method 2. The iCloud Drive Cloud Sync (Mac & Windows)
If you are processing multiple tracks or using a Windows PC, utilizing Apple's cloud infrastructure is the best batch-transfer solution.
Step 1. On your computer, drag and drop the converted songs into a dedicated folder within your iCloud Drive.
Step 2. Open the Files app on your iPhone or iPad. Navigate to your iCloud Drive directory to verify the files have synced.
Tips:
If you have 'Apple Music Sync Library' enabled across devices, simply adding the converted files to your Mac Music app will make them appear on your iPhone automatically.
Add DRM-Free Music to iMovie on iPhone/iPad
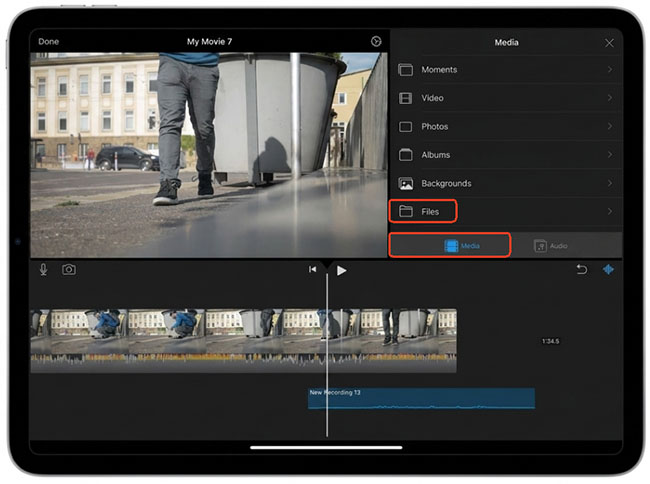
Step 1. Launch iMovie on your iPhone, iPad, or iPod Touch. Then open your existing project or create a new project from the Projects tab and click the "Add Media +" button. Tap the "Files" option to access the iOS file system.
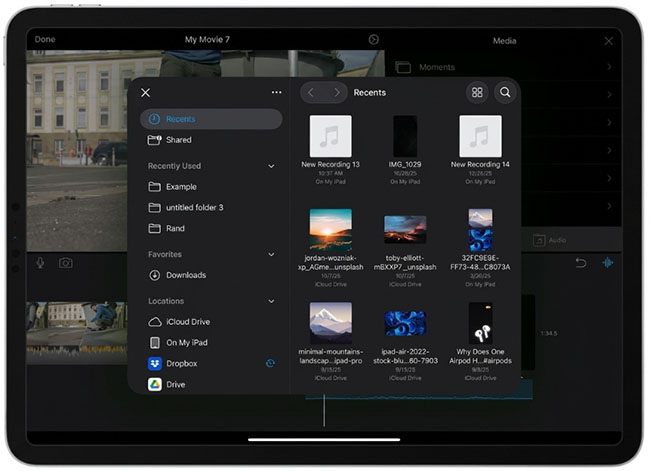
Step 2. Locate your transferred DRM-free tracks in the AirDrop downloads or iCloud Drive folder. Tap the desired track to instantly drop it into your iMovie timeline.
Export Your iMovie Project with Apple Music
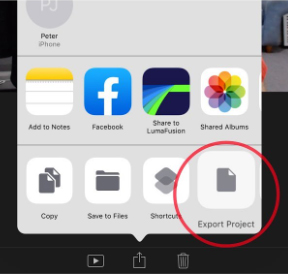
Step 1. Click the "Share" button (it looks like a square with an arrow pointing up).
Step 2. Choose "Export Project" to customize output options, like the resolution, format, and output folder.
Step 3. Finally, tap the "Save" button to export iMovie videos with Apple Music on your iPhone.
How to Add DRM-Free Apple Music to iMovie on Mac
With the above, you've learned how to add non-DRM-protected songs on iMovie on iPhone. If you are using a Mac computer, the steps are even easier. Now, please check how to add non-DRM protected music to iMovie on Mac with two methods.
Way 1. Add DRM-Free Apple Music to iMovie by Import Feature
Step 1. Open iMovie from your Mac computer. Then create a video project.
Step 2. Hit on the 'Audio' at the top bar of the window. Next, select 'Music' from the Libraries list.
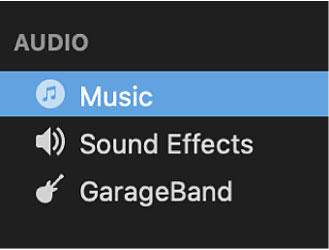
Step 3. Find your converted DRM-free music files in the target folder.
Step 4. Choose the songs you want to add to the iMovie video. Then drag it to the timeline.
Way 2. Add DRM-Music to iMovie from Apple Music by Finder
Step 1. Set up the Finder app on your Mac computer.
Step 2. Launch the iMovie program and open a video project. Click the "Import Media" button to locate the converted non-protected music files and import them to iMovie.
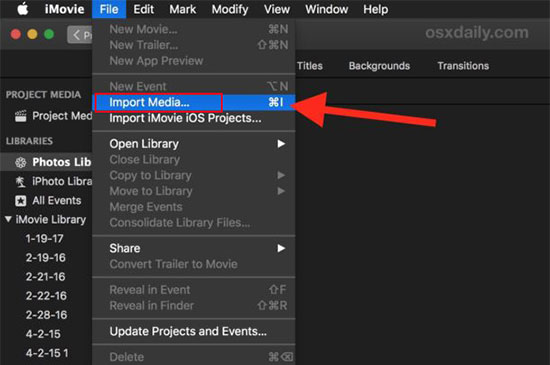
Step 3. Drag and drop the target song to the timeline. Then you can start to alter the iMovie video clip.
Export iMovie Projects with Apple Music on Mac
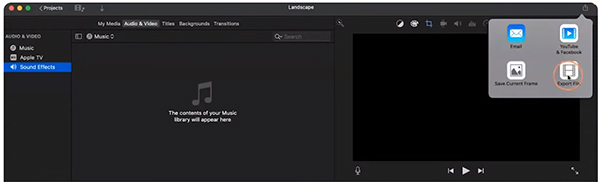
1. Tap the "Share" button at the top-right corner of iMovie, which looks like a square with an arrow pointing up.
2. Choose the "Export File" option to select the desired video format and video quality (720p, 1080p, 4K, etc.).
3. Hit the "Continue" and "Save" buttons to export iMovie videos with Apple Music background.
How to Use DRM-Protected Songs in iMovie on iPhone/Mac
Once your unprotected Apple Music is sitting in the iMovie's timeline, the real creative work begins. Raw audio files rarely fit a video perfectly on the first try; they might start too abruptly, overstay their welcome, or drown out your dialogue. In this section, we will cover how to edit and use your DRM-free music to ensure they sync seamlessly with your visuals, using iMovie's precision tools to handle transitions and volume levels like a pro.
| Editing Technique | How to Do It in iMovie |
|---|---|
| Trimming | Hover over the edge of the audio clip until the pointer becomes a double arrow, then drag to shorten or lengthen. |
| Splitting | Move the playhead to the desired spot, right-click (or long-press), and select Split Clip. |
| Fading | Look for the small grey circles at the beginning and end of the audio clip. Drag them inward to create a smooth fade-in or fade-out. |
| Volume Levels | Drag the horizontal line running through the middle of the audio clip up or down to adjust the decibel level. |

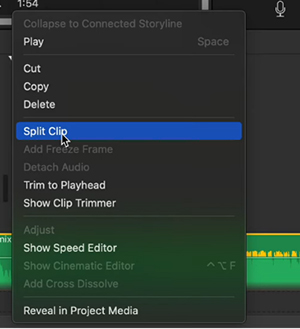
Pro Tips: Perfecting Your Mix with Audio Ducking
Once your unprotected Apple Music is sitting in the iMovie timeline, the real creative work begins. Raw audio tracks rarely fit a video perfectly on the first try. The biggest amateur mistake is letting a loud background track drown out your video's dialogue. To solve this, experts use a built-in feature called Audio Ducking.
Disclaimer:
If you plan to publish your video on YouTube for monetization, be sure to verify the commercial license for the background music. Otherwise, even if the DRM is removed, you still risk having your video muted or demonetized.
FAQs about Adding DRM-Protected Music to iMovie
Why Do I Get the Prompt: This Song Is DRM Protected iMovie?
What Songs Are Not DRM Protected on iMovie?
If you have songs purchased from iTunes Store, they are DRM-free and available in iMovie. If you use music streaming services like Apple Music, Spotify, Tidal, etc., most of the songs are DRM protected and cannot be used directly in iMovie. In this case, you need to use third-party software to remove DRM protection and convert the songs to a format that can be used in iMovie.
Why is my Apple Music song missing from iMovie?
A protected track may not appear in iMovie's browser at all. Apple specifically identifies protected files as unavailable in iMovie.
Can I add an M4A file to iMovie?
Yes, M4A is among the audio-file formats Apple currently lists as supported by iMovie. However, the file's protection status and encoding can still affect whether it can actually be used.
Does changing M4A to MP3 remove DRM?
No. Changing the filename extension doesn't remove DRM, and ordinary format conversion shouldn't be confused with bypassing content protection.
The Verdict
Ultimately, DRM restrictions shouldn't limit your creativity in iMovie. Whether you use a smart solution like DRmare Apple Music Converter to bypass format barriers, purchase the track directly, or explore iMovie's built-in options, adding the perfect soundtrack is entirely doable. Pick the method that fits your workflow best, and get back to what really matters: crafting a great video!

 Home
Home





Add DRM protected music from Apple Music, Spotify, Amazon Music, Tidal, SoundCloud, Qobuz, etc, to iMovie