


You purchased a movie from the iTunes Store, downloaded the video file, and saved it to an external hard drive for offline playback. However, when you try to open it with a regular media player or play it on a smart TV, the file does not work as expected.
The reason is that iTunes movies are usually stored in the M4V format and include Apple's FairPlay protection. Although M4V and MP4 use similar video technologies, protected iTunes videos have playback restrictions that prevent them from working with many non-Apple devices and standard media players.
So, can you convert iTunes movies to MP4? Yes. However, regular video converters such as HandBrake or VLC cannot process protected iTunes movie files. To make iTunes M4V movies more compatible, you need a M4V to MP4 converter designed specifically for iTunes video files. This guide explains how to convert iTunes M4V movies to MP4, what tools work, and how to verify the converted MP4 files for playback compatibility.
Part 1. Can You Convert iTunes M4V to MP4? Quick Answer!
Yes, iTunes movies can be converted to MP4 if you have the appropriate conversion tool. Purchased or rented iTunes movies are commonly stored as M4V files, and protected videos cannot be converted by standard video converters.
A dedicated iTunes M4V converter can process these files and export them as MP4 videos while keeping important elements such as video quality, audio tracks, subtitles, and metadata. After conversion, the MP4 files are easier to play on a wider range of devices, including computers, smart TVs, tablets, game consoles, external media players, Android devices, and third-party video editors.
| Feature | iTunes M4V | MP4 |
|---|---|---|
| File Extension | .m4v | .mp4 |
| Video Codec | H.264 / MPEG-4 | H.264 / MPEG-4 |
| Audio Support | AAC, AC3 | AAC and more |
| Compatibility | Limited | Widely supported |
| DRM Protection | Include protection | No protection |
Part 2. How to Convert iTunes Movies to MP4
For iTunes M4V movies, you need a converter that is designed to handle iTunes video files. Normal format converters only work with unprotected videos.
Best iTunes to MP4 Converter
DRmare M4V Converter is a specialized software for you who still have iTunes movie downloads stored as M4V files. It handles protected files, including iTunes movies, TV shows, and music videos. This one-stop tool can convert iTunes M4V to MP4 and more universally compatible formats, enhancing the flexibility and usability of purchased or rented iTunes content.
Besides, it can run at a 30X faster speed without causing any damage to the quality. Also, all the ID3 tags, AC3 5.1 surround sound, multilingual subtitles, and closed captions will be retained as the original. Before converting, you can edit and trim the iTunes video file within the DRmare program. With the support of batch conversion, you can convert a list of iTunes videos in a short time. Then you can save your time to do the conversion job.
After the conversion, iTunes video files will be saved as plain files on your computer. Then you can move them and play them on any other device you like to improve playback compatibility.
How to Convert iTunes M4V to MP4 on Mac/Windows PC
Test Environment:
To evaluate the conversion process, we tested the workflow under the following setup:
System: Windows 11 Pro, Intel Core i7 processor, 32GB RAM
Test File: Purchased iTunes movie file in M4V format
Verification Tools: MediaInfo for file analysis, VLC Media Player for playback testing
DRmare iTunes M4V to MP4 Converter offers free versions for both Windows PC and Mac. So, you can download the right version you want to try out for yourself. Here we will use the Windows version to show you how to convert Apple movies to MP4 in three steps.
- Step 1Import your encrypted iTunes videos to DRmare
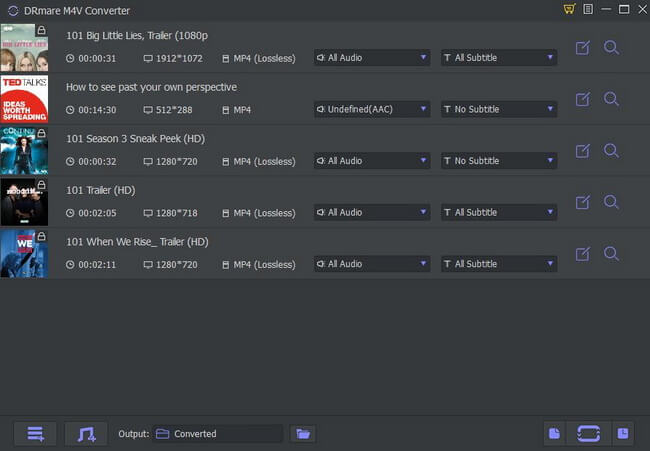
- Open the DRmare iTunes Video Converter. Then you can click 'Load iTunes Library' button from the bottom left to open a window. You will see all the protected videos which are in your iTunes library. And you can select the files you want to convert and press 'OK'. Another way to load the videos is to drag & drop the files from iTunes library to DRmare M4V Converter.
- Step 2Specify the output format of iTunes movies as MP4
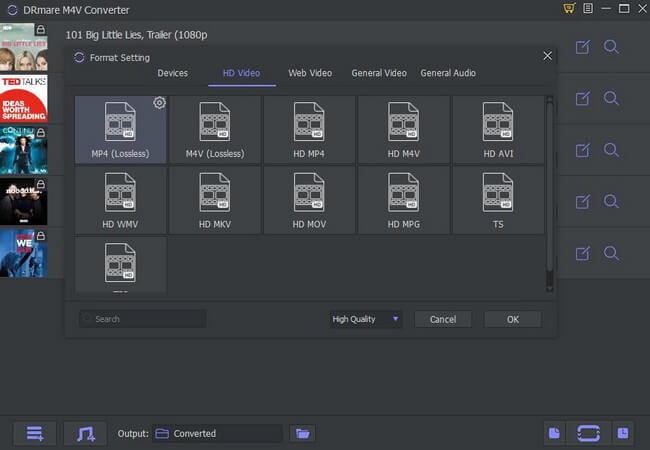
- On the bottom right corner of the software, there is a Format option. Please click on it and then you will get the Format Setting window. Then you can choose MP4 to alter the format of iTunes video as MP4. Also, you can trim the video clip into the part you want to convert by clicking the 'Edit' icon on each video click. You can also add effect, subtitle and so on for your video file.
- Step 3Convert Apple M4V Movies to MP4
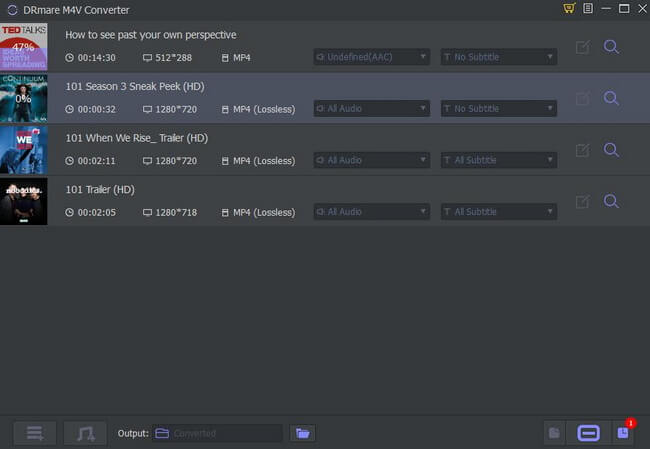
- After all settings are done, you can click the 'Convert' button. Then DRmare M4V Converter will rip iTunes movies to MP4 and remove limitation in a fast speed. What's more, the software supports batch conversions. It only takes minutes to convert couples of iTunes video files. After that, you can watch iTunes movies offline on all devices.
YouTube Video: How to Convert iTunes Videos to MP4
Part 3. Conversion Test Results: Are iTunes Movies Successfully Converted to MP4?
After converting an iTunes M4V movie, the next step is verifying whether the output file is a standard MP4 video and whether it works outside Apple's ecosystem. We used MediaInfo to check the technical details of the converted file and VLC Media Player to test playback compatibility.
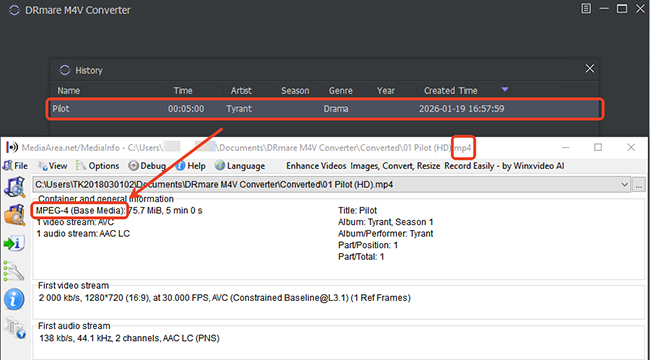
File Information Before and After Conversion
| Features | Original iTunes Movie | Converted File |
|---|---|---|
| Container Format | M4V | MP4 |
| Video Codec | H.264 | H.264 |
| Audio Codec | AAC / AC3 | AAC / AC3 |
| Playback Support | Limited | Wider compatibility |
| File Extension | .m4v | .mp4 |
The converted file was recognized as a standard MP4 container and could be opened normally with common media players.
Playback Test Results
The converted MP4 file was tested on:
- ✓ VLC Media Player
- ✓ Windows video players
- ✓ External storage playback
- ✓ Non-Apple media devices
The file was successfully recognized without requiring iTunes or Apple-specific playback software. This confirms that converting an iTunes M4V file to MP4 can improve playback flexibility across different devices.
Part 4. FAQs about Converting iTunes Videos to MP4
Can I convert iTunes M4V to MP4 via Requiem?
Can HandBrake convert iTunes videos to MP4?
No. While HandBrake is great for DVDs (with libdvdcss). However, HandBrake only works with DRM-free videos. If your iTunes movie still contains FairPlay protection, HandBrake cannot read or convert it.
Is it legal to convert purchased iTunes movies to MP4?
The legality of converting protected digital content varies depending on your location and how the converted files are used. Personal backup rules differ between countries and regions. You should check the applicable laws where you live and avoid distributing converted files.
Can I convert iTunes movies to MP4 for free?
No. Although Requiem is free to use, it is only compatible with older versions of iTunes and computer operating systems.
Can VLC Media Player convert iTunes files to MP4?
VLC Media Player includes a built-in conversion feature, which works to convert common M4V videos to MP4 and other formats. But for iTunes-protected M4V videos, it can't work with them.
Is there an online iTunes M4V to MP4 converter?
Most online video converters cannot process iTunes movies because they are designed for ordinary video files. Additionally, uploading personal movie files to unknown websites may create privacy and security concerns. For local video collections, desktop conversion tools are generally more suitable.
Can I convert rented iTunes movies to MP4?
Yes, DRmare M4V Converter can convert iTunes rentals to MP4 and other formats. Before converting any content, make sure your usage complies with applicable laws, agreements, and personal-use restrictions in your region.
Part 5. In Conclusion
If you have iTunes movies saved as M4V files but cannot play them on your preferred devices, converting them to MP4 can improve compatibility and make your video library easier to manage.
The key point is that ordinary converters only work with standard video files. iTunes movie files requires a dedicated M4V conversion solution because of their unique format and protection features.
For users who still have a collection of iTunes M4V movies, DRmare M4V Converter provides a more direct way to prepare videos for broader playback environments.


User Comments
Leave a Comment